Phone Number
Created by: Emma Johnston
Last Updated: June 11, 2024
A2P 10DLC
ABOUT A2P 10DLC
In August 2023, US phone carriers put controls in place to prevent companies from spamming and cold calling.
If you are based in the US number or messaging contacts who live there, it is a mandatory that you must register your business so that you are A2P 10DLC compliant. Businesses must identify who they are to the carrier networks (Brand registration) and what type of messages they are sending (Campaign Registration).
Any messages sent using unregistered phone numbers will be blocked by carriers (but you will still be charged for sending the message).
A2P 10DLC Registration Checklist
Before you start your A2P 10DLC registration, you must set up an example landing page which contains a compliant form and a link to your privacy policy. Your privacy policy can either be a webpage or a PDF stored in your media library, but it must state how you will use contact's data (eg, that no mobile information will be shared with third parties/affiliates for marketing/promotional purposes).
TASK CHECKLIST
Here a quick overview of the tasks you need to complete:
Task 1 - Clone the A2P 10DLC form and add the link for your privacy policy to the form checkbox
Task 2 - Clone the A2P 10DLC funnel, connect your form to the funnel and add the link for your privacy policy to the funnel footer
Task 3 - Create a subdomain for your funnel
Task 4 - Complete the registration text form to generate application wording (click on button below)
Task 5 - Complete A2P 10DLC brand and campaign registration
Task 1. Opt-in Form
CLONE FORM
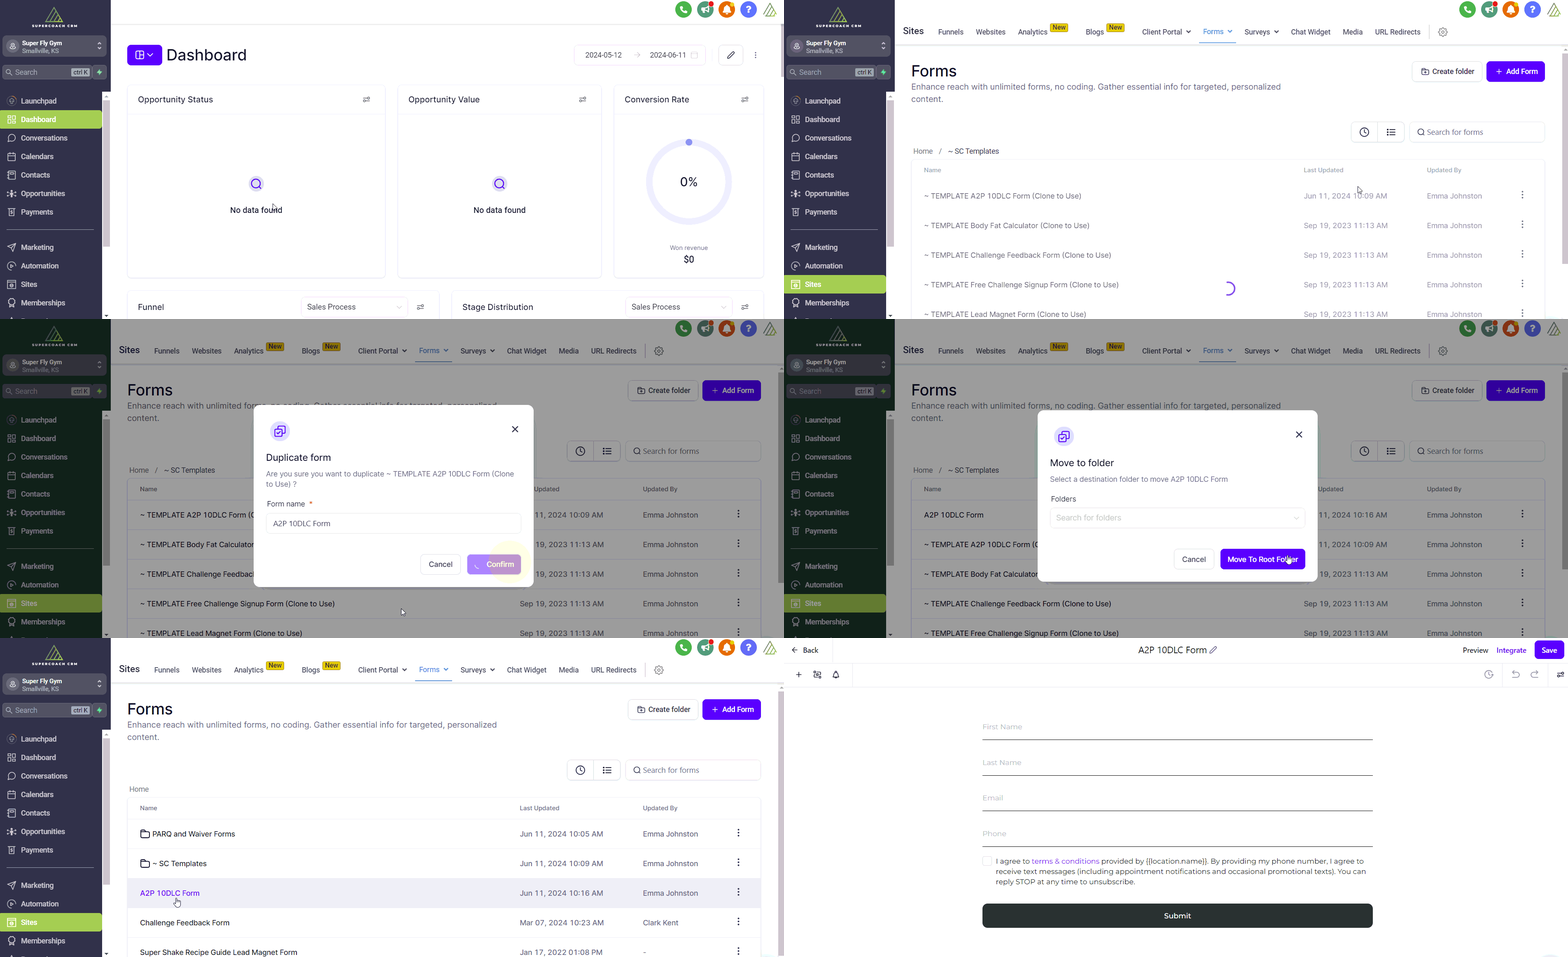
1. Go to Sites > Forms > Builder and open the SC Templates folder.
2. Click on the ellipsis menu (three horizontal dots) for the A2P 10DLC template and select Duplicate.
3. Rename the form and press Confirm to continue.
4. Click on the ellipsis menu (three horizontal dots) and select Move to Folder.
5. Select Move to Root Folder and then return to the Form Builder home page.

EDIT FORM
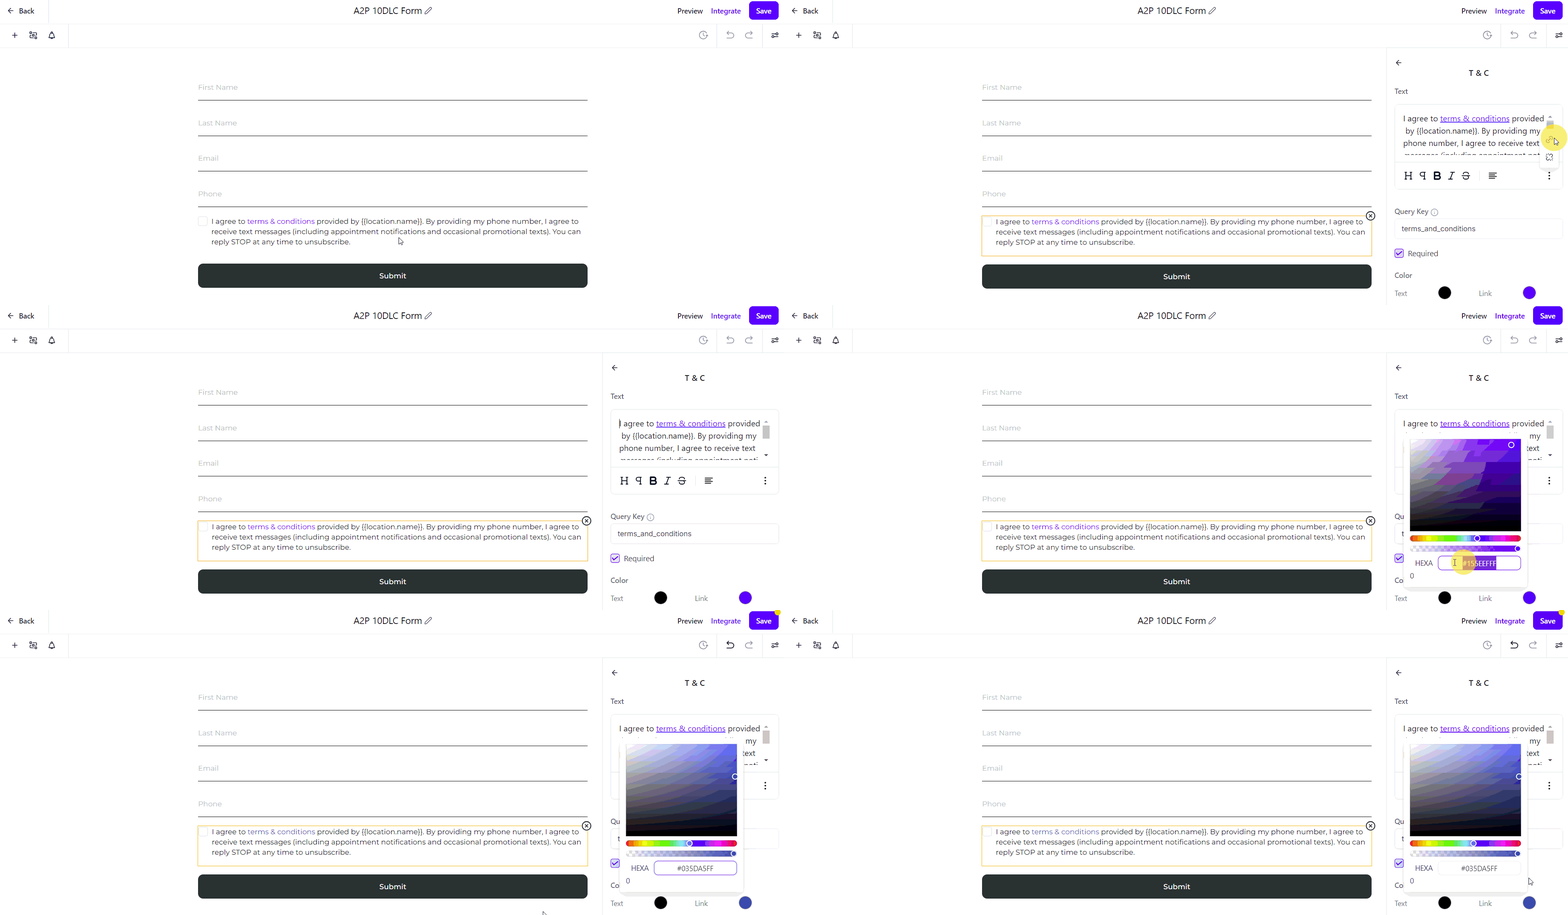
1. Open the new A2P 10DLC form and click on the Terms and Conditions field.
2. In the right-hand panel, click on the ellipsis menu (three vertical dots) and click on the Link icon.
3. Paste the link to your privacy policy and press Confirm. This can either be a URL for a webpage or a PDF link.
4. If you want to change the color of link, click on the color swatch and enter your desired hex code.
5. If you want to change the color of the button, click on the button. In the right-hand panel, click on the color swatch for Background and enter your desired hex code.
6. Press Save when finished.

Task 2. Opt-in Funnel
CLONE FUNNEL
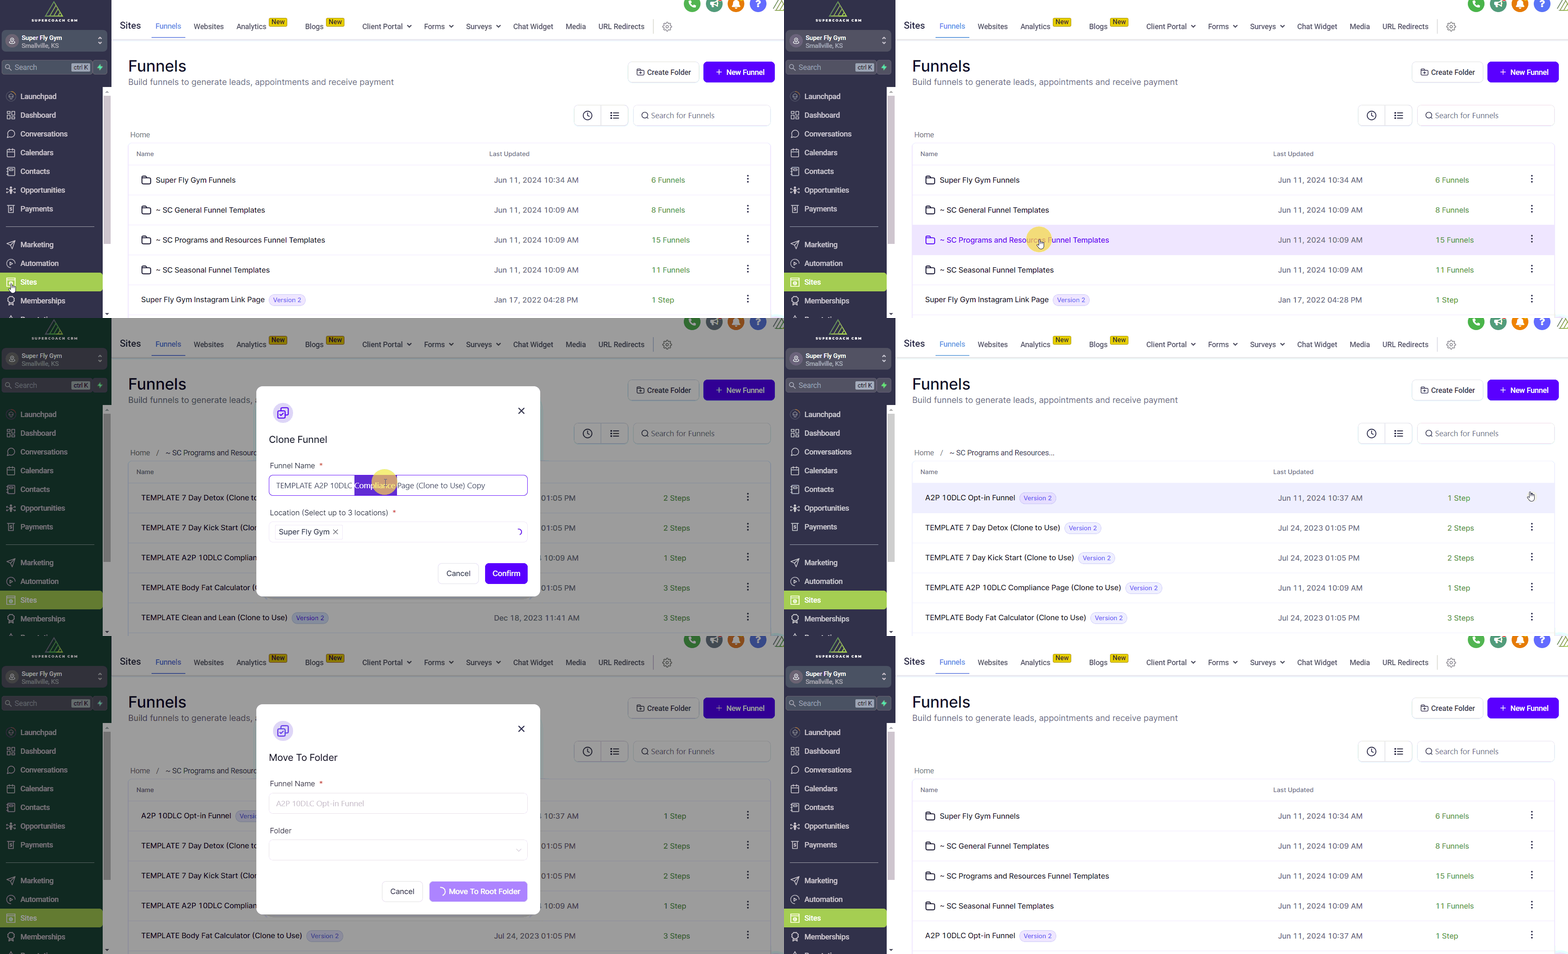
1. Go to Sites > Funnels and open the SC Programs and Resources Templates folder.
2. Click on the ellipsis menu (three horizontal dots) for the A2P 10DLC template and select Clone.
3. Rename the funnel and press Confirm to continue.
4. Click on the ellipsis menu (three horizontal dots) and select Move to Folder.
5. Select Move to Root Folder and then return to the Funnels home page.

EDIT FORM
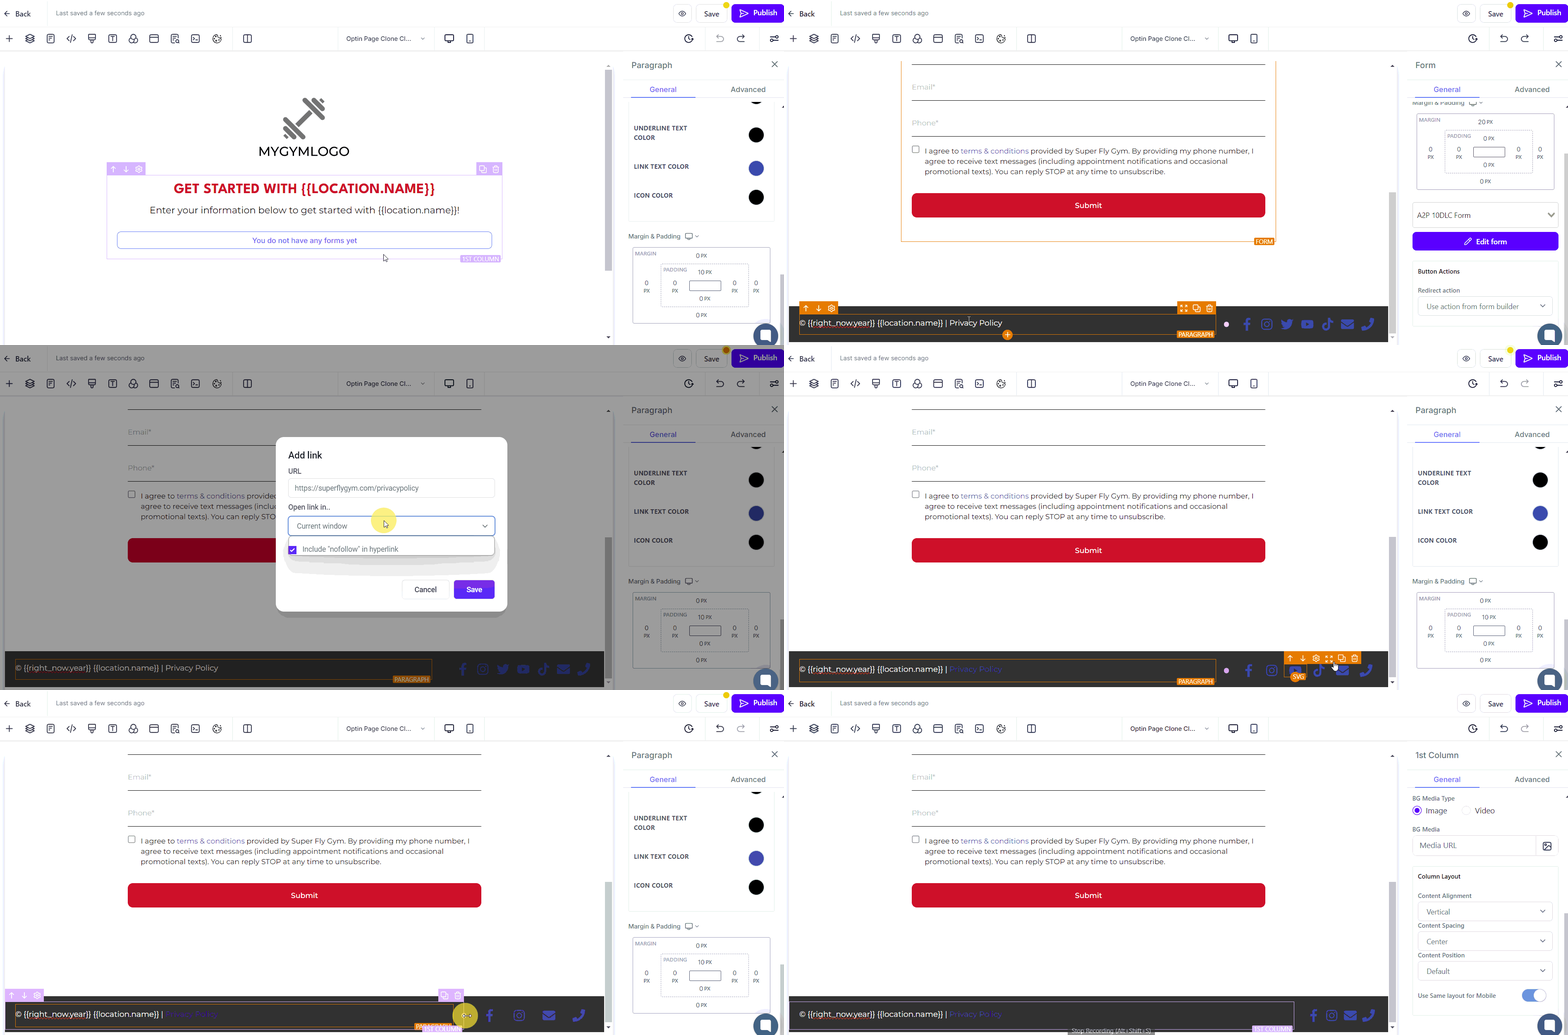
1. Open the new A2P 10DLC funnel and click on Edit.
2. Click on the empty Form element and select the A2P 10DLC form from the dropdown list in the right-hand panel.
3. In the footer, highlight the Privacy Policy text and paste the link to your privacy policy. Select Open Link in New Window and press Save.
4. Resize your logo, if needed.
5. Delete any social media icons that are not relevant to your business and resize the column.
6. Press Save to finish.

Task 3. Domain
CREATE A OPT-IN URL
1. Go To Settings > Domains and click on the blue + Add button in the top right corner.
2. Enter the subdomain address in the Domain URL box (for example optin.mycompanyname.com) click Add Record Manually to continue.
3. In the next window, click Verify Records to continue. There may be up to a 30 second delay while this processes.
3. In the final window, select it from the A2P 10DLC funnel from the dropdown list.
Task 4. Registration Text
REGISTRATION TEXT FORM
Once you have completed the step above, click on the button below to complete a form that will generate the wording you need to complete your A2P 10DLC. You will need to enter your legal business name, your SuperCoach CRM phone number (found in Settings > Phone Number) and your opt-in URL (full URL starting with https://).
We will then email you with the text ready for the next steps. It is extremely important that copy and paste the text we give you exactly. Do not make any changes, even if you feel the wording does not apply to your business or the style of message you will be sending.
Task 5. A2P 10DLC Registration
A2P BRAND AND CAMPAIGN REGISTRATION (US ONLY)
Once the Business Profile has been submitted (even if it still In Review), you can start Brand and Campaign Registration.
1. Go to Settings > Phone Number > Trust Center and click on the blue Start Registration Now button at the bottom of the page.
STEP 1 BUSINESS DETAILS
The business details must exactly match the information on your EIN exactly (if you have one).
2. In Profile Needs, select whether or not your business has an tax ID such an EIN. Press Continue.
3. In Business Details, add your legal business name, email, website URL, business type (optional), business registration ID type, business industry and region of operations. Press Continue.
4. In Business Address, add the address linked to your business. Press Continue.
5. In Contact Info, add the name, job position and contact details for an authorized representative. Press Continue.
STEP 2 BRAND DETAILS
6. In Business Use Case Brand Plans, choose Low Volume Standard. Acknowledge the information about the one-time brand and and campaign registration fees. Press Continue.
STEP 3 CAMPAIGN DETAILS
You MUST use the registration text that we emailed to you to complete this step.
7. In Messaging Use Case, select Low Volume Mixed.
8. Next, using our template, add your Use Case Description and two Sample Messages. Check the boxed for embedded links and phone number. Press Continue.
9. In User Consent, using our template, add how users Consent to Receive Messages (this must include a compliant opt-page link which includes a correctly set-up form and privacy link) and the Opt-in Messages.
10. Press Submit to complete registration.
Once submitted, the status will first show as Pending and then show as Approved.

If you have a quick, system-specific "how-to" question, you can chat with our L1 Technical Support Team using the purple chat bubble in the bottom corner of the software. This team offers live chat 24/7, giving you instant access to help at any time of day.
If you have a more complex or outcome-specific “how-to” question, or a query about project requests, done-for-you resources, or Coach Catalyst, you can email our L2 Specialist Team at [email protected]. This team is available Monday to Friday, 8:00am – 1:00pm (EDT).
© 2026 SuperCoach CRM