
FREE Program Funnels
Created by: Emma Johnston
Last Updated: March 06, 2026
Editing a Free Program
The instructions below explain how to run a free program funnel in Growth Catalyst CRM. At certain times of year, we automatically add done-for-you program funnels and resources to your account. These include the New Year funnel in January, Transform in 4 in May, Back to School in September, and the Spooktacular resources in October. In addition, we also add a number of festive resources across November and December, including Christmas and New Year lead generation materials.
Clone and Connect
At other times of the year, if you want to use one of our templates, you will first need to clone the funnel, form, and workflow and then connect them before completing the steps below. You do NOT need to complete these steps where we have added the resources to your account (found in your Project Request Folders).
CLONE THE FUNNEL
1. Go to Sites > Funnels and locate the funnel template you want to use, either the Program and Resources Templates folder (if you are running a Coach Catalyst program) or the General Templates folder.
2. Click the ellipsis menu (three vertical dots) next to the funnel and select Clone. Rename the funnel and click Confirm.
3. Use the ellipsis menu again and select Move. Move the funnel out of the Templates folder and into either the root folder or one of your own folders.
CLONE AND CONNECT THE FORM
1. Go to Sites > Forms and locate the free challenge form template you want to use from the General Templates folder.
2. Click the ellipsis menu (three vertical dots) next to the form and select Clone. Rename the form and click Confirm.
3. Use the ellipsis menu again and select Move. Move the form out of the Templates folder and into either the root folder or one of your own folders.
4. Go to Sites > Funnels, open the opt in page, click on the form element and select the form from the dropdown menu.
CLONE THE WORKFLOW
1. Go to Automations > Workflows, open the Template Workflows folder and go to Program Delivery.
If you are running a Coach Catalyst program, locate the workflow that corresponds with the program you are using. Otherwise, locate the Free Program Automations template .
2. Click the ellipsis menu (three vertical dots) next to the workflow and select Duplicate Workflow. Name the workflow and click Create.
3. Use the ellipsis menu again and select Move to Folder. Move the workflow out of the Templates folder and into either the root folder or one of your own folders. You will need to use the back arrows to exit the folder you are currently viewing.
TASK CHECKLIST
Here a quick overview of the tasks you need to complete:
Task 1 - Add your favicon and select the correct chat widget for your funnel
Task 2 - Create a subdomain/URL for your funnel
Task 3 - Edit the confirmation email in the workflow and add your Coach Catalyst program information.
Task 4 - Complete test form entry and final checks (at least five days before you launch)
Task 5 - Edit all three pages in your funnel (including updating the start date, editing the About Me section, adding testimonials, and changing the copy to match your offer and target audience)
Task 6 - Edit form (if required)
Tasks 1 – 4 are quick setup steps that will get your automations and payment working. Task 6 involves editing the funnel page and usually takes longer, as you will want to personalize the messaging for your audience.
Quick Set Up Tasks
Chat Widget and Favicon
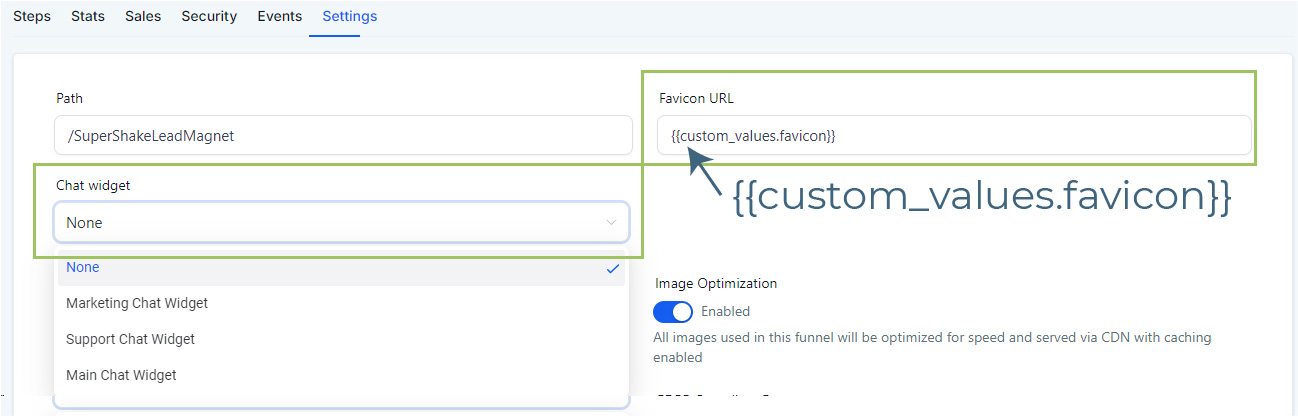
ADD CHAT WIDGET AND FAVICON
1. Go to the funnel dashboard and click on the Settings tab.
2. Open the Chat Widget drop down and select the correct chat widget.
3. In the Favicon URL box, type in custom_values.favicon surrounded by double braces/curly brackets (as shown in the image below).
4. Press Save when finished.
Click here for more information about creating different Chat Widgets.
Funnel URL
CREATE A FUNNEL URL/SUBDOMAIN
1. Go to Settings > Domains and click on the blue + Connect Domain button in the top right corner.
2. Enter your chosen subdomain (such as guidename.mygym.com or programname.mygym.com) in the Domain URL box and click Add Record Manually to continue (NOT the blue Continue button).
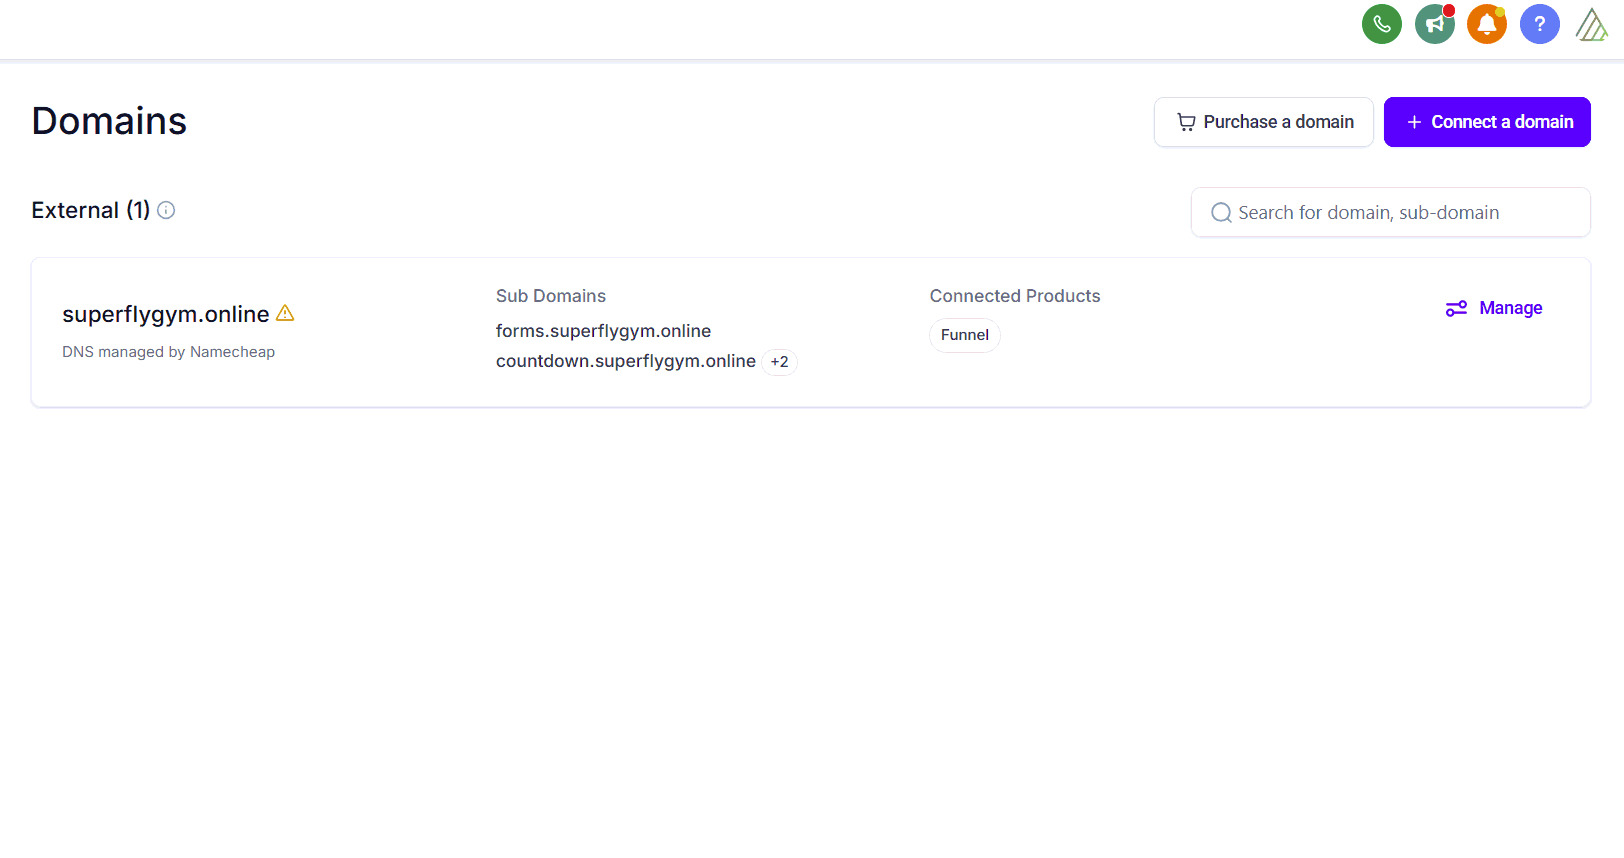
3. In the next window, click Verify Records to continue. There may be up to a 30 second delay while this processes.
4. Lastly, on the next page, choose the correct funnel and select the landing page.
Once created, you will only need the part up to the .com when sharing the link (as highlighted in the image below).

REUSING SUBDOMAINS
If you have run a particular challenge/program before, you can use the same domain again. The easiest option is to delete the domain and readd it using the instructions below. This will clear the domain from the previous funnel and ensure the default page is set to the new funnel.
Sign Up Automations
WORKFLOW TRIGGER
1. Go to Automations > Workflows. Search for the workflow using the Search Box, or locate it in the Recents tab.
2. Click the trigger at the top of the workflow and select Add Filters.
→ For a paid program, where the trigger is an order form, choose Funnel/Website, then select your funnel from the list. Click Add Filters again, choose Submission Type, and select Sale.
→ For a free program, where the trigger is a form, choose Form Is, then select your form from the list.
If we have added the resources to your account, the correct trigger filters should have already been added.
WORKFLOW ACTIONS
5. Check the Add Contact Tag and Send Internal Notification steps to see if you want to make any additional changes.

EDIT THE CONFIRMATION EMAIL
6. Open the Send Email Confirmation [Edit] step. Change the subject line if required.
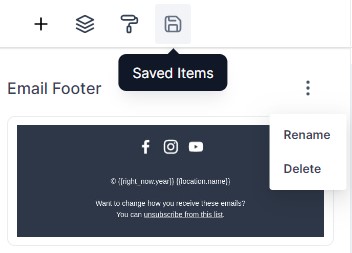
7. Scroll down to email thumbnail. Click on the ellipsis menu (three vertical dots) and select Edit email. This will open a pop-up window where you can edit the email.
8. Make the required changes as necessary. To edit the appearance of the text, click on the text and the editing toolbar will appear at the top. To add your company footer, click on the Saved Items tab and drag your footer to the bottom of the email (and delete the existing footer).
9. Press Save when complete and then press the X in the top left corner to close the window. Press Save Action to return to the workflow.
Click here for more information on using the email builder.
NOTE: If you cannot see the Save button when editing emails within the workflow, change the zoom level of your browser to 90% or 80%.
Coach Catalyst Automations
COACH CATALYST INFORMATION
1. In the Client Information section, use the tag icon on the right-hand side of each box to select the custom values for First Name, Last Name, and Email.
2. Select your Time Zone from the drop-down list. You can only assign one time zone for all clients, but they can adjust this later in their own settings, so choose the time zone that most of your clients will use.
3. From the drop-down list, select the Program you want to add the client to.
4. Next, choose when the program should Start. There are four options: Today, Tomorrow, on a Set Date, or on a specific Day of the week. You must only select ONE of these options. If you are selecting a set date, the format must be YYYY-MM-DD, as indicated in the instructions above the box.
5. In the Additional Options section, you can optionally add a Tag, assign a specific Coach, add the client to a Community, or add them to a Resource Folder.
6. Finally, select whether you want the system to send the Program Invite. This invite gives the client access to the specific program you are adding them to. All new clients will automatically receive the Coach Catalyst welcome invite regardless of this setting. If you are already sending a confirmation email within this workflow, we recommend selecting No to avoid duplicate messages.
COACH CATALYST SUPPORT
Click here if you would like more information on using programs, communities or resources in Coach Catalyst. If you need any help with your Coach Catalyst account, email [email protected].
funnel Editing Tasks
Funnel
FUNNEL ACCESS
Go to Sites > Funnels. Search for the workflow using the Search Box, or locate it in the Recents tab.
Click here for more information about using funnels and click here for more information about funnel elements.
Funnel Landing Page
EDIT THE FUNNEL LANDING PAGE
1. Select the landing page and click Edit.
2. Work through the landing page and reword the content to match your services, what's included in your program and the pain points/needs of your client. You may also want to resize the width of your logo (leave the height attribute blank).

3. Next, update the About Me section and add client testimonials in the spaces provided.
4. For longer sales pages, update the FAQ section and money back guarantee.
5. Press the Save button regularly while making changes and press Publish when complete.
TOP TIPS
Many of our funnels come fully populated with example copy, but they are templates. You will need to customize the messaging so it reflects your audience’s specific goals, challenges, and motivations. We recommend setting aside 3–8 hours to personalize your funnel and marketing emails properly. When potential clients see themselves reflected in the copy, they are far more likely to sign up.
Running the funnel without tailoring the messaging will usually lead to poor results, as generic copy rarely resonates with real clients. Take the time to adjust the language, examples, and testimonials so they accurately represent your coaching style and the people you want to attract.
Use the FAQs section to address common objections or questions that might prevent someone from purchasing, rather than repeating information already on the page. The money-back guarantee section should reinforce buyer confidence by reassuring potential clients that their purchase is risk-free.
Funnel Confirmation Page
EDIT THE FUNNEL CONFIRMATION PAGE
1. Click on either the Pages icon in the top menu bar or the page title to change to the confirmation page.
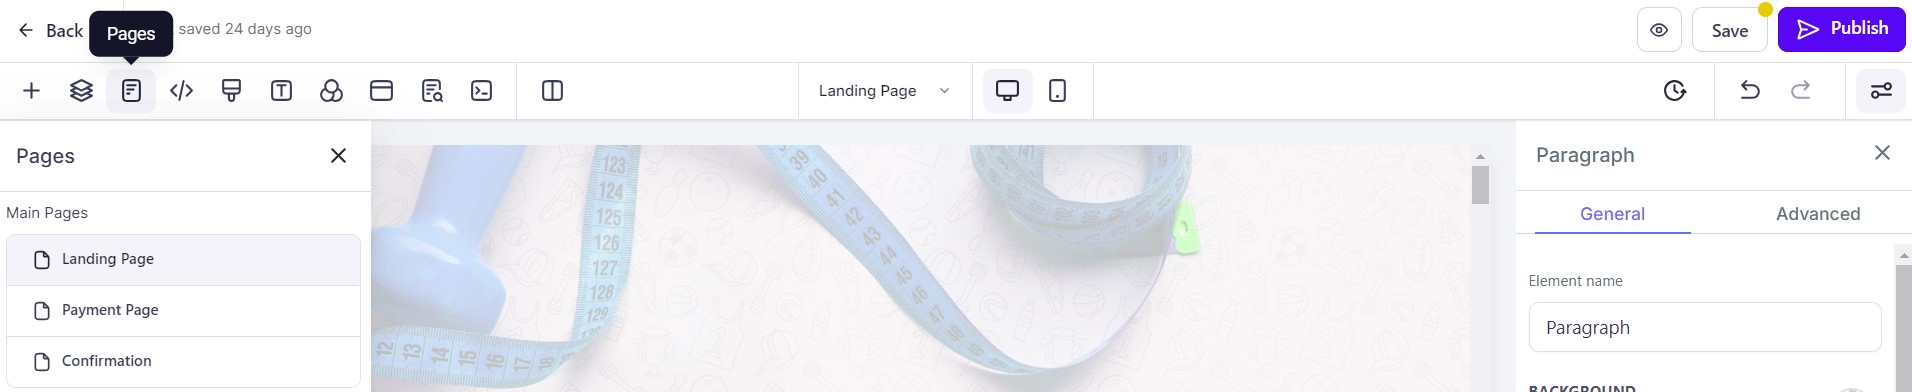
2. Work through the confirmation and reword the content to match the next steps that you want clients to take after completing their purchase.
3. Press the Save button regularly while making changes and press Publish when complete.
Funnel Opt-In Page/Popup
The form for your funnel will either be on the landing page in a popup window or it will be a separate page.

EDIT THE FUNNEL FORM PAGE
1. Click the either the Pages icon in the top menu bar or the page title to change to the opt-in page.
2. Work through the opt-in/sign-up page and update the offer stack.
3. Press the Save button regularly while making changes and press Publish when complete.
EDIT THE FUNNEL POP UP
1. From the landing page, click on Popup Settings in the top menu bar.
2. To change the layout of the popup window, click the blue Open Popup Settings button at the top of the window.
3. To make changes to an element in the popup, first click on the element and then work through the options in the settings menu.
4. Press the Save button regularly while making changes and press Publish when complete.
Form
SIGNUP FORM
1. If you wish to changes to the form, click on the form in the funnel editor. In the right hand panel, click on the blue Edit Form button. This will open a new window. You can also access this section from going to Sites > Forms > Builder and selecting your form.
2. Make any changes needed to fields/wording and press Save Form to finish.
Click here for more information on editing forms.
Testing & Troubleshooting
Testing
TEST THE FUNNEL AND AUTOMATIONS
Once you have completed your edits, you will need to test the funnel. Open your funnel and complete the opt-in form. We strongly recommend testing your funnel at least five days before launch to allow time for any fixes if needed.
Troubleshooting and Support
SUPPORT OR QUESTIONS
If you have quick, specific “how-to” questions (such as how to change an image, how to add a product to your funnel, or how to create a coupon), you can live chat with the 24/7 Level 1 Technical Team by clicking on the purple chat bubble in the bottom right corner of your screen. Click on the support tab and type "human" into the chat box.
If you have a more complex or outcome-specific “how-to” question, or a query about project requests, done-for-you resources or Canva design, please contact the Level 2 Support Team by emailing [email protected]. Please allow up to two business days for a response or resolution.
TROUBLESHOOTING COACH CATALYST
When testing your funnel, if your client isn’t added to Coach Catalyst — don’t panic! In most cases, it is caused by something very small and simple, and is usually easy to fix.
Work through this Troubleshooting Guide to identify and resolve the issue. If, after that, the client is still not being added to Coach Catalyst, please contact their support team on [email protected].
Additional tasks
Additional Tasks and Optional Extras
COOKIE CONSENT (Required for some countries such as UK and EU)
Depending on where you operate and where your website visitors are from, as you are collecting data when someone signs up, you may need a cookie notice. Click here for more details about how to add cookie consent to your funnel.
COUNTDOWN TIMER
If your program has a set start date, we recommend creating a countdown time in Marketing > Countdown Timer for your event. You can then replace the existing funnels timer and add a countdown to your final emails.
DISCOUNT COUPONS
If you want to offer a discount, such as an early bird offer or a member discount, you can create a coupon in Payments > Coupons. Click here for more details about how to create and use coupons.
SOCIAL MEDIA POSTS
If you want to schedule your promotional posts, go to Marketing > Social Planner. Click here for more details about how to use the Social Planner.
INSTAGRAM LINKS PAGE
Don't forget to update your Instagram links page! Go to Sites > Funnels and select your Instagram Links funnel. Clone an existing button and edit the button text and URL at the bottom of the left hand panel.
SMARTLIST
You could also create a Smartlist in Contacts for people who have joined/signed up for the program or resource. You can either set the filter as the challenge tag or the purchase automations workflow. Click here for more details about how to create a Smartlist.
If you have a quick, system-specific "how-to" question, you can chat with our L1 Technical Support Team using the purple chat bubble in the bottom corner of the software. This team offers live chat 24/7, giving you instant access to help at any time of day.
If you have a more complex or outcome-specific “how-to” question, or a query about project requests, done-for-you resources, you can email our L2 Specialist Team at [email protected]. This team is available Monday to Friday, 8:00am – 1:00pm (EDT).
For Coach Catalyst questions, email [email protected].
© 2026 Growth Catalyst CRM