
Conversations
Created by: Emma Johnston
Last Updated: April 30, 2025
Conversations Dashboard
ACCESSING YOUR MESSAGES
Click on Conversations. In the panel on the left, you will see a list of your messages. You can navigate between Unread, Recents, Starred, and All messages. Unread messages are messages that have not yet been read, Recents will show recent messages (read and unread), Starred will show messages you have marked as starred, and All is your entire message history.
SEARCH YOUR MESSAGES
You can use the search box at the top on the left hand panel to search for a specific message.
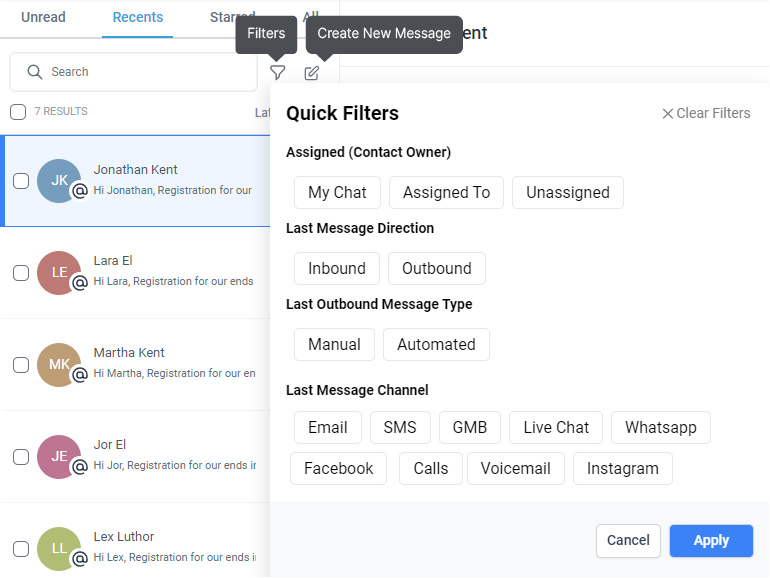
FILTER CONVERSATIONS
Select the Filter icon at the top of the left hand panel to filter by Assigned User and/or by Channel.
SORT CONVERSATIONS
You can sort conversations by date. The default setting is Latest All Messages, but you can also select Oldest All Messages, Latest Manual Messages and Oldest Manual Messages.
Inbox Actions
CREATE NEW MESSAGE
To create a new message, click on the Edit icon at the top of the left hand panel. Search for the contact (either by name, emails or phone) and then select your contact from the list and press Continue.
If there is no contact with that search information, you will be given an option to create a new contact.
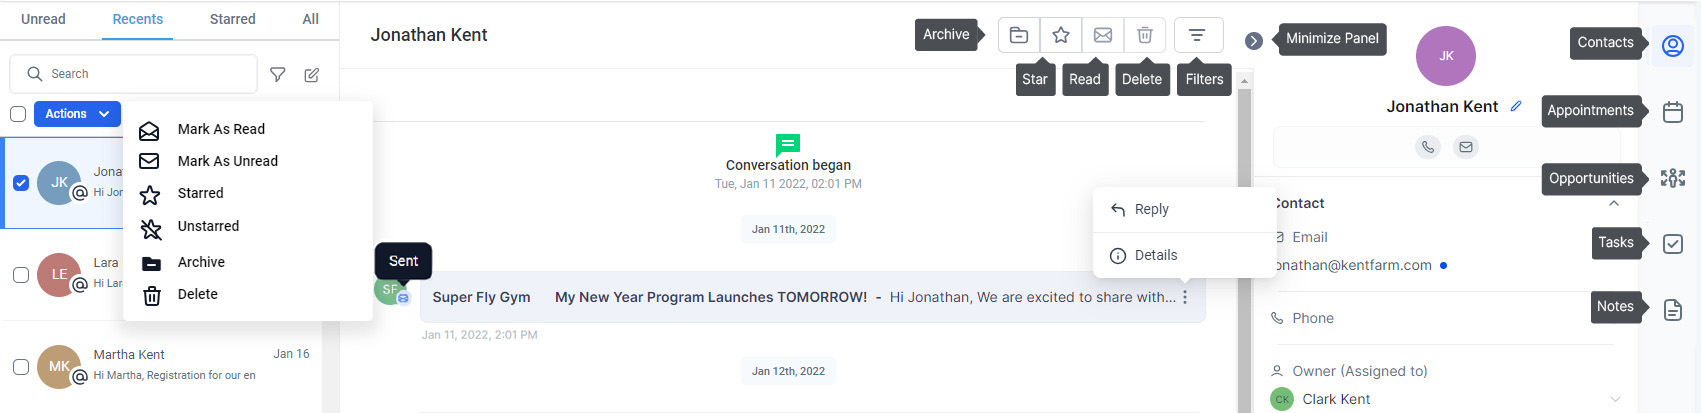
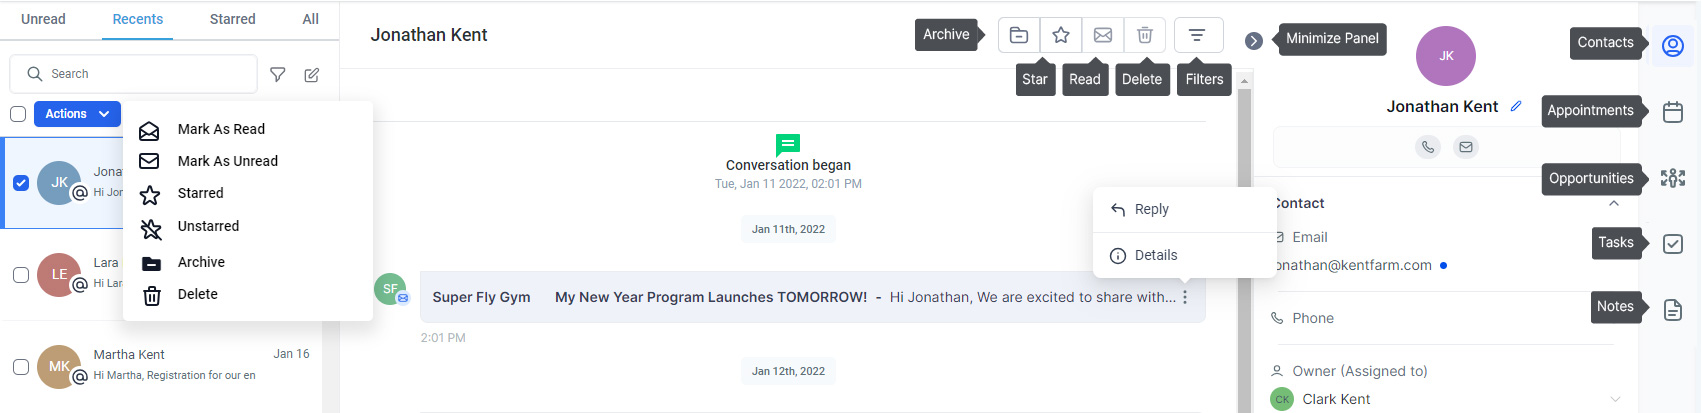
VIEW MESSAGE THREADS
To view/expand a previous thread, click on the grey box. To reply to the thread, click on the vertical ellipsis menu (three dots) and select Reply.
VIEW MESSAGE DETAILS
To view more details about the message, click on the vertical ellipsis menu (three dots) and select Details. This can be particularly useful if the message was automated and you want to identify which workflow the message was sent from.
VIEW EMAIL STATUS
The email icon next to the sender initials/photo will show the status of the email. A blue icon means that the email has been Sent or Delivered, a green icon means the email has been Opened, and a red icon means the email has Failed. Hovering over the icon will give you more information. Where an email has failed, you can hover over the red exclamation mark for more details (and, where appropriate, there is the option to Resend).

MARK AS READ/UNREAD
To mark a conversation as read or unread, either click on the Envelope icon in the top right corner of the central panel or select the message(s) and choose Mark as Read/Unread from the Actions dropdown.
Unread messages can be found in the Unread tab or marked with a blue dot in the All tab.
MARK AS STARRED/UNSTARRED
To mark a conversation as starred or unstarred, either click on the Star icon in the top right corner of the central panel or select the message(s) and choose Mark as Starred/Unstarred from the Actions dropdown.
Starred messages can be found in the Starred tab or marked with a orange star in the All tab.
DELETE A CONVERSATION
To permanently delete a conversation, click on the Trashcan icon in the top right corner of the central panel or select the message(s) and choose Delete from the Actions dropdown. Click Yes to confirm (or cancel).
ARCHIVE A CONVERSATION
To permanently delete a conversation, click on the Archive icon in the top right corner of the central panel or select the message(s) and choose Archive from the Actions dropdown. Click Yes to confirm (or cancel).
View and Send Messages
AVAILABLE CONVERSATION CHANNELS
Depending on what you have integrated with SuperCoach CRM, there are nine types of messages that you might see in the conversations area (email replies, chat widget, text messages, phone call, Conversation AI replies, Messenger messages, Instagram Direct Messages, Whatsapp messages, and Google Business Messages).
To update your integrations, go to Settings > Integrations.
Chat
SMS/Text
Phone Call

Messenger
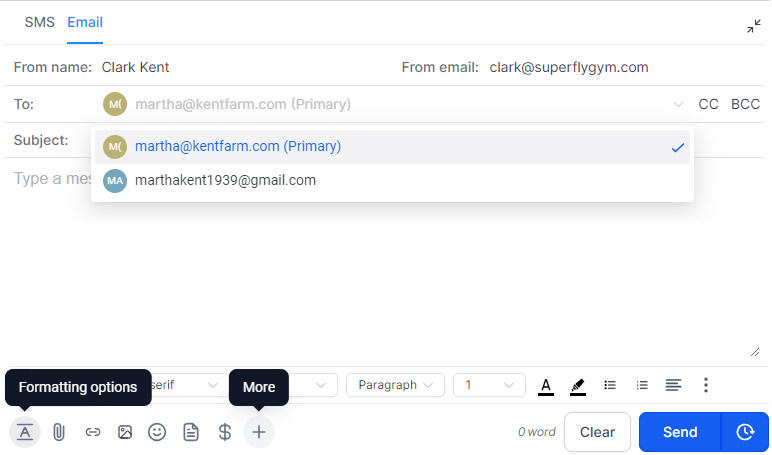
WRITE/SEND MESSAGES
You can send a message to your client from the center panel.
1. Click on the Expand icon to expand the bottom window.
2. Select the type of message you want to send (these options will change for each client depending on the contact information you have for them).
3. Write your message as required. You can click the Formatting Options icon to bring up the formatting toolbar and the More icon to add custom values. There are also option to insert a link, image, file, or emoji.
4. Press Send or Schedule to finish.
Emails will default to the primary email address for the contact. To change to another email address, open the dropdown menu on the To field. You can click on CC or BCC to add additional recipients.
REQUEST PAYMENT
For SMS and Email, you have to option to Request Payment. Click here for more information.
INSERT SNIPPET
For SMS and Email, you have to options to Insert Snippet. Snippets (message templates) can be really useful when responding to FAQ or when you have an email that you send regularly (such as an appointment follow up email) that you want to personalize before sending. Snippets can be created in Conversations > Snippets.
MULTIPLE EMAIL ADDRESSES
Emails will default to the primary email address for the contact. To change to another email address, open the dropdown menu on the To field.
CUSTOM VALUES
You can use Custom Values to dynamically populate emails with items such as contact name or business email.
Click here for more information about custom values.
VIEWING CONVERSATION HISTORY
When you click on a message, you'll see the conversation history in the center panel. You can scroll up and 'fetch older messages', depending on the length of history of conversations you've had with the particular contact. To expand previous messages, click on the three dots under the message header.
VIEWING CONTACT INFORMATION
The third panel on the right-hand side provides a snippet of the contact information for the user that you are interacting with. You can click the phone button to call the phone number, and you can view their email address. You can add Tags, view Active Automations, and configure DND Settings (Do Not Disturb). If a contact has a DND channel enabled, you can click the i icon in the configuration to learn more.
There are also additional tabs on the far right to view and book Appointments, view and create Opportunities, view and add Tasks, and view and add Notes.
Automations
CONVERSATIONS WORKFLOW
When someone initiates or replies to a particular conversation channel, you can trigger a workflow. This can be used to send an automated response, send replies based on keyword or create a chat bot.
1. Click on Automation > Workflows and click the blue + Create Workflow button in the top right of the screen.
2. On the next screen, select Start from Scratch. Once in the workflow builder, at the top of the page, you can rename a workflow using the pencil icon next to the title.
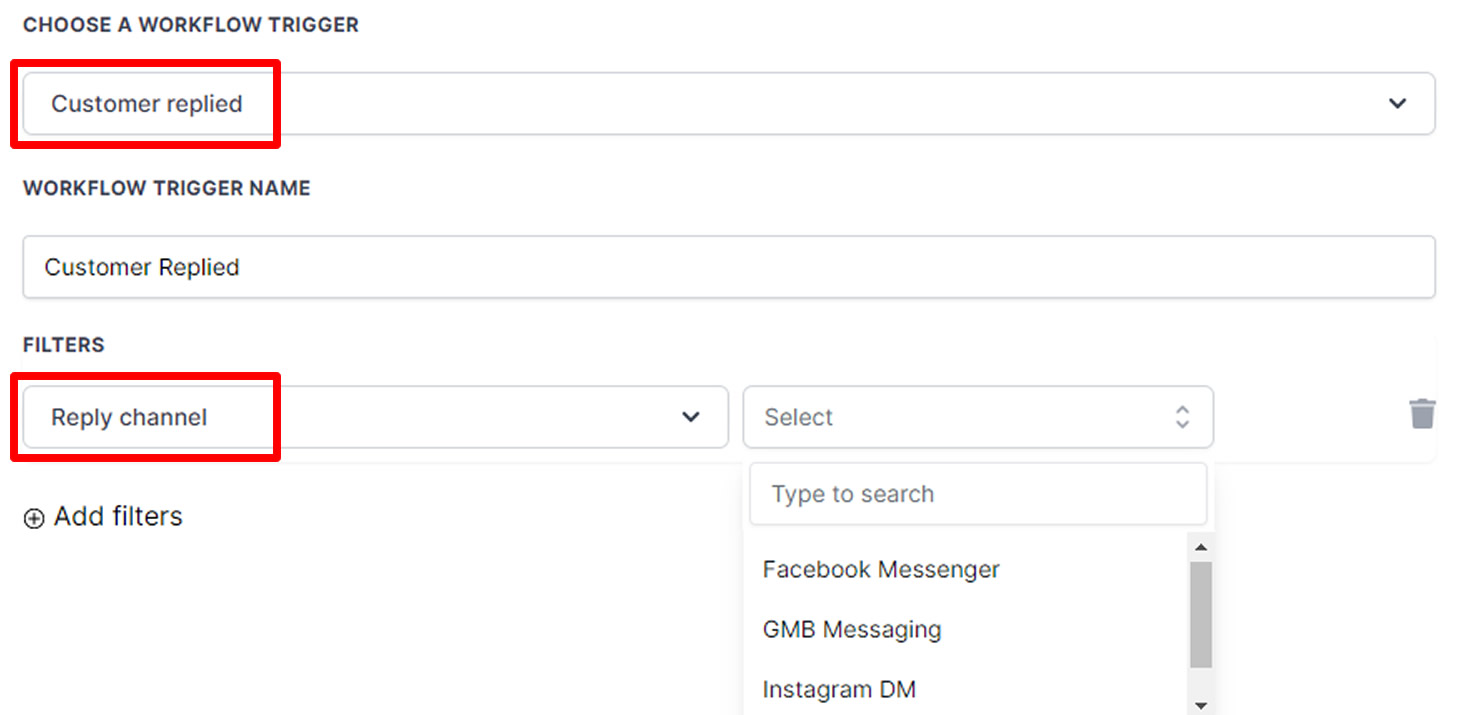
3. Click Add New Trigger and select Customer Replied. Add filter Reply Chanel and select the channel type. You can add additional filters such as Contains Phrase, Exact Match Phrase, Has/Doesn't Have Tag, Intent Type and Replied to Workflow.
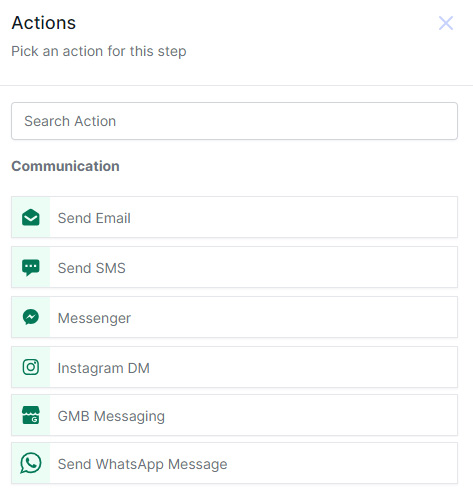
4. Click the + to add a new event to the workflow. Use the drop-down menu to select the choose one or more actions to occur, such Send Email, Send SMS, Messenger, Instagram DM, GMB Messaging, Send Whatsapp Message.
5. Add any other required steps.
6. Toggle on Publish and press Save.
Messenger and Instagram Direct Messages
MESSENGER SETTINGS
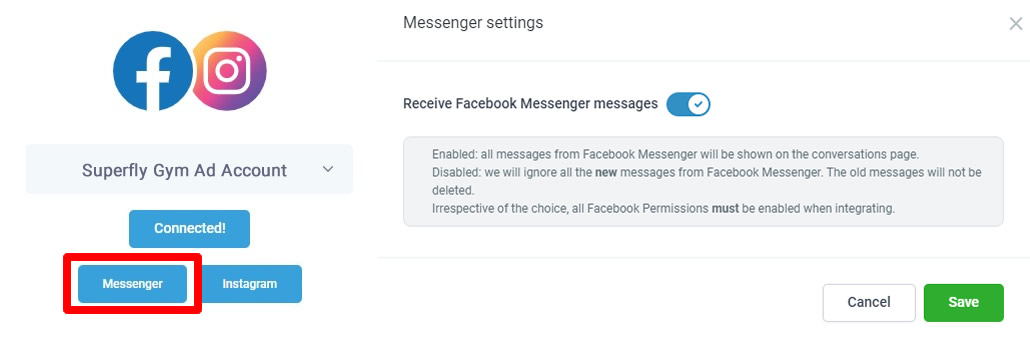
Messenger is a free online tool powered by Meta Company (Facebook) that gives customers the facility to send you messages through your Business Page. To enable Messenger messages, click on Settings > Integrations > Facebook and click on the Messenger button. Toggle on Receive Facebook Messenger Messages and press Save.
24 HOUR REPLY WINDOW
To send messages to someone on Messenger, the conversation must be initiated by the user. With the exception of sponsored messages, Facebook has a restriction in place where, when a person sends your Page a message, you only have up to 24 hours to respond. For more information about this, click here for the Facebook developers messaging page.
INSTAGRAM SETTINGS
Instagram Direct Messages lets you send messages to one or more people in chats. To enable Instagram direct messages, click on Settings > Integrations > Facebook and click on the Instagram button. Toggle on Receive Instagram DM Messages and press Save.

EMAIL AND PHONE NUMBER
If someone sends an email or phone number in Messenger or Instagram DM, it will be automatically recognized by the system and add to their contact information in Contacts.
Messenger/Instagram Automations
MESSENGER/INSTAGRAM WORKFLOW
You can set up a trigger for when someone sends you a Messenger Message.
1. Click on Automation > Workflows and click the blue + Create Workflow button in the top right of the screen.
2. On the next screen, select Start from Scratch. Once in the workflow builder, at the top of the page, you can rename a workflow using the pencil icon next to the title.
3. Click Add New Workflow Trigger and select Customer Replied from the drop-down menu. In define filters, choose Reply Channel and select Facebook Messenger.
4. Click the + to add a new event to the workflow. Use the drop-down menu to select the choose one or more actions to occur, such as Messenger, Instagram DM or Add a Tag. You can also use the If/Else action to send different responses based on the content of the original message.
5. Add any other required steps.
6. Toggle on Publish and press Save.
Click here to learn about how to create a bot to respond to messages.
WhatsApp Messaging
WhatsApp is a premium service that allows you to send unlimited messages. Click here for pricing information.
1. To enable WhatsApp, go to Settings > WhatsApp and enter your credit card information.
2. Press Subscribe to continue.
3. Follow the directions to link your Facebook Business account and your SuperCoach CRM phone number.
WHATSAPP TEMPLATE
You can set up templates to use in WhatsApp replies.
1. Go to Settings > WhatsApp > Templates and click on the + Create Template button.
2. Enter a template name, select a category option (marketing or utility) and select a language.
3. Enter the Body text for the message. If you want to include a dynamic value, such as the contact's name, click + Add Variable. Press the Tag icon to add the required custom variable (and enter an example value for the preview).
4. Press Create to finish.
You also have the option of adding Header text and Footer text to the message.
WhatsApp Automations
WHATSAPPS WORKFLOW
You can set up a trigger for when someone sends you a Messenger Message.
1. Click on Automation > Workflows and click the blue + Create Workflow button in the top right of the screen.
2. On the next screen, select Start from Scratch. Once in the workflow builder, at the top of the page, you can rename a workflow using the pencil icon next to the title.
3. Click Add New Workflow Trigger and select Customer Replied from the drop-down menu. In define filters, choose Reply Channel and select Whatsapp.
4. Click the + to add a new event to the workflow. Use the drop-down menu to select the choose one or more actions to occur, such as Send WhatsApp Message or Add a Tag. You can also use the If/Else action to send different responses based on the content of the original message.
5. Add any other required steps.
6. Toggle on Publish and press Save.
Google Business Messaging
Google Business is a free online tool powered by Google. Many businesses use this platform as a business listing to attract more leads and gain publicity. This is also where they share information about their business so people know what they offer, where to find them, and how their business performs.
GOOGLE BUSINESS SETTINGS
1. Click on Settings > Integrations > Google Business. Here you can check GMB messages are enabled.
2. Click Change Settings and edit your display name, welcome message, business website, and privacy policy URL.
3. Press Save.
ENABLE/SET UP GMB MESSAGING
1. Sign in to your GMB account at www.google.com/business/.
2. After signing in, click Messaging and follow the instructions.
3. In 'Get Messages from Customers', turn on Messaging and click Okay.
4. If you want, you can also edit your welcome message.
Google Business Message Automations
GMB MESSAGE WORKFLOW
You can set up a trigger for when someone sends you a GMB Message.
1. Click on Automation > Workflows and click the blue + Create Workflow button in the top right of the screen.
2. On the next screen, select Start from Scratch. Once in the workflow builder, at the top of the page, you can rename a workflow using the pencil icon next to the title.
3. Click Add New Workflow Trigger and select Customer Replied in the event drop-down menu. In define filters, choose Reply Channel and select Gmb Messaging.
4. Click the + to add a new event to the workflow. Use the drop-down menu to select the choose one or more actions to occur, such as GMB Messaging or Add a Tag. You can also use the If/Else action to send different responses based on the content of the original message.
5. Add any other required steps.
6. Press Save and toggle on Publish.

If you have a quick, system-specific "how-to" question, you can chat with our L1 Technical Support Team using the purple chat bubble in the bottom corner of the software. This team offers live chat 24/7, giving you instant access to help at any time of day.
If you have a more complex or outcome-specific “how-to” question, or a query about project requests, done-for-you resources, or Coach Catalyst, you can email our L2 Specialist Team at [email protected]. This team is available Monday to Friday, 8:00am – 1:00pm (EDT).
© 2026 SuperCoach CRM