Funnels
Created by: Emma Johnston
Last Updated: April 13, 2023
Order Bumps
An order bump is a way to add on an additional product on the checkout page.
ADD THE ORDER BUMP PRODUCT TO THE FUNNEL
Before you can add the order bump product to the funnel, you first need to create the product. Click here for instructions.
1. Click on Sites > Funnels and select the funnel.
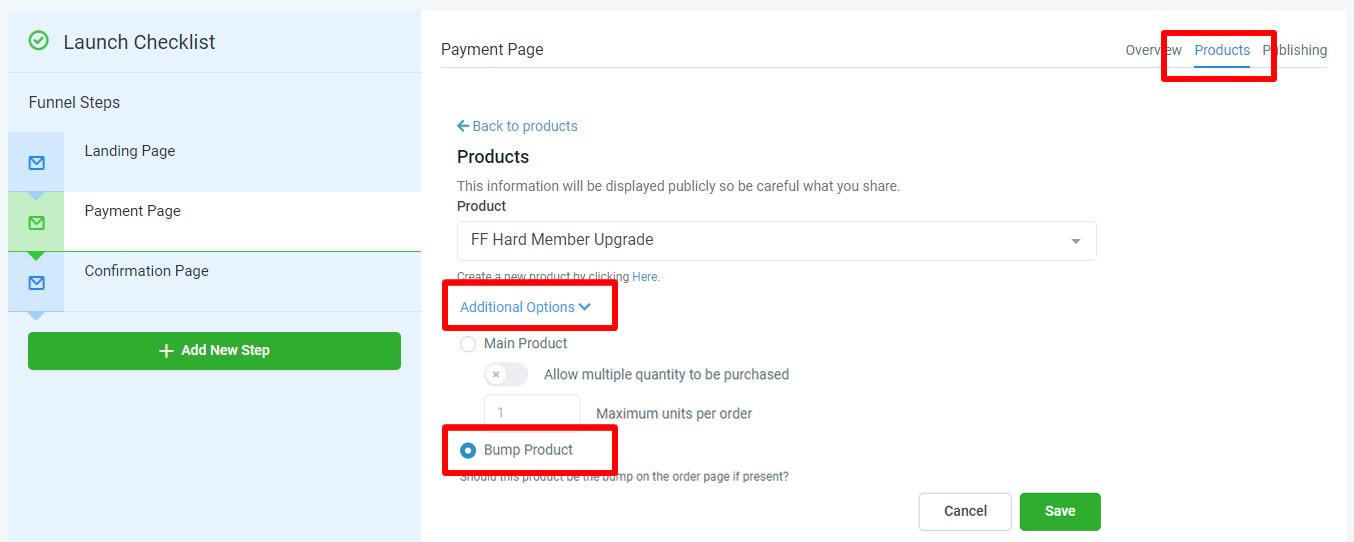
2. Click on the sales page step and click on the Products tab.

3. Click on the green + Add Product button in the top right corner.
4. Add the Product from the drop-down menu and select the Price. You can also type in the box to search for a product.
5. Expand Additional Options and select Order Bump.
6. Press Save to exit.

ADD A ONE-STEP OR TWO-STEP ORDER FORM
Here are the summary steps for adding an order form. For full instructions on adding an order form, click here.
1. Click on Sites > Funnels and select the funnel where you wish to add the order bump.
2. Click the Edit Page icon for the page you wish to edit.
3. Click + Add Element and select either 2 Step Order or 1 Step Order from the bottom of the list.
EDITING THE ORDER FORM
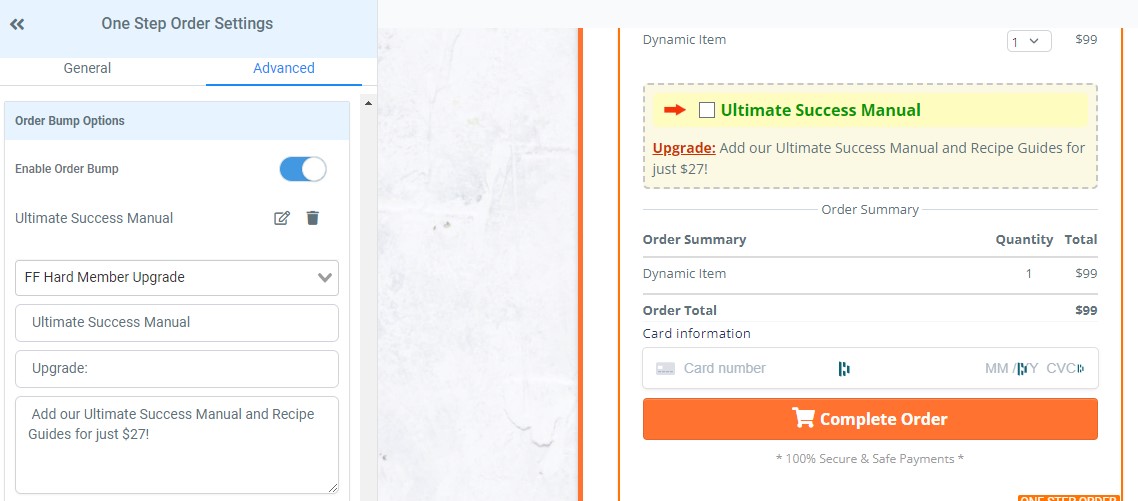
1. Click on the order form to bring up the settings menu on the left and go to the Advanced settings tab.
2. Click on Order Bump Options and toggle on Enable Order Bump.
3. Click on + Add Bump Product and select the product from the drop-down menu.
4. Add a main headline, an OTO headline, and OTO text. You can add an image if required.
5. Click Save to exit.

One Time Offer Upsell (OTO)
OTOs (One Time Offers) or Upsell Offers are used when a customer has already purchased your main offer and you want to offer them an upsell product. As you already have their credit card, you can offer them an additional product and it only takes one click to purchase it!
CREATE AN OTO FUNNEL PAGE
1. Go to Sites > Funnels and select your funnel. Create a new step (or clone an existing step) for your OTO page. The OTO step must be after the payment step.
ADD THE OTO PRODUCT TO THE FUNNEL
Before you can add the OTO offer to the funnel, you first need to create the product. Click here for instructions.
2. Click on the OTO page step and click on the Products tab.
3. Click on the green + Add Product button in the top right corner.
4. Add the Product from the drop-down menu and select the Price. You can also type in the box to search for a product.
5. Press Save to exit.
EDIT THE OTO FUNNEL PAGE
You can edit the page as required to include the information about your product/service. We recommend adding a progress bar to the top of your page. Click here for instructions.
ADD THE UPSELL BUTTON
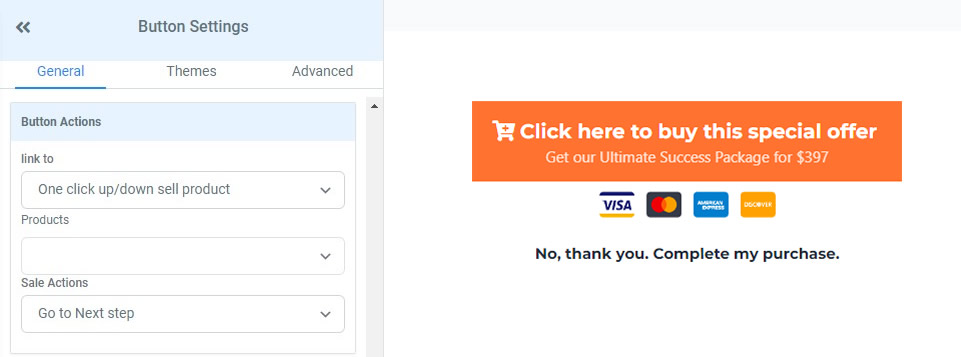
5. Click + Add Element and add a Button.
6. Click on the button to bring up the settings menu on the left. Scroll to the bottom to Buttons Actions. under the General tab of the left-hand menu.
7. Link to One Click Up/Down Sell Product, choose your Product from the drop-down list, and select the Sale Action (such as Go to Next Step).

8. Edit the button's appearance (color, text, etc). You need to make it clear that clicking the button will purchase the product. You can add a cart icon, use subtext and add a credit image.
9. Add another button or link for the customer to decline the offer if they are not interested. Set the Button Actions (for example, Next Step to take them to the confirmation page). Although this is not needed to complete the original purchase, it reassures the customer that their order is complete.
10. Press Save.
Order Bump and OTO Automations
ORDER FORM SALE WORKFLOWS
When someone purchases the order bump, you might want to automate an event (such as adding them to a Coach Catalyst program, adding a tag, or sending a payment confirmation email).
1. Click on Automation > Workflows and click the blue + Create Workflow button in the top right of the screen.
2. On the next screen, select Start from Scratch. Once in the workflow builder, at the top of the page, you can rename a workflow using the pencil icon next to the title.
3. Click Add New Workflow Trigger and select Order Form Submission. In Add Filters, choose In Funnel and select your funnel. Click Add Filter, choose Submission Type and then select Bump or Upsell.
If you have more than one order bump or OTO product, you can also add additional filters to filter by Product Type. Once selected, the trigger will now run for the selected product exclusively.
4. Click the + to add a new event to the workflow. Use the drop-down menu to select the choose one or more actions to occur, such as Add a Contact Tag, Send an Email or Execute a Webhook.
5. Add any other required steps.
6. Toggle on Publish and press Save.
ORDER FORM SALE TRIGGER
If you are on the Bronze price plan, you will need to use triggers for when someone completes an order form. In 'What should trigger this rule', select Order Form Submission in the event drop-down menu. In define filters, choose Submission Type and then select Bump.
Testing
TEST MODE
To check your funnel order form and OTO page are working correctly (and that your automations fire as expected), you should always test your funnel. Click here for instructions.

If you have a quick, system-specific "how-to" question, you can chat with our L1 Technical Support Team using the purple chat bubble in the bottom corner of the software. This team offers live chat 24/7, giving you instant access to help at any time of day.
If you have a more complex or outcome-specific “how-to” question, or a query about project requests, done-for-you resources, or Coach Catalyst, you can email our L2 Specialist Team at [email protected]. This team is available Monday to Friday, 8:00am – 1:00pm (EDT).
© 2026 SuperCoach CRM