
Reputation and Reviews
Created by: Emma Johnston
Last Updated: July 09, 2024
Reputation
Reviews will also help you gather information about your business, what to improve, and if your user/leads were satisfied with the services that your business provides.
Reputation Dashboard
REPUTATION AND REVIEW DASHBOARD
To see review summary and statistics page, click on Reputation > Overview. The default date range is the last 6 months (but this can be changed using the drop down in the top left corner). On the top row, you will see Invites Goal (how many people you have invited to leave you a review in that time frame), Reviews Received (how many reviews you have received and the percentage change), and Sentiment (how many positive and negatives reviews you have received and the percentage change).
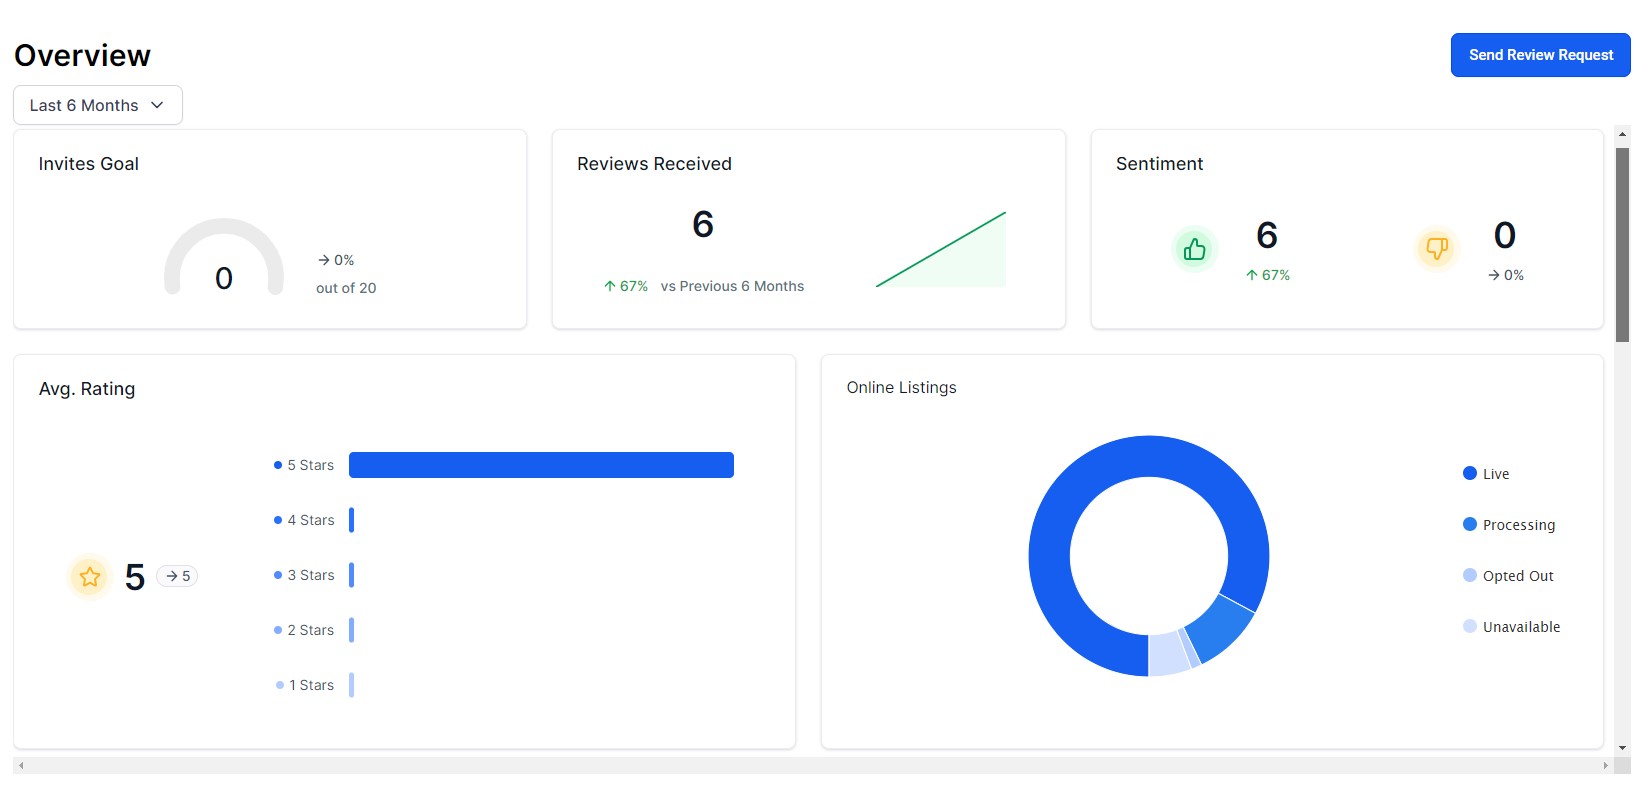
You will also see Average Rating (including a breakdown of scores) and Online Listing (if you have opted to use Yext).
Click on the three vertical dots in the top right corner of any box to change the date range. You will also see Invite Trends (a bar chart displaying the number of review requests sent) and Review Trends (a bar chart displaying the number of reviews received). Hover over the bars of any of these four sections for more information.
Finally, you will see Latest Review Requests (a list of who review requests have recently been sent to and what date they sent), as well as Latest Reviews (see received reviews including date, source, name, score and comment).


View/Manage Reviews
VIEW REVIEWS
To view reviews, click on Reputation > Reviews. You can filter by rating score, source, and date range. You can also search for specific reviews using the search box. Under each review, you can also respond to the review by pressing Reply.

CONVERSATIONS
Reviews also appear in Conversations as a conversations element (on both the desktop and mobile apps). You can also respond directly in the window (which posts back to the review source).
Best Practise
RESPONSE BEST PRACTISE
Responding to reviews, in general, is important because it shows your customers that you are paying attention and value their service. For Google review responses, it allows you to inject keywords into Google which may help improve your ranking. For example, if you replied with 'Thank you for your kind review, we aim to be the best gym in Redwood Falls'.
If you do receive a valid negative review, it is best practice not to ignore it. Instead, offer a solution or explanation. Use your response as a chance to rebuild customers’ trust. Always remember that your response is public. Keep responses genuine and courteous.
Spam Reviews
REPORT SPAM REVIEWS OR DISPUTE A REVIEW
If you want to dispute a Google review, you can click on the link below the review and it will open the resolution tool. If you want to dispute a Facebook review, you need to report the post.
REVIEW WIDGET
If you use the review widget on a funnel or website, you can remove Facebook spam reviews. Go to Reputation > Reviews and find the spam review. Click on the Trashcan icon and press Submit.
NOTE: This will only remove the review from SuperCoach CRM. You will still need to report the review in Facebook.

View/Manage Requests
REVIEW REQUEST STATUS
To view the status of a review, click on Reputation > Requests.
Queued status: When a user creates a review request, the system will attempt to send the request immediately. If there is a queue of other review requests in front of your request, there may be a slight delay before the request goes out.
Sent status: The review request has been sent.
Delivered status: If an SMS review has been sent, Twilio will confirm the delivery of the SMS sent.
Failed status: When an SMS review request fails to deliver. This can happen for a variety of reasons such as the phone number not being valid.
Manual Review Requests
REVIEW SETTINGS
Before you can send a manual request, you will need to edit the email and SMS templates in Settings > Reputation Management. Click here for more information.
BULK ACTION
You can send review requests as a bulk action. Click here for more information.
QUICK ADD
1. Click on the green lightning bolt icon at the top of the main left-hand menu and select Send a Review Request.
2. In the pop-up window, start typing in the name of the contact and select their name as it comes up in the dropdown menu. If a contact has both a phone number and email address, they will appear twice giving you the option to select which contact method you want to use.
3. Press Send a Review Invite.
INDIVIDUAL CONTACT REQUEST
1. If you want to send a review request to a single client, click on Contacts and select that contact.
2. Click on the ellipsis menu (three dots) next to the contact and select Send Review Request.
3. Press Send a Review Invite to send the request. The system will default to sending the request by SMS if you have a phone number for the contact.
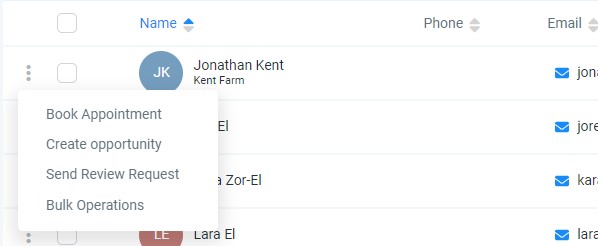
REPUTATION DASHBOARD
1. If you want to send a review request to a single client, you can also click on Reputation > Overview and press the blue Send Review Request button in the top right corner.
2. In the pop-up window, start typing in the name of the contact and select their name as it comes up in the dropdown menu. If a contact has both a phone number and email address, they will appear twice giving you the option to select which contact method you want to use.
3. Press Send a Review Invite.
Automated Review Requests
REVIEW SETTINGS
Before you can send a automated request, you will need to edit the email and SMS templates in Settings > Reputation Management. There is also a link to the Reputation Management Settings in the Send Review Request action panel in Workflows. Click here for more information.
CREATE A WORKFLOW
1. Click on Automation > Workflows and click the blue + Create Workflow button in the top right of the screen.
2. On the next screen, select Start from Scratch. Once in the workflow builder, at the top of the page, you can rename a workflow using the pencil icon next to the title.
3. Click Add New Workflow Trigger and choose a workflow trigger from right-hand panel.
4. Click the + to add a new event to the workflow. Choose Send Review Request and select whether you want to send an email or SMS.
5. Add any other required steps.
6. Press Save and toggle on Publish.

Reputation Settings
GENERATE A GOOGLE REVIEW LINK
First, ensure that you have your Google My Business account connected in Settings > Integrations > Google My Business.
1. Click on Settings > Reputation Management and scroll to the Leave a Review Link section.
2. Click Generate Link and press Save.
NOTE: Some phones will preview an image when you send your review link. The image it will show for your review link is the one you see in your Google Business profile. To change that, log in to your Google Business Places account, click the Dashboard tab, and scroll to the Your Businesses section to find your current listing. Click Edit under your business name, and then click the Remove link below your existing picture. Click Add Photo and select your new profile image from the File Upload window that opens. Click OK to continue. Click Add Photo and then click Submit to finish changing your profile picture.
SMS REVIEW TEMPLATE
1. Click on Settings > Reputation Management and scroll to the Customize Review SMS section.
2. Add an image (optional) and create your message, ensuring you include your Google review link or a link to an alternative review page (such as Facebook or another social media platform).
3. Click Save.
EMAIL REVIEW TEMPLATE
1. Click on Settings > Reputation Management and scroll to the Customize Review Email section.
2. Add a subject line, email heading, message, and call to action (positive answer is the button text). Ensure you include your Google review link or a link to an alternative review page (such as Facebook or another social media platform).
3. Click Save.
CUSTOM SCHEDULE FOR REVIEW REQUESTS
Here you can determine how and when your review emails and SMS text messages will go out to your customers. By default, review requests are sent immediately once.
1. Click on Settings > Reputation Management and scroll to the Review Request Behavior section.
2. Select Follow a Custom Schedule for Review Requests. Refresh the page.
3. Under both SMS and Email, select an option from the drop-down menu for when to send the message after a manual request is sent.
4. Under both SMS and Email, select an option from the drop-down menu for how often to send out requests.
5. Press Save.
When customizing review communication or sending a request, make you are logged in as the user email that matches the SMTP integrated email. The system will use the user login email as the sender email when sending review request emails.
GOOGLE REVIEW IMAGE
Some phones will preview an image when you send your review link. The image it will show for your review link is the one you see in your Google Business profile.
1. To change that, log in to your Google Business account, click the Dashboard tab, and scroll to the Your Businesses section to find your current listing.
2. Click Edit under your business name, and then click the Remove link below your existing picture.
3. Click Add Photo and select your new profile image from the File Upload window that opens. Click OK to continue.
4. Click Add Photo and then click Submit to finish changing your profile picture.
Review Widget
CUSTOMIZE REVIEW WIDGET
To create a new widget, go to Reputation > Widgets and click on + Create New.
EDIT AN EXISTING WIDGET
To edit an existing widget and go to Reputation > Widgets, click on the desired widget and select Edit Widget.
CUSTOMIZE REVIEW WIDGET
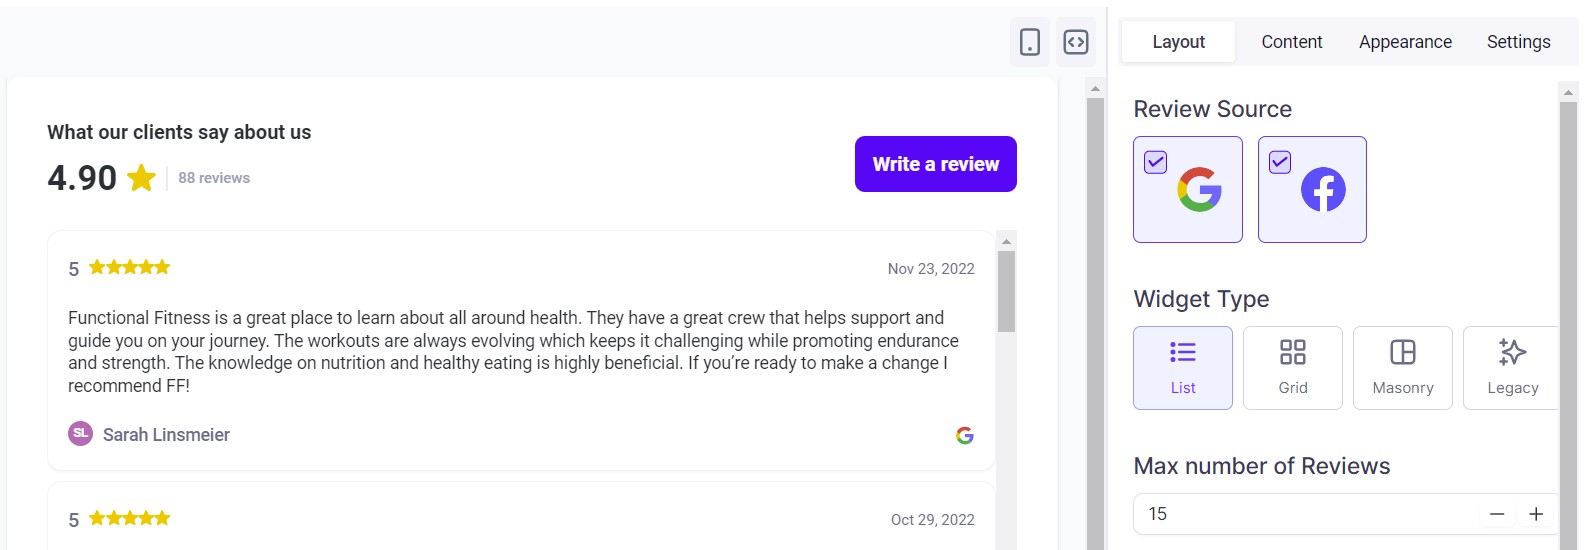
On the left hand side, there are four tabs. Once complete, press Save. Add a widget name to the popup window and press Save to finish. You can also choose whether to make the widget live.
In the Layout tab, you can edit the review source, widget type (list, grid, masonry, or legacy), number of reviews shown, and whether you want to display 'powered by'.
In the Content tab, you can edit the title and description, as well as the review header (average rating, number of reviews and whether to display the Write a Review button).
In the Appearance tab, you can choose the theme (light or dark) and fonts, and customize the appearance (header title, title color, star rating color, and/or background color).
In the Settings tab, you can edit the appearance of the reviews (and choose whether you want to display the date and the reviewer icon, and whether you want to exclude reviews containing no description.
DELETE A WIDGET
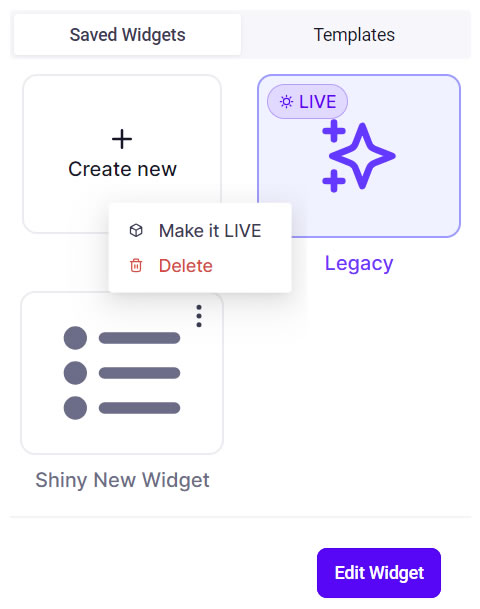
To delete an existing widget and go to Reputation > Widgets, click on the vertical ellipsis menu (three dots) and select Delete.
REVIEW WIDGET
You can add the review widget as an element on SuperCoach CRM funnels and websites. Click here for more information.
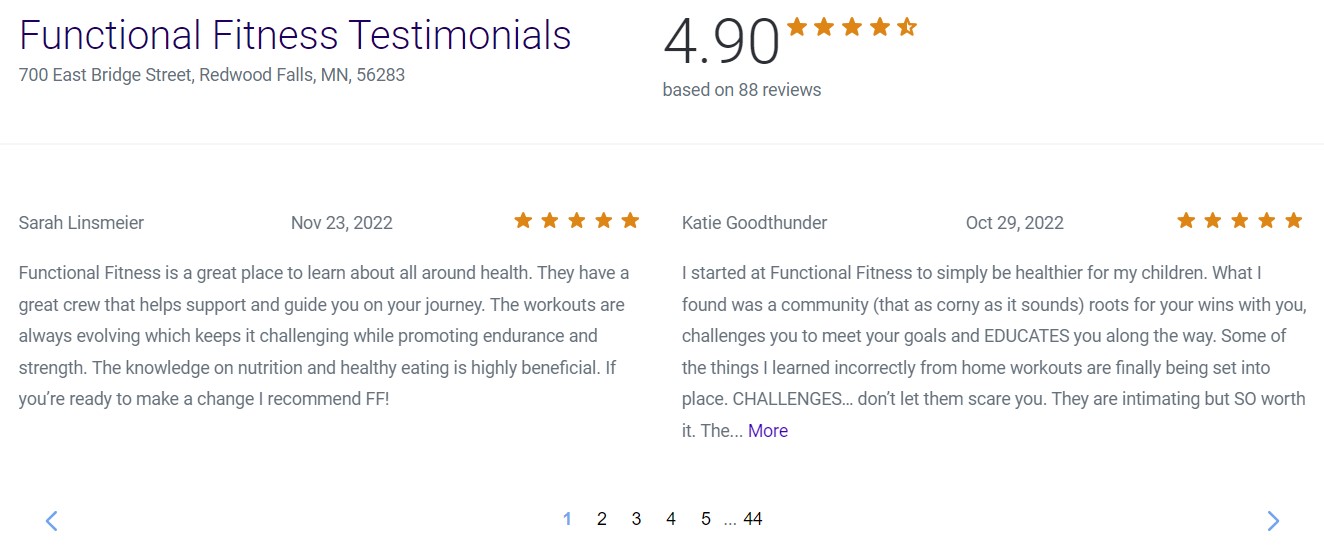
MAKE A WIDGET LIVE
To change which widget is live and go to Reputation > Widgets, click on the vertical ellipsis menu (three dots) and select Make it Live.
EMBED REVIEW WIDGET
You can also embed the widget on external websites. To edit an existing widget and go to Reputation > Widgets, click on the desired widget and select Edit Widget. Click on the Settings tab and copy the embed code.
Yext
ONLINE LISTINGS BY YEXT
Available to businesses in the US, Canada and UK, Online Listings by Yext is an incredibly powerful SEO tool that creates backlinks and ensures your client's Vital business info (address, operation hours, phone numbers, etc) is consistent across 100+ of the world's most reputable websites.
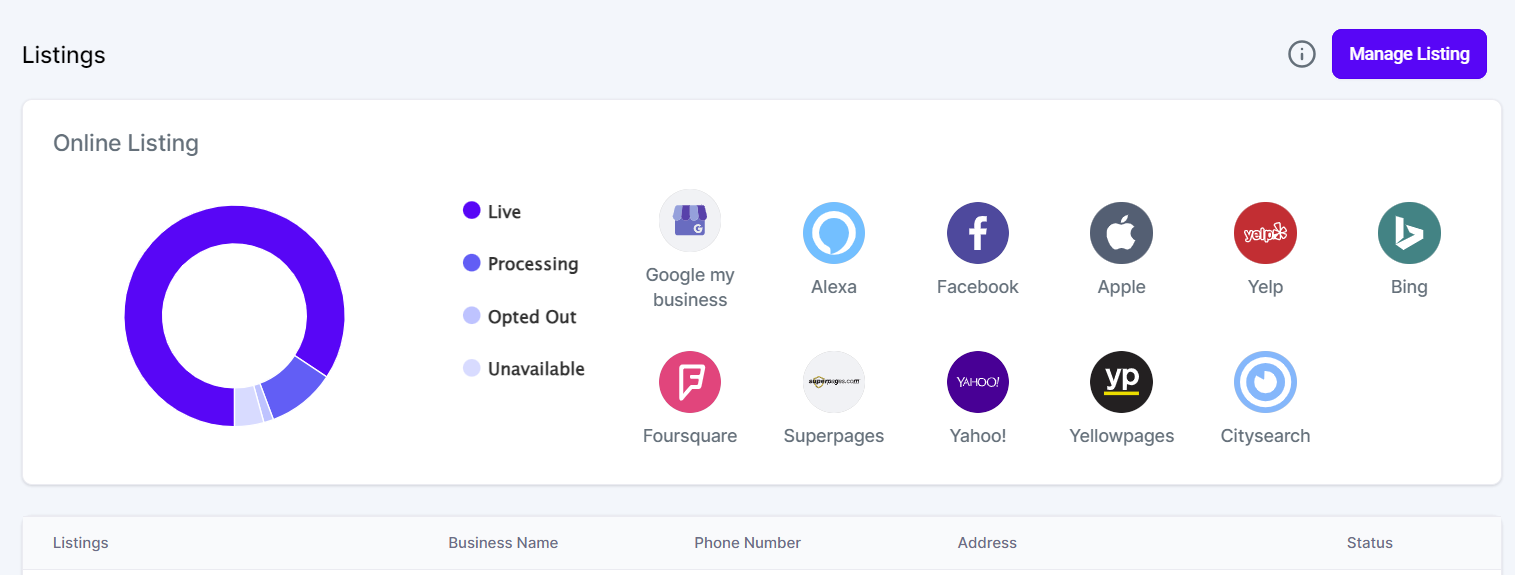
Online Listings by Yext is available as an add-on to your account. This feature costs $49 per month. Buying this service with Yext directly costs $999 per year, so this saves you more than $30 per month/over $400 per year.
To add Yext to your account, email [email protected]. Once added, go to Reputation > Listings to view your Listing dashboard. Here you can view your listing, business information and listing status. To manage or cancel your Yext subscription, click on the Edit Listing Information button.

If you have a quick, system-specific "how-to" question, you can chat with our L1 Technical Support Team using the purple chat bubble in the bottom corner of the software. This team offers live chat 24/7, giving you instant access to help at any time of day.
If you have a more complex or outcome-specific “how-to” question, or a query about project requests, done-for-you resources, or Coach Catalyst, you can email our L2 Specialist Team at [email protected]. This team is available Monday to Friday, 8:00am – 1:00pm (EDT).
© 2026 SuperCoach CRM