
Opportunities
Created by: Emma Johnston
Last Updated: August 26, 2025
Opportunities and Pipelines
OPPORTUNITIES AND PIPELINES
The Opportunities page lets you track leads and clients as they move through different pipelines in your business, such as your sales process. Each pipeline gives you a clear visual of what stage someone is at, making it easy to see progress at a glance, spot bottlenecks, manage follow-ups, and identify opportunities that may have gone stale. This helps you assess how well your processes are working and where improvements can be made.
Pipelines
Pipelines
CREATE A NEW PIPELINE
1. Click on Opportunities > Pipelines and click on the green + Create New Pipeline.
2. Add a pipeline name and stage name.
3. Click + Add Stage to add additional stages. You can add as many stages as you would like.
4. Once complete, press Save to finish.
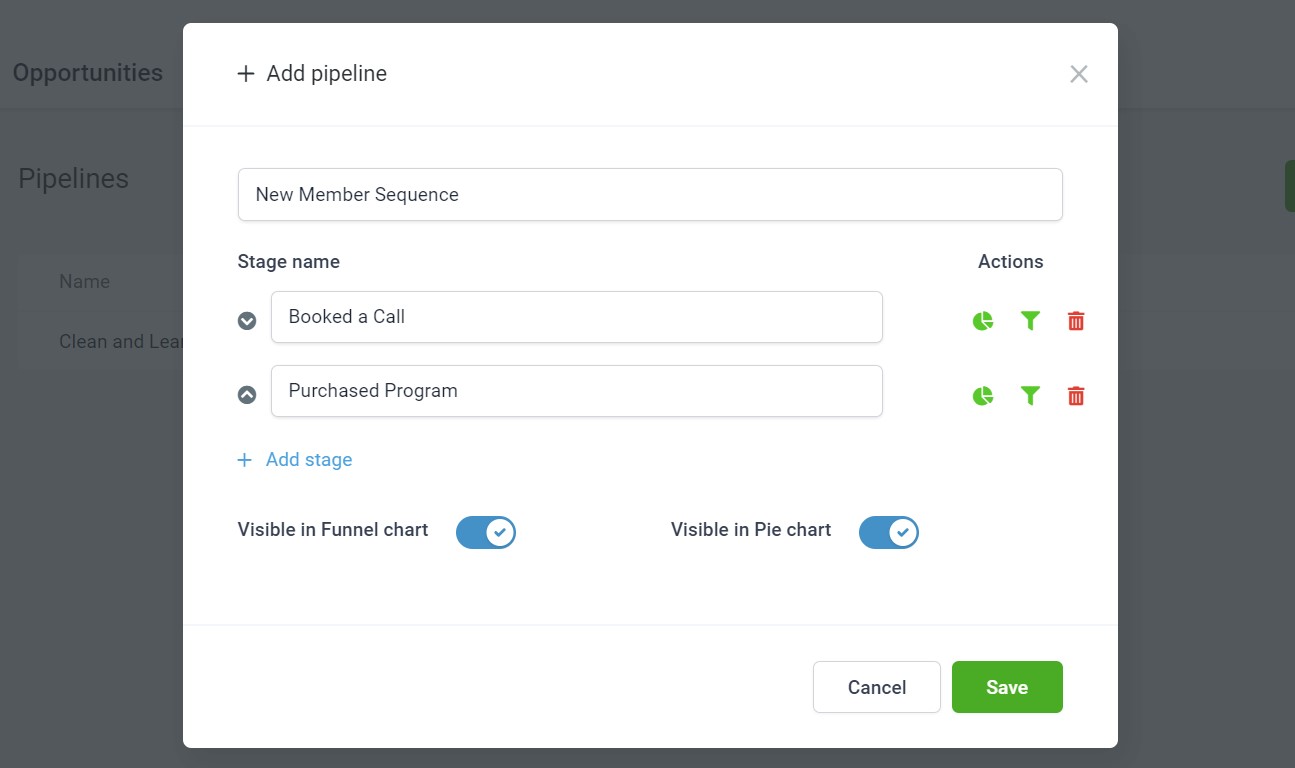
REORDER PIPELINE STAGES
You can reorganize the stages by clicking the arrows to move the stage up or down.
PIPELINE CHART OPTIONS
When creating a pipeline, you can select whether the pipeline information to be visible in the Funnel Chart or Pie Chart on the Dashboard overview page (by toggling those options on or off). You can also select whether an individual stage is visible in the funnel chart and visible in the pie chart by clicking on the the green icons on the right-hand under Actions.

EDIT OR DELETE A PIPELINE
To edit a pipeline, select the Pencil icon. Follow the on-screen instructions and press Save when you have completed the changes. To delete a pipeline, select the Trashcan icon. Press Ok to confirm.
Opportunities
Adding Opportunities
You can either add a contact to a pipeline from Opportunities or from Contacts.
ADD FROM OPPORTUNITIES
1. Go to Opportunities > Opportunities and click the blue + Opportunity button.
2. In the Contact Name box, start to search for the required contact.
3. Select the contact from the short list.
4. Select a pipeline and stage and click Add to save. You can also assign an owner, and enter lead value and source.

ADD FROM CONTACTS
1. Click on Contacts, go to their name.
2. In the Contact tab, scroll down to the bottom of the left panel to the ACTIONS section. Expand the Opportunities section and and click on + Add.
3. Select a pipeline and stage and click Add to save. You can also assign an owner, and enter lead value and source.
If the duplicate setting is enabled, you can add them to as many pipelines as you like.
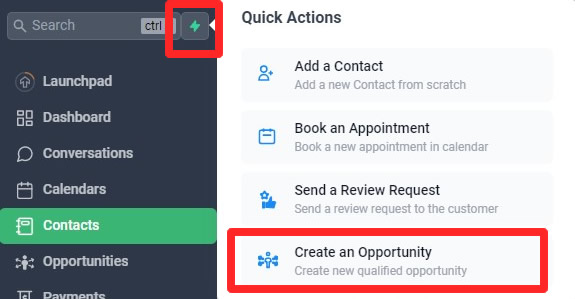
QUICK ADD
1. Click on the green lightning bolt icon at the top of the main left-hand menu and select Create an Opportunity.
2. In the window that pops up, enter contact information (such as name, email, phone number, and time zone) and the opportunity information (such as opportunity name, pipeline and stage, status, lead value and source).
3. Press Add to Save.
BULK ACTION
You can add/update the Opportunity for multiple Contacts. Choose a pipeline, stage, opportunity, lead value, and more.
1. Go to Contacts, select the required contacts and click on the Funnel (Pipeline Change) icon.
2. In the window that pops up, choose a pipeline, stage, opportunity, lead value, opportunity status, and more.
3. Click Add/Update Opportunity to confirm your changes.

DUPLICATE OPPORTUNITIES
If you want to add a contact to multiple opportunities, you must first enable this. Go to Settings > Business Profile. In the General section in the bottom right, check the box for Allow Duplicate Opportunity.
You can also allow duplicate opportunities in the Pipeline Stage Change options in workflows. This will only put them into a duplicate opportunity if it is in a different pipeline that they were not previously a part of.
Opportunities
OPPORTUNITES
To view the Opportunities, go to Opportunities > Opportunities. When viewing your opportunities, you can click on one of the contacts to view tags, open a conversation, contact the person, add a task, and more!
You can change which pipeline you want to view from the drop down menu in the top left corner. You can search the opportunities by name, phone, email, or tags using the Search Box. You can use the Sort By option to sort the information (ascending or descending) by Date Added or by Deal Value.

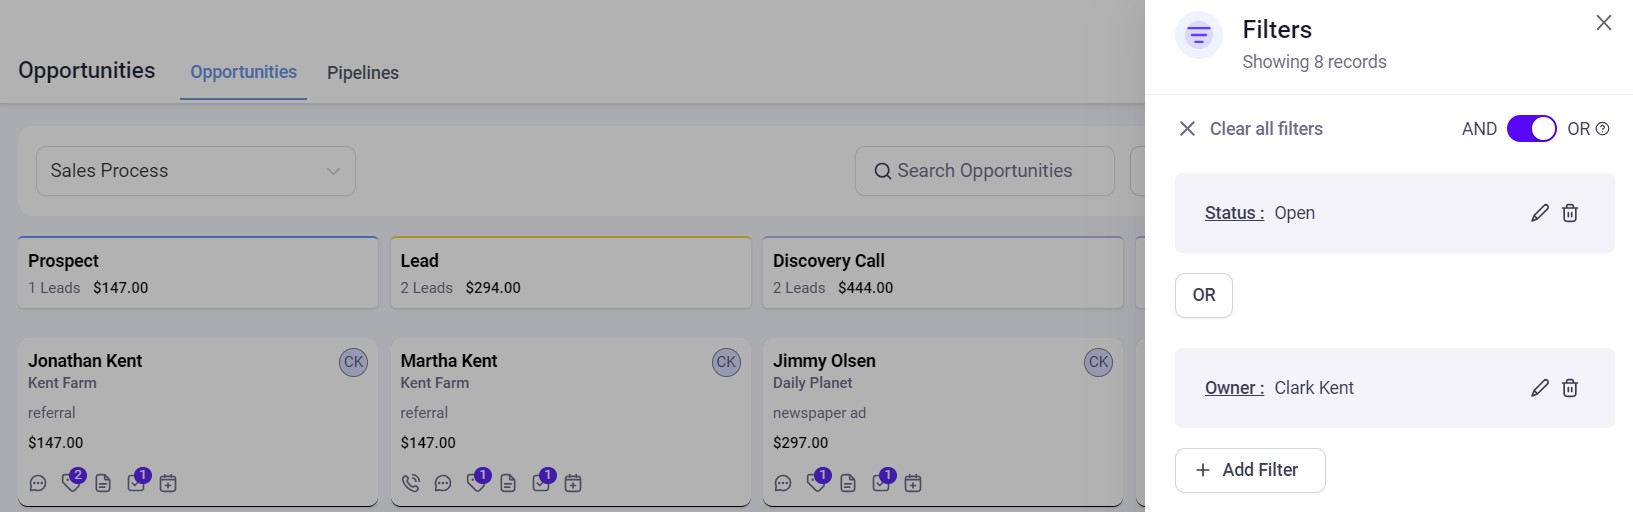
FILTERING THE OPPORTUNITIES
To filter the cards, click on the Filters icon on the right hand side of the top menu bar. Choose your filter (owner, lead status, campaign type, last stage change, when the opportunity was created or updated, lead value, when the opportunity was won or lost) and press Apply. You can add additional filters by clicking on + Add Filter and toggle on whether those filter to be AND or OR.
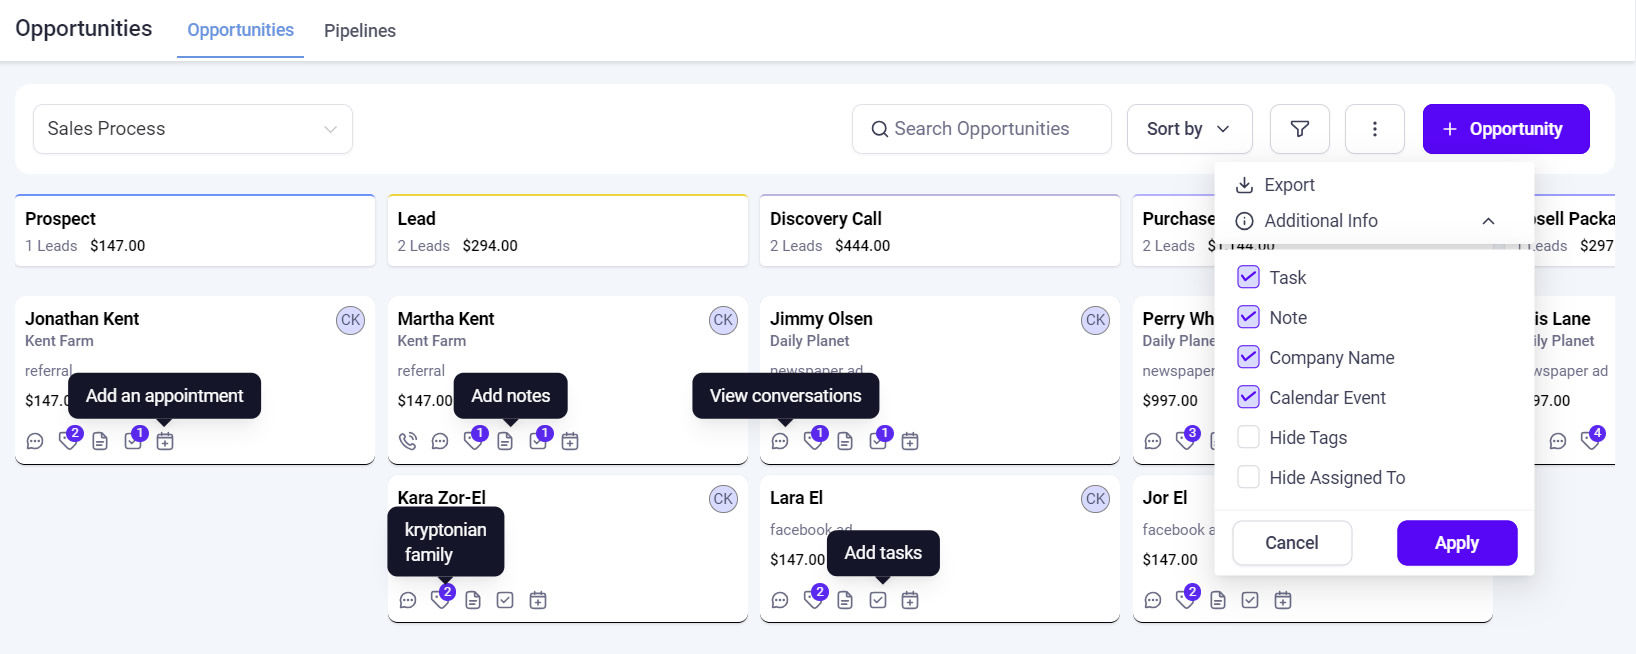
ADDITIONAL INFORMATION
To view additional information, click on the ellipsis menu (three vertical dots) in the top right corner and select Additional Info. From the drop-down menu, select the required options. to change the information displaying on the cards. This section will remember what you’ve previously selected. You can choose to display tasks, calendar events, notes and/or company name. You can also hide tags and assigned to.
CONTACT SUMMARY ACTIONS
You can perform contact actions by clicking the contact card. In the pop up window, you can select from Opportunity (to see contact information and opportunity information), Book/Update Appointment, Tasks and Notes.
You can also click the icons on the footer of the contact card to select the action.
The icons will show counts for tags, tasks and notes. Hovering over the icons will show more information.
EXPORT OPPORTUNITY INFORMATION
To download opportunity information as a CSV file, click on the ellipsis menu (three vertical dots) in the top right corner and select Export.
CHANGING PIPELINE STAGE
You can manually move contacts into other pipeline stages by dragging their contact card. You can also automate pipeline stage changes (as well as triggering a workflow by moving a card). Click here for information on automations.
Opportunity Status
CHANGE OPPORTUNITY STATUS
If a contact has completed a pipeline (for example, if they have joined a program in a sales process or finished the stages of an onboarding process), you can drag their tile to the bottom of the screen and drop them into Won. You can also click on the tile and change the status from Open to Won. Click Update to save your changes.

END AN OPPORTUNITY
If an opportunity isn't going to work out or close, you can archive them. You can drag their tile to the bottom of the screen and drop them into Lost or Abandoned. You can also click on the tile and change their status. Click Update to save your changes.
When a contact is lost, you can select the reason. From the popup window, choose a reason from the drop-down menu or click Create New Reason to add an option. Press Confirm to finish.
DELETE AN OPPORTUNITY
To remove an opportunity from the list entirely. Click on the 'tile', scroll to the bottom, and click the red "Delete" button. This will completely delete the contact from your pipelines (but not your Contacts list).
Opportunity Fields
OPPORTUNITY FIELDS
You can create and add custom fields for opportunities, allowing you to capture and organise additional information specific to your business needs. These fields can also be organised into custom folders.
CREATE AN OPPORTUNITY FIELD
1. Click on Settings > Custom Fields, and click on the green + Add Field button in the top right corner.
2. Choose the type of field you want to create and click Next.
3. Add the field Name.
4. Select Opportunity from the Object from the dropdown menu and which Group (opportunity folder) you want to add the field to.
5. Press Save to exit.
You can rearrange the order of the custom fields. The order of the custom fields within their folder is the order of the menus in the opportunities card in Opportunities. Click here for information about rearranging/managing Custom Fields.
CREATING CUSTOM OPPORTUNITY FOLDER
1. Go to Settings > Custom Fields, and click on the white + Add Folder button in the top right corner.
2. Enter the name of the folder and select Opportunity from the Object from the dropdown menu.
3. Press Save.
You can rearrange the order of the folders. The order of the opportunities folder is the order of the menus in the opportunities card in Opportunities. Click here for more information about rearranging/managing Custom Field Folders.
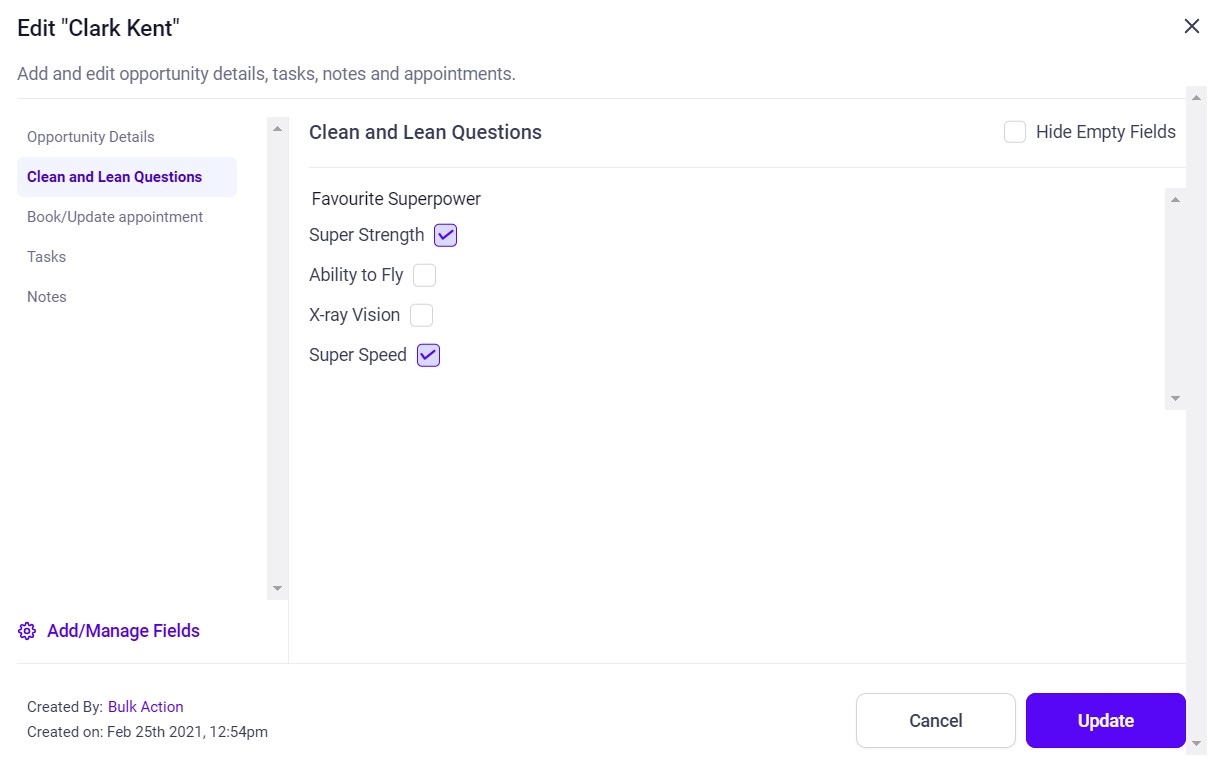
VIEWING OPPORTUNITY FIELDS
Go to Opportunities > Opportunities and click on the required contact. You can change between Field Folders in the panel on the left. You can also Hide Empty Fields.
Automations
PIPELINE/OPPORTUNITY TRIGGERS
When a contact changes pipeline stage or status (or when a new opportunity is created), you may want to trigger an automated action, such as removing a tag, sending a re-engagement email, or offering a promotion.
1. Go to Automations > Workflows and create a new workflow (or open an existing one).
2. Click Add Trigger, choose the relevant option (Opportunity Status Changed, Pipeline Stage Changed, or Opportunity Created), then add a filter to select the correct pipeline and stage.
3. Add any action steps you want to happen next, such as Remove Tag or Send Email.
4. Finally, toggle on Publish and press Save.
UPDATE PIPELINE STAGE
1. Click on Automation > Workflows and click the green + Create New Workflow button in the top right of the screen.
2. Choose an option for the type of Workflow you wish to create, such as Start a Workflow from Scratch, and click the + Create New Workflow button again to enter the builder. Add a workflow name and press Save.
3. Click Add New Workflow Trigger and select an event that will trigger the rule. Define filters, where applicable.
4. Click the + to add a new event to the workflow. Choose Add/Update Opportunity. Select the pipeline and stage. For the opportunity name, you can use the dynamic field . Complete the other options.
5. Add any other required steps.
6. Toggle on Publish and press Save.
Dashboard
Dashboard
Your Dashboard is the first thing that you will see when you log into the system. It will outline the progress and performance of your business. The top two sections of your Dashboard give you a summary of your opportunities and pipeline data. The content of your dashboard will depend on your user permissions.
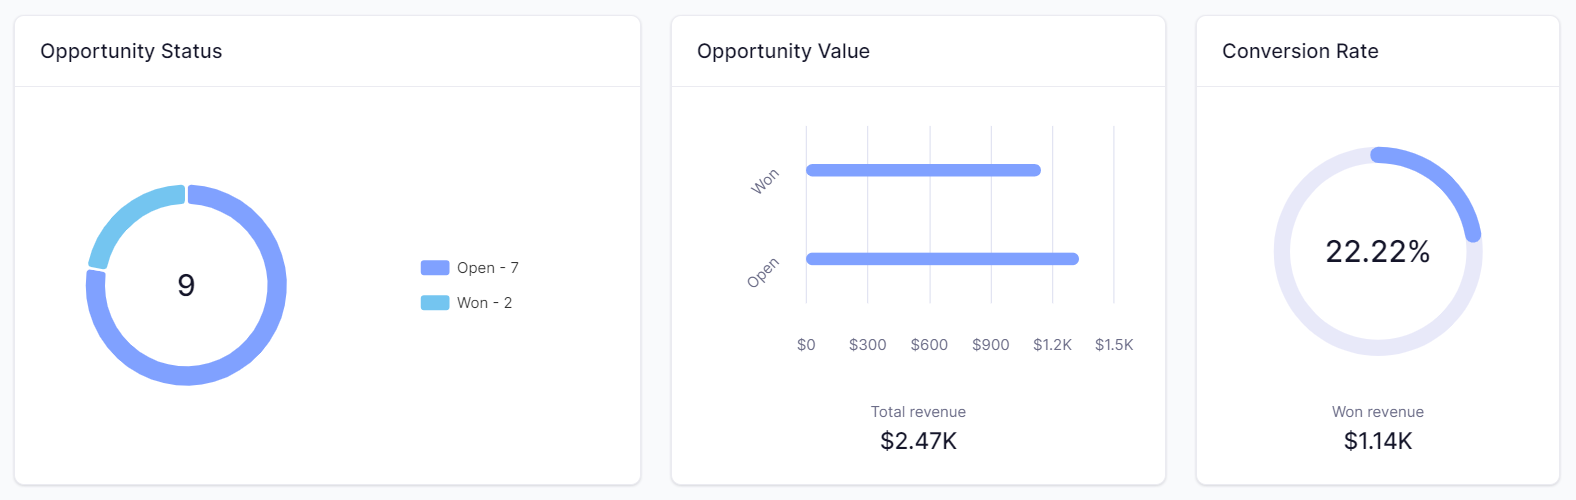
OPPORTUNITIES
Click on the date in the top right corner of the page to change the date range.
Opportunity Status – Number of leads in your pipelines (split into open and won)
Opportunity Value – The total revenue of your leads, as well as information on open/won.
Conversion Rate – Percentage of your leads/accounts marked as Won.
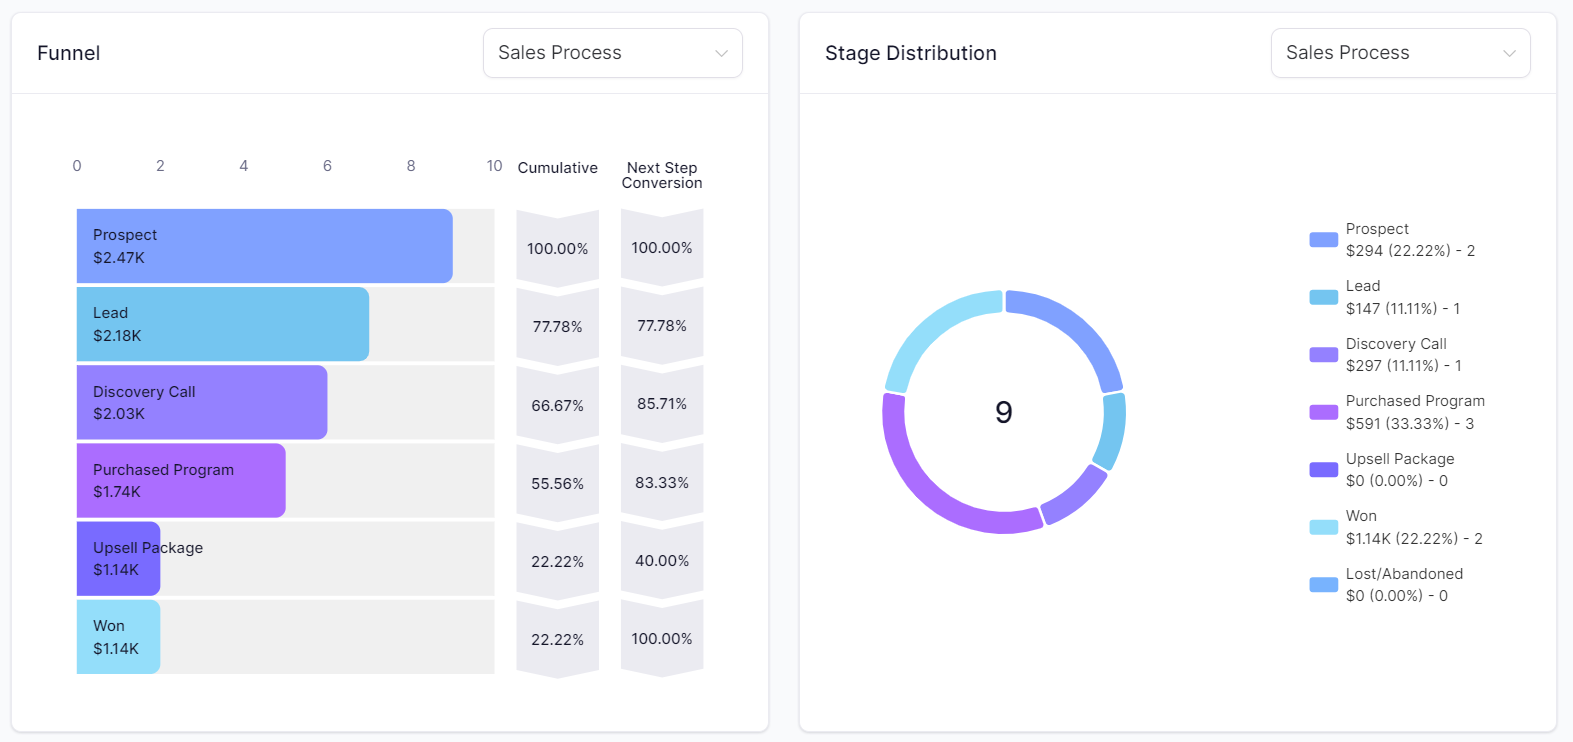
PIPELINES STAGES
Click on the drop-down next to the pipeline name to change which pipeline is displayed.
Funnel – A visual representation of what stages your opportunities have passed through within your pipeline. The graph shows how many opportunities have passed through each stage, the total opportunity value that has passed through each stage, the cumulative percentage, and the percentage of conversions from one stage to the next.
Stages Distribution – A visual representation of what stage your opportunities are currently in. The graph shows how many opportunities are in each stage and the total opportunity value of each stage.

If you have a quick, system-specific "how-to" question, you can chat with our L1 Technical Support Team using the purple chat bubble in the bottom corner of the software. This team offers live chat 24/7, giving you instant access to help at any time of day.
If you have a more complex or outcome-specific “how-to” question, or a query about project requests, done-for-you resources, or Coach Catalyst, you can email our L2 Specialist Team at [email protected]. This team is available Monday to Friday, 8:00am – 1:00pm (EDT).
© 2026 SuperCoach CRM