
Funnels
Created by: Emma Johnston
Last Updated: February 08, 2025
Dashboard / Create a Funnel / Builder / Menu Bar / Formatting / Mobile / Colors / Popup / Cookies / Settings / A/B Testing
Funnels
You can use the funnel builder to create funnels for landing pages, lead magnets, and sales pages. You can create pages with a variety of elements such as pop-ups, forms, payment forms, calendars, surveys, and buttons. You can completely customize each step and each element, including fonts, colors, borders, shadows, and spacing.
Funnel Dashboard
FUNNEL DASHBOARD
Click on Sites > Funnels. You can view a list of your existing funnels here or click the green + New Funnel button to create a new funnel. If you create a new funnel, add a funnel name and click Create Funnel.
Once you create a new funnel, you have to add a step. Each step is an actual page.

EDIT A FUNNEL
To edit an existing funnel, you can either click on the funnel name or you can click on the three vertical dots and select Edit.
CLONE A FUNNEL
Click on the ellipsis menu (three vertical dots) and select Clone. Enter a new name and click Clone Funnel.
DELETE A FUNNEL
Click on the ellipsis menu (three vertical dots) and select Delete. Type the phrase DELETE into the box and press Yes, Delete. You can also press Cancel, Keep to cancel.
FUNNEL FOLDERS
You can use folders to keep your funnel organized. From the funnel dashboard, click New Folder. Give the folder a name and press Create Folder. To rename or delete a folder, click the ellipsis menu (three vertical dots) and select the required option.
MOVE A FUNNEL TO A FOLDER
Click on the ellipsis menu (three vertical dots) and select Move to Folder. Select the folder that you want to move the funnel to and press Move to Folder.
Creating a New Funnel
CREATE A FUNNEL
1. Click on Sites > Funnels. Click the green + New Funnel button to create a new funnel.
2. Add a funnel name and click Create Funnel.
CREATE A STEP/PAGE
Once you create a new funnel, you have to add a step. Each step is an actual page.
1. Click on + Add New Step.
2. Add a page name and path, and click Create Funnel Step.
3. You can then either choose Create from Blank if you want to start a page from scratch or choose Import to a step from another funnel in your account.
CLICK FUNNELS PAGES
You also have the option here to import an existing ClickFunnels page when create a new step. Paste the link from the funnel step you want to import (starting https://) and allow a few moments for the import to complete. After it loads, you can see what’s been imported and make any changes within the builder. You will need to add new forms and order forms.
EDIT A STEP/PAGE
1. To edit a step, click the yellow Edit button.
2. Select either Edit Page to edit the page in the same window or Edit in a New Tab to edit the page in a new browser tab.
PREVIEW STEP/PAGE
To preview the page, click the Preview Page icon.
CLONE A STEP/PAGE
1. To clone an existing page, click on Clone Funnel Step.
2. To copy the step in the same funnel, click on Clone Step in This Funnel on the left-hand side of the pop-up window to make a copy. To copy the step to another funnel(s), on the right-hand side of the pop-up window, select your location and the funnel(s) you want to copy it to and click on Add Step to More Funnels.
DELETE A STEP/PAGE
1. To delete a page, click Delete Funnel Step.
2. Type the phrase DELETE into the box and press Yes, Delete. You can also press Cancel, Keep to cancel.
Funnel Builder Introduction
PAGE STRUCTURE
Each page is made up of sections, rows, columns, and elements. They need to be created in that order, and nest inside their respective elements (sections can house multiple rows, rows can house multiple columns and columns can house multiple elements).
When selecting an item on a funnel page, the surrounding box will change color to indicate what has been select. The surrounding box for Sections have a green border, Rows have blue border, Columns have a purple border and Elements have an orange border.

ADD NEW ITEMS
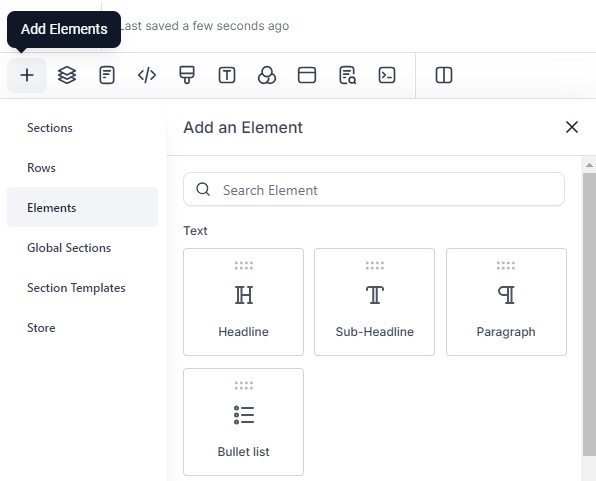
When you create a new page, follow the prompts to add a section, row (with columns) and a new elements. Drag-and-drop the required items from the menu that appears on the left-hand side of the screen.
To the adding additional items, select a matching existing item (section, row, column or element) and click on the + icon at the bottom of the surrounding box. You can also select the Add Elements icon in the top menu bar the item. Select Elements from the menu and drag-and-drop the required items onto the page.
ADD, MOVE, CLONE OR DELETE
Selecting a section, row, column or element will bring up a surrounding box with additional options. These options include move up or move down in the top left corner and drag, clone, and delete in the top right corner. Sections also have a save option (either as a global section for that funnel or as a template to add to other funnels).
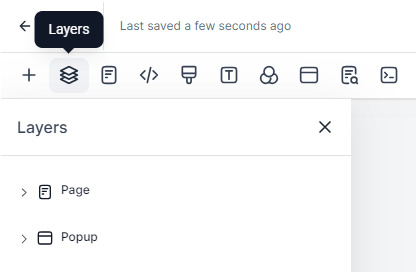
You can also manage layers and elements by clicking on the Layers icon in the top menu bar,

Funnel Builder Menu Bar
MANAGE LAYERS
To manage layer such as sections, rows, columns or element, click the Layers icon in the top menu bar. Here you have the options to can reorder, hide or show, edit, clone and delete. This can be especially useful when a section, row or column has no padding and you cannot select it easily.
NAVIGATE TO OTHER PAGES
To navigate between different pages in the funnel, you can either click the Pages icon in the top menu bar or click on the page title. Press Save to save any changes first and then select the page you want to change to in the left hand panel.

TRACKING CODE
To add tracking code for the page (rather than adding site wide in the funnel settings), click on the Tracking Code icon in the top menu bar.
CUSTOM CSS
To add custom CSS to the funnel, click on the Custom CSS icon in the top menu bar.
TYPOGRAPHY/FONTS
To change default heading and paragraph fonts, click on the Typography icon in the top menu bar. Click on the font you want to change, and either type in the name of the font you want (if you know it) or select one from the dropdown list.
Click here to browse/preview the available fonts.
BACKGROUND
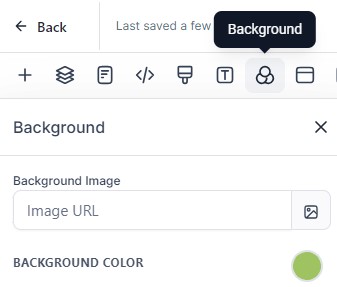
To edit the background color or add/edit the background image, click on the Background icon in the top menu bar.
POPUP
Click here for more information about creating and editing a popup.
SEO META DATA
You can edit SEO meta data (such as page title, description, keywords, author and social image) by clicking on the SEO Meta Data icon in the top menu bar. Adding the information in the right hand panel, click Update Meta Data in the bottom right corner.
For Facebook, the social image dimensions should be 1200 x 630px.
COOKIE CONSENT
Click here for more information about adding a cookie consent banner to your funnel.
VIEW MODE
You can choose between 2 Column Mode (which pushes the funnel editing space to the left to make space for the properties panel) or Auto (where the properties panel sits on top of the funnel editing space).
VISIBILITY
In the center of the menu bar, you can toggle between desktop view and mobile view. Click here for more information on optimizing for mobile.

PREVIEW PAGE
You can preview the page by clicking on the Preview button In the top right corner. This will also save the page.
SAVE/PUBLISH PAGE
You can save your changes by clicking on the Save button In the top right corner. Be sure to regularly save any changes you've made. Once complete, press Publish to make those changes live.
VERSIONS
You can restore previous versions of funnels by clicking on the Versions buttons. You can preview previous versions and press Restore.
UNDO/REDO
You can undo and redo actions using the icons on right of the menu bar. This can be particularly useful if you delete a section or element accidentally.
Funnel Builder and Element Formatting
SETTINGS AND FORMATTING
Clicking on a section, row, column, or element will bring up a settings menu on the right-hand side. Depending on what has been selected there will be a General tab and an Advanced tab, each giving different options.
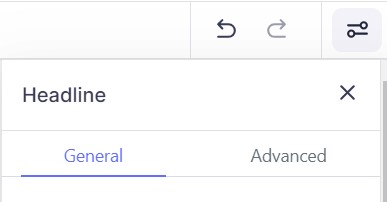
The settings include options such as background images, background colors, padding, margin, fonts, font size and font colors, shadows, borders, text transforms. You can set a redirect action on a form, survey, button, calendar, etc.
SECTION WIDTH
You can change width of a section under the General tab. You can also change the alignment. This can be useful when trying to make text look balanced. Note that this only affects desktop; section width is always 100% on mobile.

PADDING AND MARGINS
You can change padding and margins for sections and elements in the left hand panel under the General tab. Click on the value that you want to change and then either use the slider, type in a value, or select one of the pre-set options.
You can also set different values for desktop and mobile. By default, all changes made initially to the desktop design will be applied to the mobile version. To make specific changes to the mobile version, click on the desktop/mobile icon next to the Margin & Padding title. You can also swap to Mobile Mode in the menu bar.
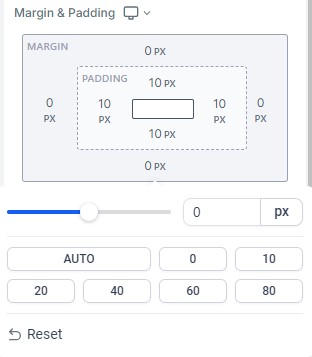
Note that left padding and right padding for sections, rows and columns affects desktop only. Left padding and right padding for elements affects desktop and mobile.
TEXT AND BOX SHADOWS
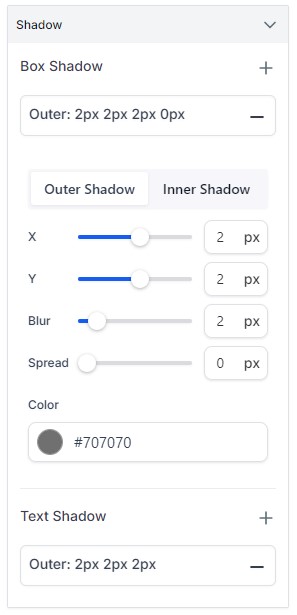
To add text or box shadows to an element, click on the element and go to the Advanced tab. Under the Shadow section, click on the + icon to next to Box Shadow or Text Shadow to apply the effect. Clicking on the shadow options will open an additional menu where you can change the shadow values, blur, spread and color.
ELEMENT NAME/TITLE
It can be helpful to name certain items on your page, especially sections. Click on the item and type a new name in the Element Name/Title box at the top on the General tab in the left-hand panel.
ADDING ELEMENTS
You can add a variety of elements to a funnel page including headings, paragraphs, bullet lists, images, forms, payment forms, calendars, surveys, and buttons. Click here for information about funnel elements.
PAGE BACKGROUND
To change the entire funnel background, click on the Background icon in the top menu bar. You can click the picture icon to add a background image (and then choose the Image Option and the Image Opacity). You can click the filled circle to add a Background Color. If you change the opacity of the background image, the background color will show through.
Mobile Optimization
OPTIMIZING FOR MOBILE
When building funnels, we use a desktop, so it can be easy to make the mobile version an afterthought. However, as the majority of users will probably using a phone to access your page, it is extremely important that you consider how your funnel looks and functions on mobile devices.
When designing a funnel, you can toggle between Desktop Mode and Mobile Mode by selecting the icons in the menu bar.

Once the page has been completed, we also recommend viewing the funnel page on a real mobile. Note that the page will look vary slightly in appearance on different mobile screens.
TEXT SIZE, ALIGNMENT AND LINE HEIGHT
You can define different font sizes, font weight, text alignment and line height for desktop and mobile. By default, the mobile version will take on the same values as the desktop version. To change these, either select Mobile Mode from the top menu bar or select mobile from the element properties.
BUTTON AND IMAGE ALIGNMENT
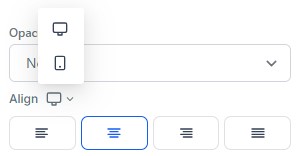
For button and images, you can set different alignments for desktop and mobile. By default, the mobile version will take on the same values as the desktop version. To change these, either select Mobile Mode from the top menu bar or select mobile from the element properties.
PADDING AND MARGINS
For all elements, rows, columns and sections, you can set different margins and padding. For example, you may want more padding on the top and bottom of sections on desktop to give the layout breathing space. You may also want the header section to take up more room on desktop than you do on mobile. You may also want to add margins at the bottom of columns on mobile to create space between the sections.
By default, the mobile version will take on the same values as the desktop version. To change these, either select Mobile Mode from the top menu bar or select mobile from the element properties.
VISIBILITY
There will also be times when you want an element to appear on either desktop or mobile, but not both. For example, you may want to add a extra image to the desktop version to fill up the space next to text.
We recommend building the desktop version first and then, in mobile view, determine which sections or elements don't show up how you want them to. Once you've determined what you need to change, you can duplicate them, change one version to desktop-only and the other to mobile-only. You'll then be able to edit the mobile-only as needed.
To change whether a section or element is visible or hidden on desktop and/or mobile, select the item and change the Visibility for each device in the Advanced tab in the left panel. When an element is only visible on certain devices, an additional icon will appear in the top right cover of the surrounding box for that item to indicate the visibility settings.
The visibility of a parent item will supersede the visibility for a child item (eg, if a column is set to only be visible on desktop, then all of the elements within that column will also only be visible on desktop).

Funnel Colors
VIEW/ADD COLORS
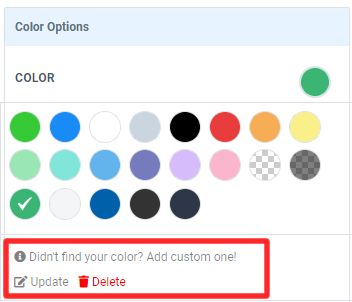
To view the funnels colors, click on any element to bring up Color Options in the General tab and click on the filled circle. To add a new color, click on Add Custom One. Type in the hex code and press Add Color to save.
To update an existing color, first click on the color and then choose Update. Add the new hex code and press Update Color. Updating a custom color will update all the elements on the page that use that color.
To delete an existing color, first click on the color and then choose Delete and click OK to confirm. Deleting a color will make any elements on the page that had that color transparent.
TRANSPARENCY
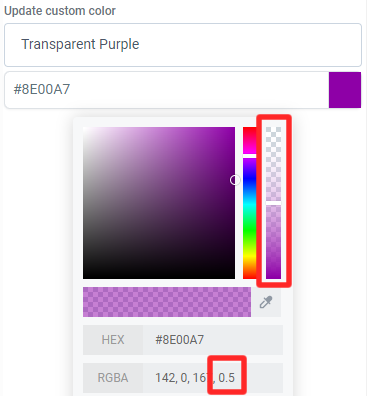
To change the transparency of a custom color, click on the filled square next to the hex code to open additional settings and either use the vertical slider or change the alpha value.
Popup
CREATE A POPUP
To create a popup, click on the Popup Settings icon in the funnel menu bar. When the popup window opens, hover over the plus icon and click on the green + Add Row button. In the right-hand panel, choose the number of columns and then add the required elements.

EDIT THE POPUP SETTINGS
To edit the popup settings, click on the blue Open Popup Settings at the top of the popup window. In the right-hand panel, under the General tab, there are options to change the padding, background color, background image, overlay color and width.
You can also change whether you want to popup to only appear when a button is pressed (None) whether the popup shows on Exit (by default, this is toggled on), or whether it appears after a delay. If Delay is selected, then you will be given additional options to specify the numbers of seconds you want the delay to be.
In the right-hand panel, under the Advanced tab, there are options to change popup border (including style, width and color) and the border radius. There is also the option to add a box shadow.
Cookies and Funnel Compliance
COOKIE CONSENT
If your funnel collect personal data or has tracking code (such as a Meta pixel or Google Analytics), you may need a cookie notice (depending on where you operate and where your website visitors are from). If either your business or customers are based in the UK or Europe, you will need cookie consent. Click here to read the GDPR regulations. If your business is based in Australia, you may need cookie consent. Click here to read the APP regulations.

COOKIE CONSENT
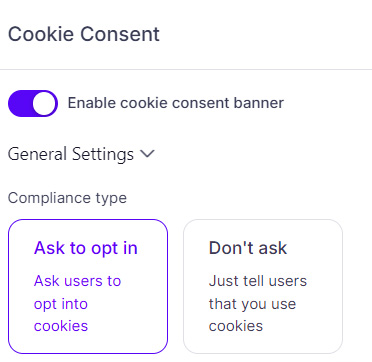
1. To add a cookie notice, click on the Cookie Consent icon in the top menu bar.
2. Toggle on Enable Cookies in the right hand panel and check the box on the popup window to show that you understand the information.
3. Under General Settings, choose the Compliance Type (whether you want users to opt in or whether you just want to inform them that you use cookies).
4. Edit the Message Description as required and choose whether you want to provide a link to your privacy policy.
5. To change the style of the cookie notice, expand the Styling Options box and edit the fonts and colors.
6. Press Save to save changes and then press Publish when complete.
Funnel Stats and Settings
FUNNEL BUILDER TABS
After you have created a new funnel or clicked on an existing funnel, there four different tabs to set up your funnel (Steps, Stats, Sales and Settings).
Steps – View all your funnel steps/pages. There are three tabs for Overview (to edit or preview your funnel steps), Products (to view or create products associated with the funnel page), and Publishing (where you can update the step name and path also known as the slug).
Stats – View the statistics for each step in your funnel including page views, opt-ins, sales, and earnings per pageview for a selected date range.
Sales – For older funnels (version 1), this tab allows you to track any transactions that have happened within a selected date range. For newer funnels (version 2), go to Payments > Transactions.
Events - Send tracking events data to Meta. Click here for more information about Meta events.

FUNNELS SETTINGS
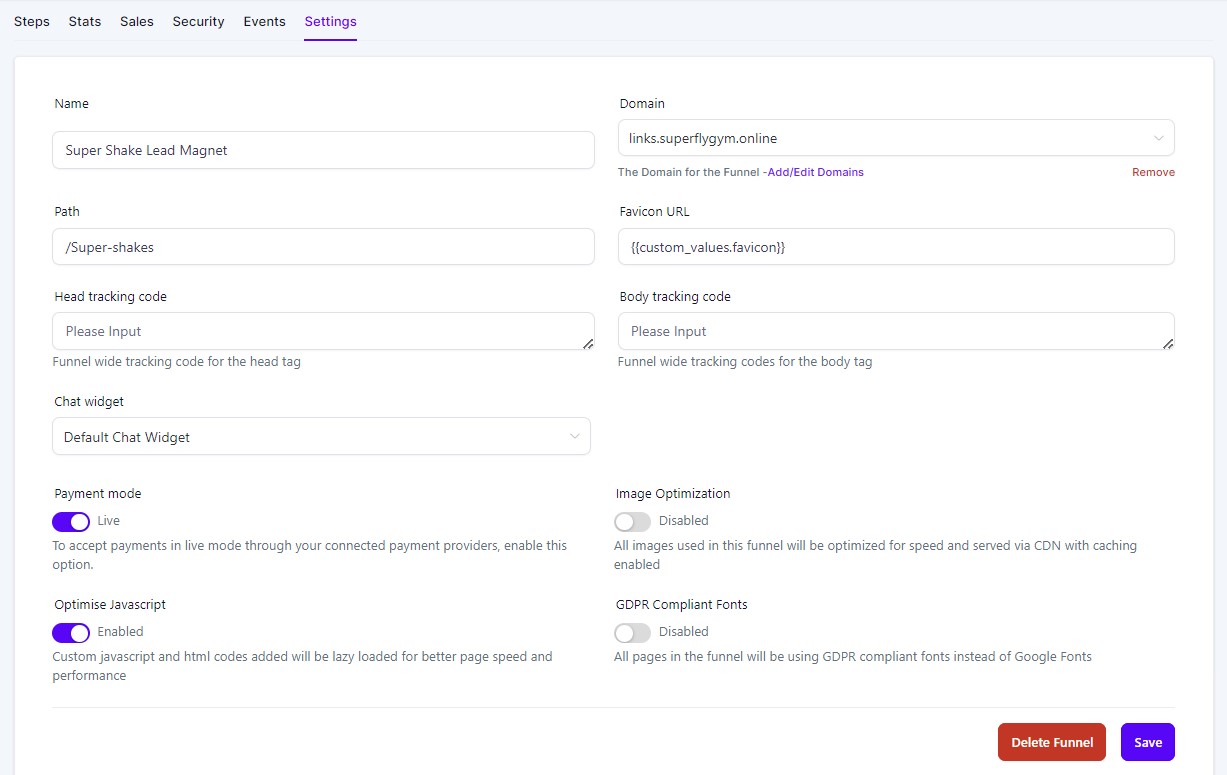
Update the name and path, connect a domain, add a favicon URL, change the payment mode, and select a chat widget. You can also include Head and Body Tracking Code (scripts that run on each funnel step, such as chat widget and analytics).
ADD DOMAIN
To add an existing domain to the funnel, select the domain from the dropdown menu in the funnel settings and press Save.
Click here for more information about creating a new domain.
ADD A FAVICON
A favicon is also known as a tab icon, URL icon, bookmark icon, and more. It is an image file containing one or more icons associated with a particular site or page. To add a favicon, paste your favicon URL into the funnel settings. You can also use the custom value (see above image) to add your default favicon.
ADD CHAT WIDGET
To add the chat widget to your page, open the drop down list and select the required widget. You can preview the funnel or website, and refresh the page to view what the widget will look like for contacts visiting your funnel/website page.
Click here for more information about editing the chat widget.
IMAGE OPTIMISATION
You can also toggle on Image Optimisation to optimise images for better loading speed. Click here for more information about image optimization.
TRACKING CODE
You can add tracking code to your funnel by adding code to either the Header Tracking Code box or the Body (Footer) Tracking Code box, as required by the third party tool. Click here for information about adding Google Analytics code.
Analytics
A/B PAGE TESTING
You can create two pages in order to test the copy and/or design of your landing pages.
1. Go to Sites > Funnels. From the list, click on an existing funnel and go to the step that you want to split test.
2. Click + Create Variation and choose whether you want to duplicate the existing page (Create a Duplication Variation) or start from scratch with a completely new page (Create from Blank). If you have pressed this in error, click on the cross in the top left-hand corner to close the window.
3. Click Edit Page to make changes to the variation page. There are also options to Preview Page and Delete Page. After making the required changes to the variation page, press Save.
4. Using the slider, choose the percentage split of traffic that you want each page to receive. Press Start Split Test to complete the set-up. You can choose to split-test using multiple domains.
5. You can access performance statistics from the same dashboard.
IMPORTANT! This will change the link of the funnel from mywebsite.com/page to mywebsite.com/s/page. You will need to direct traffic to this new link.
Analytics
ANALYTICS
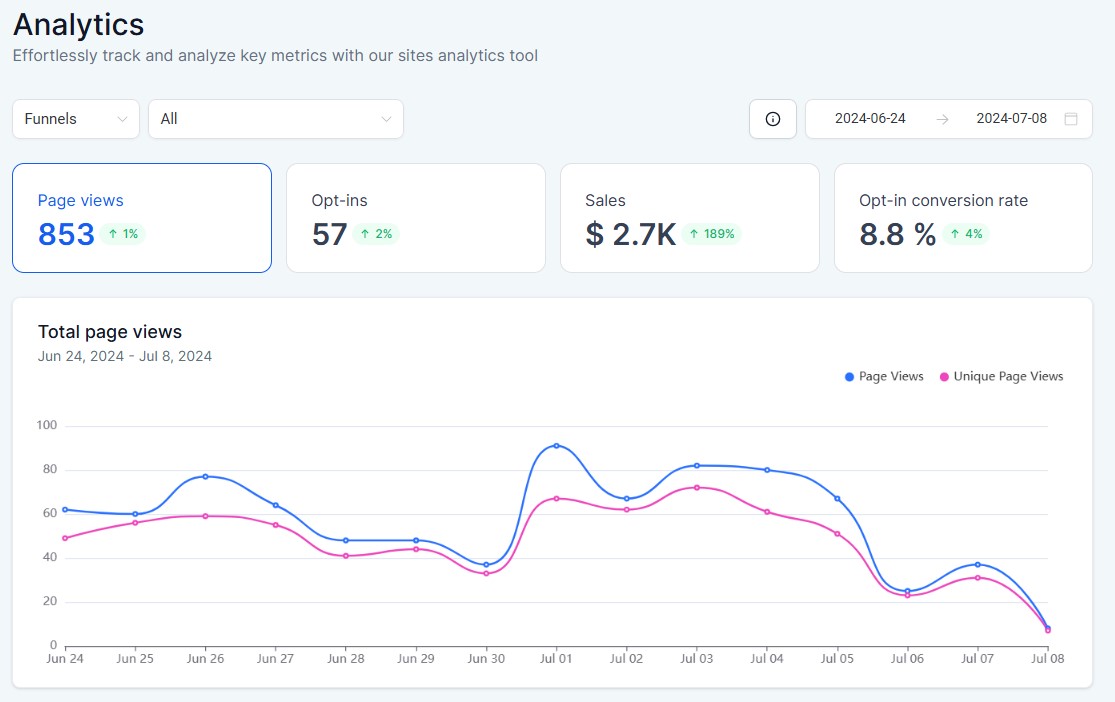
In addition to the statistics found in Settings for an individual funnel, you can also track and analyze key metrics in Sites > Analytics. You will can filter by type (funnels or websites), by funnel name and by date.
The page will give you information about overall page views, unique page view, opt-ins, sales and opt-in conversion rate.

If you have a quick, system-specific "how-to" question, you can chat with our L1 Technical Support Team using the purple chat bubble in the bottom corner of the software. This team offers live chat 24/7, giving you instant access to help at any time of day.
If you have a more complex or outcome-specific “how-to” question, or a query about project requests, done-for-you resources, or Coach Catalyst, you can email our L2 Specialist Team at [email protected]. This team is available Monday to Friday, 8:00am – 1:00pm (EDT).
© 2026 SuperCoach CRM