
Contacts
Created by: Emma Johnston
Last Updated: June 25, 2024
Contacts Dashboard
CONTACTS
Click on Contacts. The main page displays a list of all your contacts and basic information like name, phone number, email, when they were created, last activity, and tags.
CHANGE DISPLAY COLUMNS
By dropping down the Columns menu at the top, you can update which columns are displayed.

SEARCH
You can also use the Quick Search feature to search by name, email, business name, tag, or phone number.
SORT COLUMNS
By clicking on the triangles by a column name, you can order that column by ascending or descending order.
FILTERS AND SMART LISTS
You can filter your contacts by any standard field, custom field, tag, or pipeline stage. You can also create Smart Lists.
See the Smart Lists page for more details/instructions.
BULK ACTIONS
You can perform a range of one-off actions to selected or all contacts, such as an email or SMS, adding/removing a tag, adding to a workflow, updating a pipeline stage or sending a review request.
Click here for more information about Bulk Actions.

Contact Actions
EDIT A CONTACT
1. Click the name of the contact you wish to edit.
2. Fill in the information you wish to change or update in the appropriate field (i.e. first name, email address, phone number).
3. Scroll to the bottom of the page and click Save.
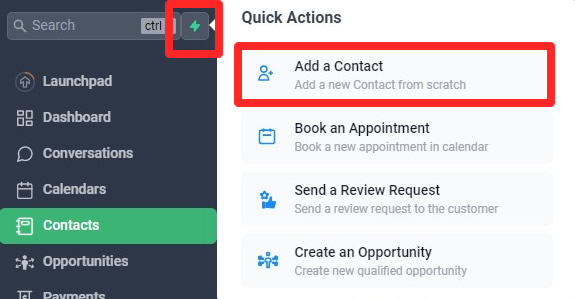
QUICK ADD
1. Click on the green lightning bolt icon at the top of the main left-hand menu and select Add a Contact.
2. Enter contact information, such as name, email, phone number, and timezone.
3. Press Save.
4. Once completed, refresh the page.
ADD A CONTACT
1. Click on the Add Contact icon.
2. Enter contact information, such as name, email, phone number, and time zone.
3. Press Save.
4. Once completed, refresh the page.

DELETE A CONTACT
Deleting a contact will remove them from conversations, notes, opportunities, tasks, appointments, manual actions, and campaigns. This will remove the selected contacts from the system entirely.
1. Click the Delete Contact icon on the top menu bar.
2. In the popup window, click Delete Contacts to confirm the deletion.
3. Once completed, refresh the page.
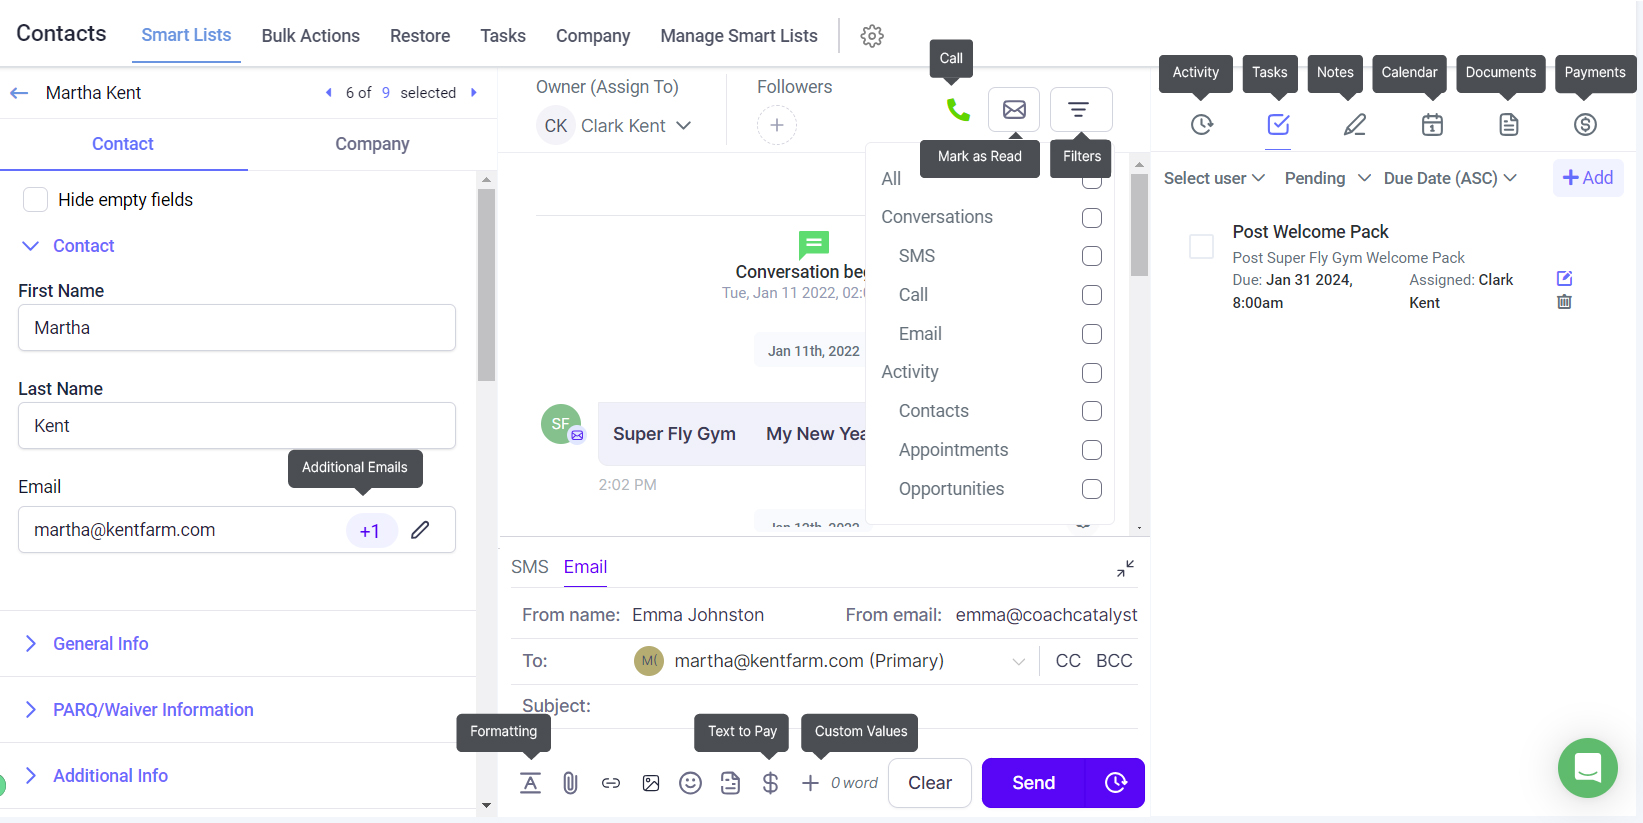
Contact Information
VIEW A CONTACT
Click the name of the contact you wish to view.
ASSIGN CONTACT
You can view/edit who a contact is assigned to in the top left corner of the center panel.
CONTACT INFORMATION
In the panel on the left, you see collapsible sections for contact information, general information, additional information and custom field folders. The appearance and order of these sections and fields can be customized in Settings > Custom Fields. You can also Hide Empty Fields.
Click here for more information on Custom Fields.
EDIT CONTACT INFORMATION
If you edit or add any contact information, press the green Save button to save the changes.
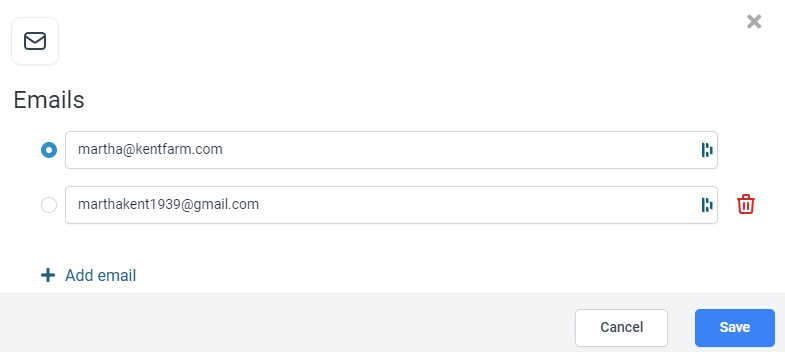
ADDITIONAL EMAIL ADDRESSES
If you need to enter more than email address, click the Edit icon next to the Email field. In the popup window, enter the additional email addresses and press Save to confirm. If you need to add more than one additional email address, click + Add Email.
To change the primary email address, click on the radio button. To delete an email address, click on the red Trashcan icon.
ADDITIONAL PHONE NUMBERES
If you need to enter more than phone number, click the Edit icon next to the Phone field. In the popup window, enter the additional phone number (including the type of number) and press Save to confirm. If you need to add more than one additional phone, click + Add Phone Number.
To change the primary phone number, click on the radio button. To delete an phone number, click on the red Trashcan icon.

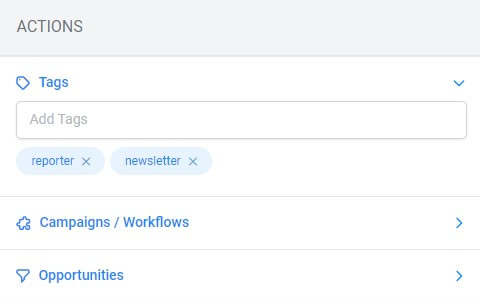
ACTIONS TAGS
If you scroll down to the bottom of the left panel to the ACTIONS section, you will view, add and delete contact Tags.
ACTIONS WORKFLOWS
If you scroll down to the bottom of the left panel to the ACTIONS section, you can view active and past Workflows. You can also add the contact to a new Workflow.
ACTIONS OPPORTUNITIES
If you scroll down to the bottom of the left panel to the ACTIONS section, you can view current Opportunities to see which pipelines a contact is currently in, and add the contact to a new Pipelines.
MEMBERSHIP OFFERS
If you want to manually add a membership offer to a contact, scroll down to Offers at the bottom of the left hand panel and select the offer from the dropdown list.
Do Not Disturb DND
DO NOT DISTURB
If you scroll down to the bottom of the left panel of the contact card, you can also see DND preferences by channel (Do Not Disturb). This might happen, for example, if a contact has unsubscribed from your newsletter or emails.
If a contact has a DND channel enabled, you can click the i icon in the configuration to learn more.

SMS/TEXT MESSAGE DND
If DND is enabled for text messages/SMS messages, it is not possible to manually override this setting. To disable DND for text messages/SMS messages, a contact will need to text START to your business phone number.
Conversation History and Messages
CONVERSATION HISTORY
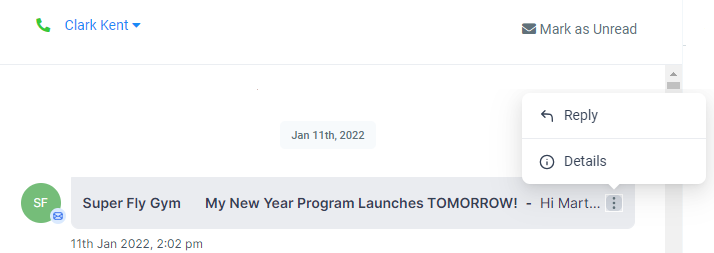
In the center panel, you can see conversation history and send them an message or an email. To view/expand a previous thread, click on the grey box. To reply to the thread, click on the vertical ellipsis menu (three dots) and select Reply.
You can scroll up and 'fetch older messages', depending on the length of history of conversations you've had with the particular contact. To mark messages as read or unread, click on the option in the top right corner of the center panel.
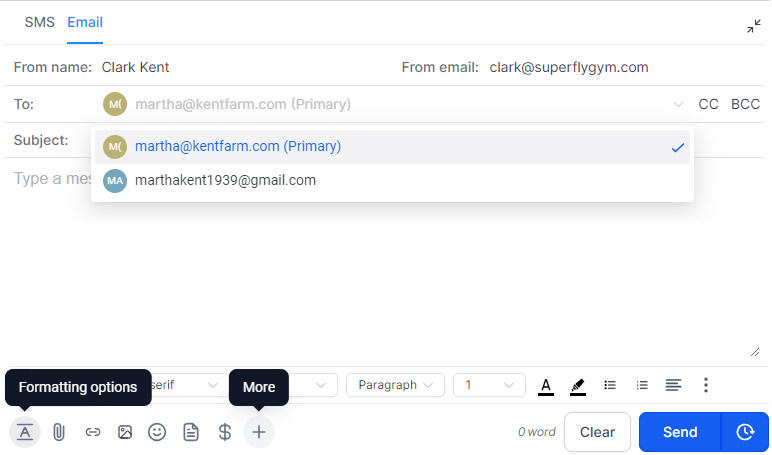
SEND MESSAGES
You can send a message to your client from the center panel.
1. Click on the Expand icon to expand the bottom window.
2. Select the type of message you want to send (these options will change for each client depending on the contact information you have for them. For SMS and Email, you have to options to Use a Template or Request Payment.
Click here for more information on Text to Pay.
3. Write your message as required. You can click the Formatting Options icon to bring up the formatting toolbar and the More icon to add custom values.
4. Press Send or Schedule to finish.
Emails will default to the primary email address for the contact. To change to another email address, open the dropdown menu on the To field. You can click on CC or BCC to add additional recipients.
Additional Information
ACTIVITY
In the right panel, click on the Activity icon to view all past activity for the client. The section shows any funnel or website page the contact has visited, any forms or surveys that have been completed, and any trigger links that have been clicked. It also shows first attribution source as well as latest attribution source.
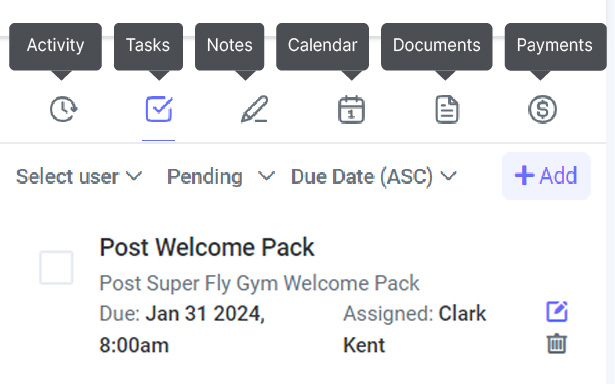
TASKS
In the right panel, click on the Tasks icon to view all tasks. To edit an existing task, click on the Edit icon (pencil). To delete a task, click on the Trashcan icon. To create a new task, click on + Add in the top right corner. You can also add tasks as a workflow action.
NOTES
In the right panel, click on the Notes icon to view all notes. To edit an existing note, click on the Edit icon (pencil). To delete a note, click on the Trashcan icon. To create a new note, click on + Add in the top right corner. You can also add notes as a workflow action.
APPOINTMENTS
In the right panel, click on the Appointment icon to view all appointments. To edit an appointment time/date or status, click on the Edit icon (pencil). To delete/cancel an appointment, click on the Trashcan icon. To create a new appointment, click on + Add in the top right corner.
DOCUMENTS
In the right panel, click on the Documents tab to view documents. You can search for documents by name in the Search Box. To add a new document, click on the + Add button. Maximum size limit is 250 MB and file types supported includes PPT, Docs, PDF, and various image formats.
You can also toggle between the four tabs to filter by All, Internal, Sent (documents sent using the client portal) and Received (documents received via the client portal).

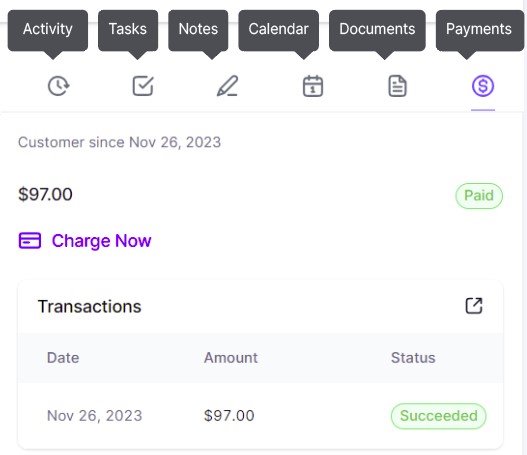
PAYMENTS
In the right panel, click on the Payments icon to view all payments, subscriptions and invoices. You can also take a one time payment by selecting Charge Now.
Merging Contacts and Duplicate Contacts
MERGING CONTACTS
If you have duplicate contacts, you can merge them together. You can merge up to 10 contacts at a time.
See the Bulk Actions page for more details/instructions.
HOW TO ALLOW OR PREVENT DUPLICATE CONTACTS
1. Click on Settings > Business Info > General.
2. Check or uncheck the box to allow or prevent duplicate contact records.
If "Allow Duplicate Contact" is on, the duplicate contact will only work when the system receives a lead from a form or when leads can be manually added. If you try to import a bulk upload, an error will occur.

If you have a quick, system-specific "how-to" question, you can chat with our L1 Technical Support Team using the purple chat bubble in the bottom corner of the software. This team offers live chat 24/7, giving you instant access to help at any time of day.
If you have a more complex or outcome-specific “how-to” question, or a query about project requests, done-for-you resources, or Coach Catalyst, you can email our L2 Specialist Team at [email protected]. This team is available Monday to Friday, 8:00am – 1:00pm (EDT).
© 2026 SuperCoach CRM