Websites
Created by: Emma Johnston
Last Updated: September 01, 2023
Blogs
Create a beautiful blog with our powerful blog post editor which can be used to compose, optimize for SEO and content marketing, and distribute it anywhere to attract readers.
Blog Post Dashboard
BLOG POST DASHBOARD
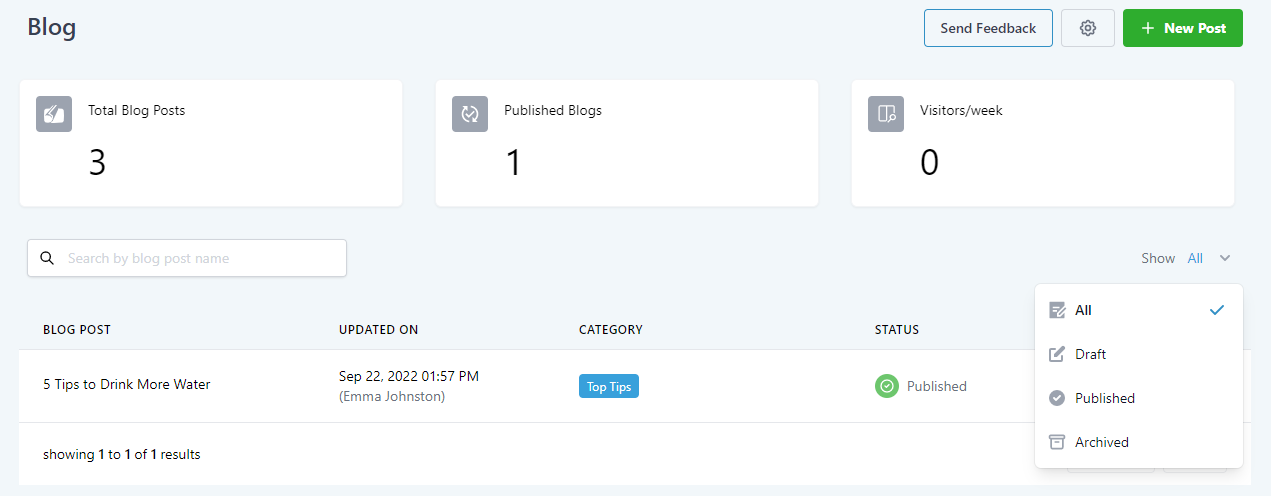
Click on Sites > Blogs to view all blog post and an overview of total blog posts, publish blog posts and visitors per week. You can see blog information such as when the post was last update, category and status. You can search for a blog post by name and filter what posts are shown by status (all, draft, published, archived.

UPDATE A POST
1. To clone a post, go to Sites > Blogs.
2. Either click on the name of the post or click on Actions > Update Post.
3. Make the necessary changes and click Update in the top right corner to save.
4. Check the blog information, making changes where necessary, and press Update to finish.

UPDATE SEO INFORMATION
1. To clone a post, go to Sites > Blogs.
2. Click on Actions > Change Blog SEO Details.
3. Make the necessary changes and click Update Blog Post to save (or cancel).
CLONE A POST
1. To clone a post, go to Sites > Blogs.
2. Click Actions > Duplicate Post.
You can also clone a post in the Blog Page Editor. When editing a page, click on the ellipsis menu (three vertical dots) in the top right-hand corner of the screen, and select Duplicate Post. Press back to return to blog dashboard to access the cloned post.
DELETE A POST
1. To permanently delete a post , go to Sites > Blogs.
2. Click Actions > Delete Post. Press Delete to confirm (or cancel).
You can also delete a post in the Blog Page Editor. When editing a page, click on the ellipsis menu (three vertical dots) in the top right-hand corner, and select Delete Blog Post. Press Delete to confirm (or cancel).
ARCHIVE A POST
1. To archive a post , go to Sites > Blogs.
2. Click Actions > Archive Post.
To view archived post, change the Show dropdown menu.
Create a Blog Post
CREATE A NEW POST
1. Go to Sites > Blogs and click on the green + New Post button.
2. Enter a blog post title, post description and image (which will be used for the SEO Meta Tag). Press + Create Post.
3. Select and delete the template content.
4. Add the content for your blog post using the editor toolbar.
5. Press Save.

BLOG FONTS
To additional font options, click on font option menu in the editor toolbar and select Custom Fonts. Choose your font from the dropdown menu and press Select Font to confirm.
PREVIEW A POST
To get a preview of a post, click on the ellipsis menu (three vertical dots) in the top right-hand corner, and select Preview Post. You can toggle between desktop view and mobile view.
SCHEDULE OR PUBLISH A POST
1. Once you have finished your post, click on the blue Continue button in the top right corner.
2. Enter a URL slug and select a category. You can also add keywords and an author.
3. Select either Publish or Schedule & Publish on the right hand side, choose a date and press Save.
Content AI
CONTENT AI COSTS
Content AI is a premium feature that is charged based on words generated. The first 500 words are free, but, after that, the pricing is $0.15 per 1000 words generated.

CONTENT AI
1. Click on Content AI in the top right corner of the blog editing menu bar.
2. In the popup window, select the type of content you want it to generate (outline, introduction or section).
3. Add a title and brief description.
4. Add keywords, pressing enter between each word (or phrase).
5. Select a writing tone from the dropdown menu and the number of variations you want the AI to generate (from 1 to 5).
6. Select the length of the content (small is around 200 words, medium is around 400 words, large is around 600 words, or custom is up to 900 words).
7. Click Generate Content.
8. On the next window, press copy to add a variation to the Chosen Content box on the right hand side, and edit as required.
8. Press Continue.
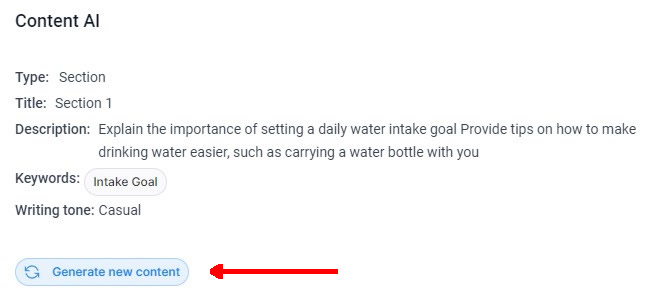
You can use Content AI to first generate an outline of your blog and then generate text for each section. Once you outline is generated, click the Content AI button again and click on Generate New Content. Repeat steps 2 - 8 above. You can copy and paste text from the outline in the description.

Blog Settings
ADD OR EDIT AUTHORS
You can create author from the blog dashboard or the blog publishing screen.
1. Go to Sites > Blogs and click on the Settings Icon in the top right corner of the dashboard.
2. Click + Add New Author. Enter the author name and photo and click + Create Author. You can also add social media links.
To edit or delete an author, click on the three horizontal dots next to the author name.
ADD OR EDIT CATEGORIES
You can create a category from the blog dashboard or the blog publishing screen.
1. Go to Sites > Blogs and click on the Settings Icon in the top right corner of the dashboard.
2. Click + Add New Category. Enter the category label, url slug and description and click + Add New Category. You can also add square image for the category.
To editor delete a category, click on the three horizontal dots next to the author name.
Blog Website Page
CREATE A BLOG POST PAGE
1. Click on Sites > Websites and select the website you want to add the blog to.
2. Click the green + Add New Page button in the top right corner.
3. Enter a name (such as Blog Posts) and enter a path (such as /blog) and click Create New Page. You can either select Use Existing or Create from Blank.
ADD A BLOG POST LIST
4. Create a new section, add a row with one column. Add an element and select Blog Post List.
5. Use the General and Advanced settings in the left hand panel to make any required changes (such as changing the blog type/layout or pagination) and press Save. You can also add other elements to the page, such as a global header or footer.
6. Once finished, you will need to edit your navigation bar to include your new blog page.

BLOG CATEGORY NAVIGATION
You can also add a navigation menu and search bar to the blog page.
1. Add an element and select Category Navigation.
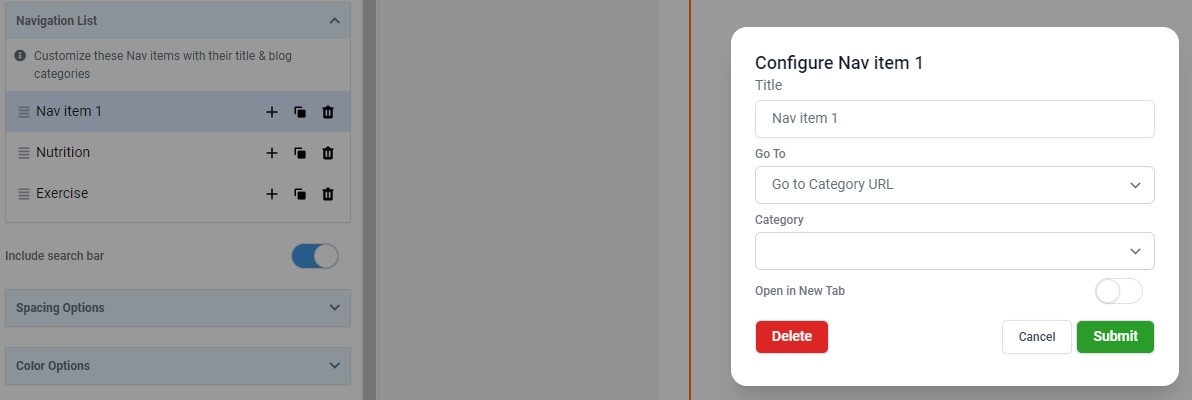
2. To edit the navigation menu items, click on the Navigation bar and go to the Navigation List section in the General tab in the left hand panel. Click on Nav Item 1 and add a Title and Category. Press Submit to confirm.
3. Repeat this process to edit the other menu items. You can also rearrange items, add new items, clone items and delete items.
4. Use the General and Advanced settings in the left hand panel to make any other required changes (such as changing the blog type/layout or pagination) and press Save.

Blog RSS
BLOG RSS FEED GENERATOR
RSS is a way to send our updated content on your blog without pasting the link every time for the new blog.
1. Go to Sites > Blogs, click on the Settings Icon in the top right corner of the dashboard and select the RSS tab.
2. Set a maximum number of blogs for the feed either by typing in a value or using the plus/minus buttons (minimum is 1, maximum is 100).
3. Copy the URL and share it with your RSS aggregator.

If you have a quick, system-specific "how-to" question, you can chat with our L1 Technical Support Team using the purple chat bubble in the bottom corner of the software. This team offers live chat 24/7, giving you instant access to help at any time of day.
If you have a more complex or outcome-specific “how-to” question, or a query about project requests, done-for-you resources, or Coach Catalyst, you can email our L2 Specialist Team at [email protected]. This team is available Monday to Friday, 8:00am – 1:00pm (EDT).
© 2026 SuperCoach CRM