
Smart Lists
Created by: Emma Johnston
Last Updated: May 12, 2025
Filters
You can filter your contacts by any standard field, custom field, tag, or pipeline stage. You can even filter leads with no activity within a certain time frame. Once the list is filtered, you can do bulk actions (such as adding or removing a tag, sending an SMS message or email, changing a pipeline stage, or deleting those contacts).

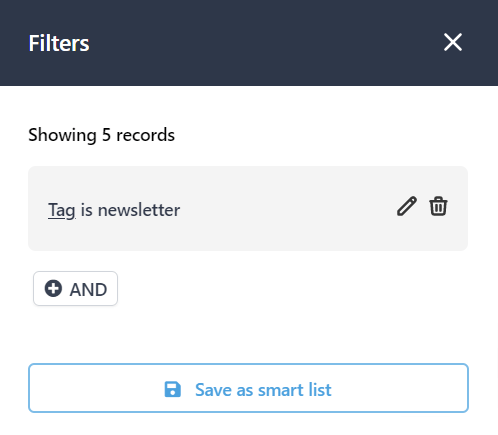
FILTERS
1. Click on Contacts and then click on the More Filters button on the right-hand side of the toolbar.
2. Either search for the filter you want to use in the search box or scroll down the list.
3. Once the field or tag is selected, choose from the radio options or drop-down list below.
4. Click Apply.
5. If you need to add an additional filters, click on the + AND or +OR buttons and repeat steps 2 - 5.
AND includes both filters, OR includes either filter.
6. Once finished, close the Filters window. When a list is filtered, a blue number appears on the More Filters button to indicate the number of filters applied.
NOTE: If you want to filter by Tag 1 OR Tag 2, click on Any Of. If you want to filter by Tag 1 AND Tag 2, you would need to add the second tag as an additional filter.
EDIT A FILTER
1. To edit an individual filter, click More Filters and click on the Edit icon next to the filter name.
2. Make the required changes and then click Apply.
DELETE A FILTER
To remove an individual filter, click More Filters and click on the Trashcan icon next to the filter name.
Smart Lists
Smart Lists are a great way to organize contacts. They are helpful when sending marketing emails or performing bulk actions quickly.
SAVE A SMART LIST
1. Once a list is filtered, you can create a smart list by clicking Save as Smart List at the bottom of the Filters window.
2. Type in a name for your smart list and press Save. This will create a new tab at the top.
CHANGE SMART LIST FILTERS
To make changes to a smart list's filters, click on More Filters. Edit or delete filters as required. Press Save to update that smart list or press Save as New to create a new smart list.
Manage Smart Lists
MANAGE SMART LISTS
To rearrange, clone, share, edit or edit your Smart Lists, go to Contacts > Manage Smart Lists.
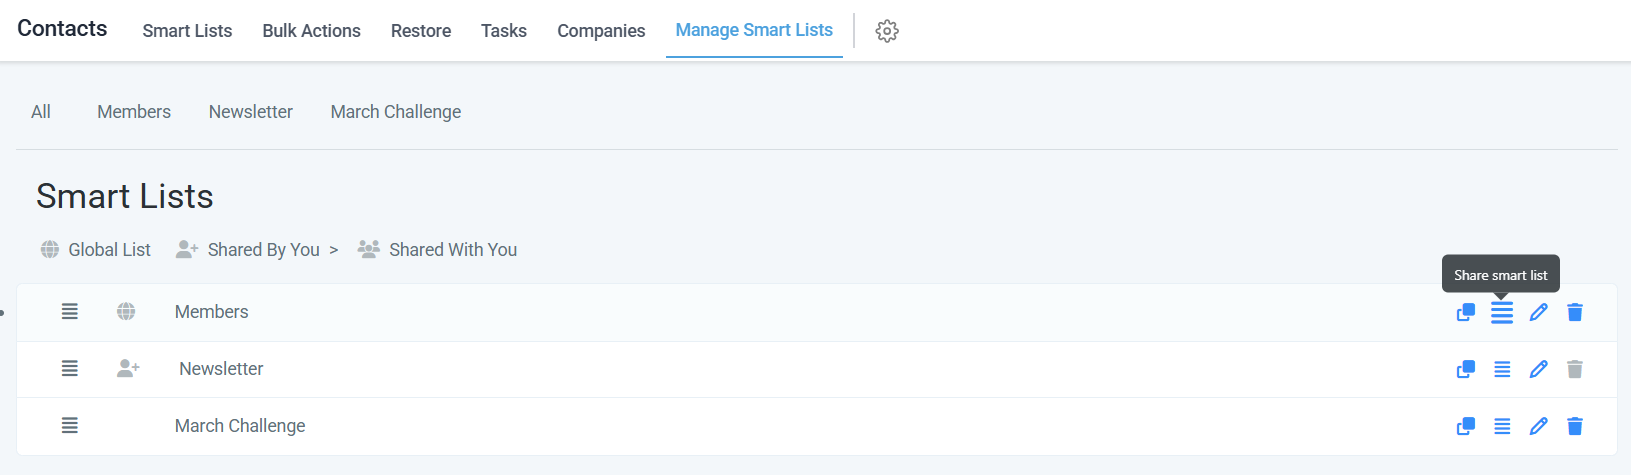
SHARING A SMART LIST
If you want other team members to see a smart list, you must share it. Click on Share Smart List (four blue horizontal lines). Either select Share With All Users (Global) or select the required team members. Press Save to exit.
COPY A SMART LIST NAME
To copy an existing smart list, click on the Clone icon on the left. Enter a name for the new list and press Save to exit.
EDIT A SMART LIST NAME
To edit the name of a smart list, click on the Pencil icon on the left. Edit the name as required and press Save to exit.
DELETE A SMART LIST
To delete a smart list, click on the Trashcan icon on the left and press OK to confirm.
REORDER YOUR SMART LISTS
To rearrange the order that your smart lists appear in Contact, click on the four grip lines on the right to reorder the smart lists.

If you have a quick, system-specific "how-to" question, you can chat with our L1 Technical Support Team using the purple chat bubble in the bottom corner of the software. This team offers live chat 24/7, giving you instant access to help at any time of day.
If you have a more complex or outcome-specific “how-to” question, or a query about project requests, done-for-you resources, or Coach Catalyst, you can email our L2 Specialist Team at [email protected]. This team is available Monday to Friday, 8:00am – 1:00pm (EDT).
© 2026 SuperCoach CRM