
Coach Catalyst
Created by: Emma Johnston
Last Updated: August 28, 2025
Coach Catalyst Automations
When someone completes a form (for a free program) or buys a program through a two-step order form (in a funnel), they can be automatically added to a Coach Catalyst program by using a workflow. You can also add them to a Community and Resource Folder.
Workflow and Trigger
CLONE THE WORKFLOW
1. Click on Automation > Workflows and locate the Purchase Automations template you want to use. There is a general template in CP Template Workflows folder or program specific templates in the CP Marketing/Automations folder.
Using a template will ensure that all of the four required action steps are set up correctly.
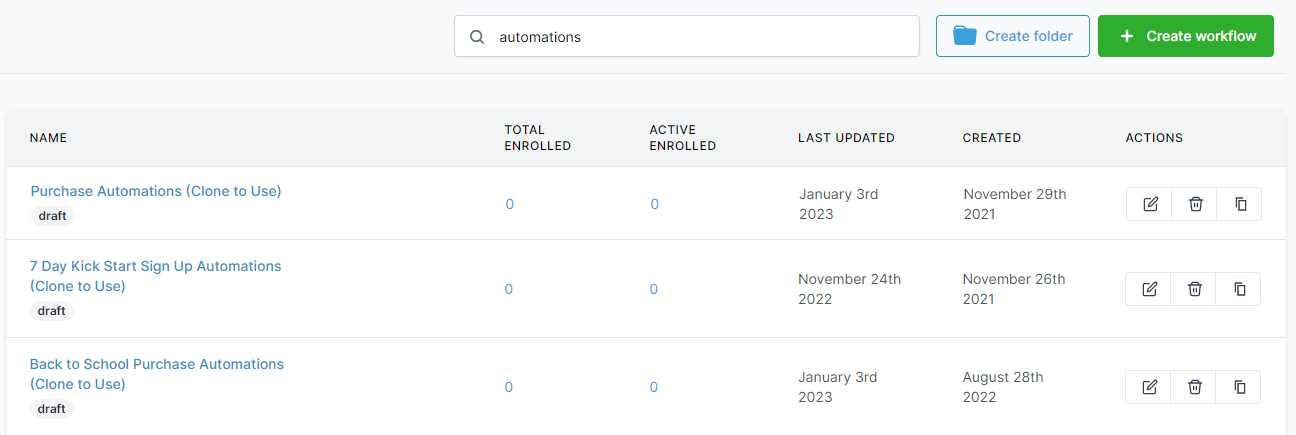
2. Click on the Clone icon on the right-hand side. In the popup window, rename the workflow and press the green Create button.
3. Hover over your new workflow, click Actions > Move to Folder and either move it to a new folder or out of the current folder. Press Save.
EDIT THE WORKFLOW TRIGGER
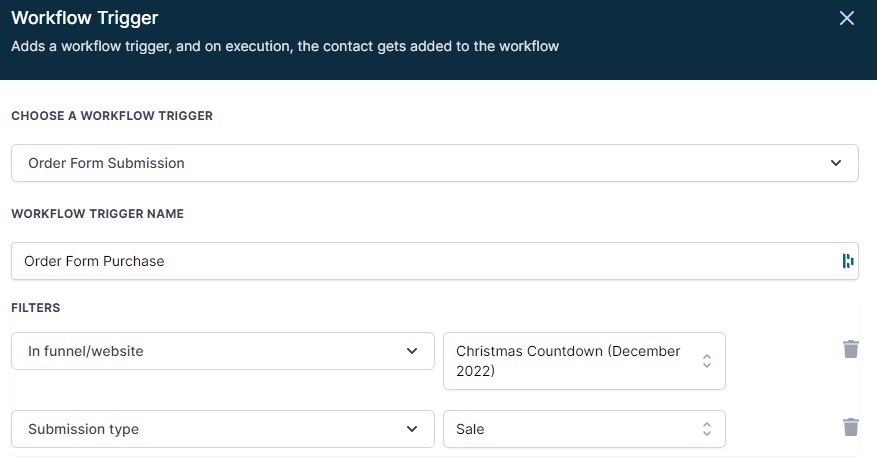
4 . Open the workflow trigger in the white box at the top of the workflow. For paid programs, choose Order Form Submission as the workflow trigger. In Filters, choose the required funnel/website and set the submission type to Sale.
For free programs, choose Form Submission as the workflow trigger. In Filters, select Form Is and choose the correct form.
Coach Catalyst Program
ADD COACH CATALYST PROGRAM
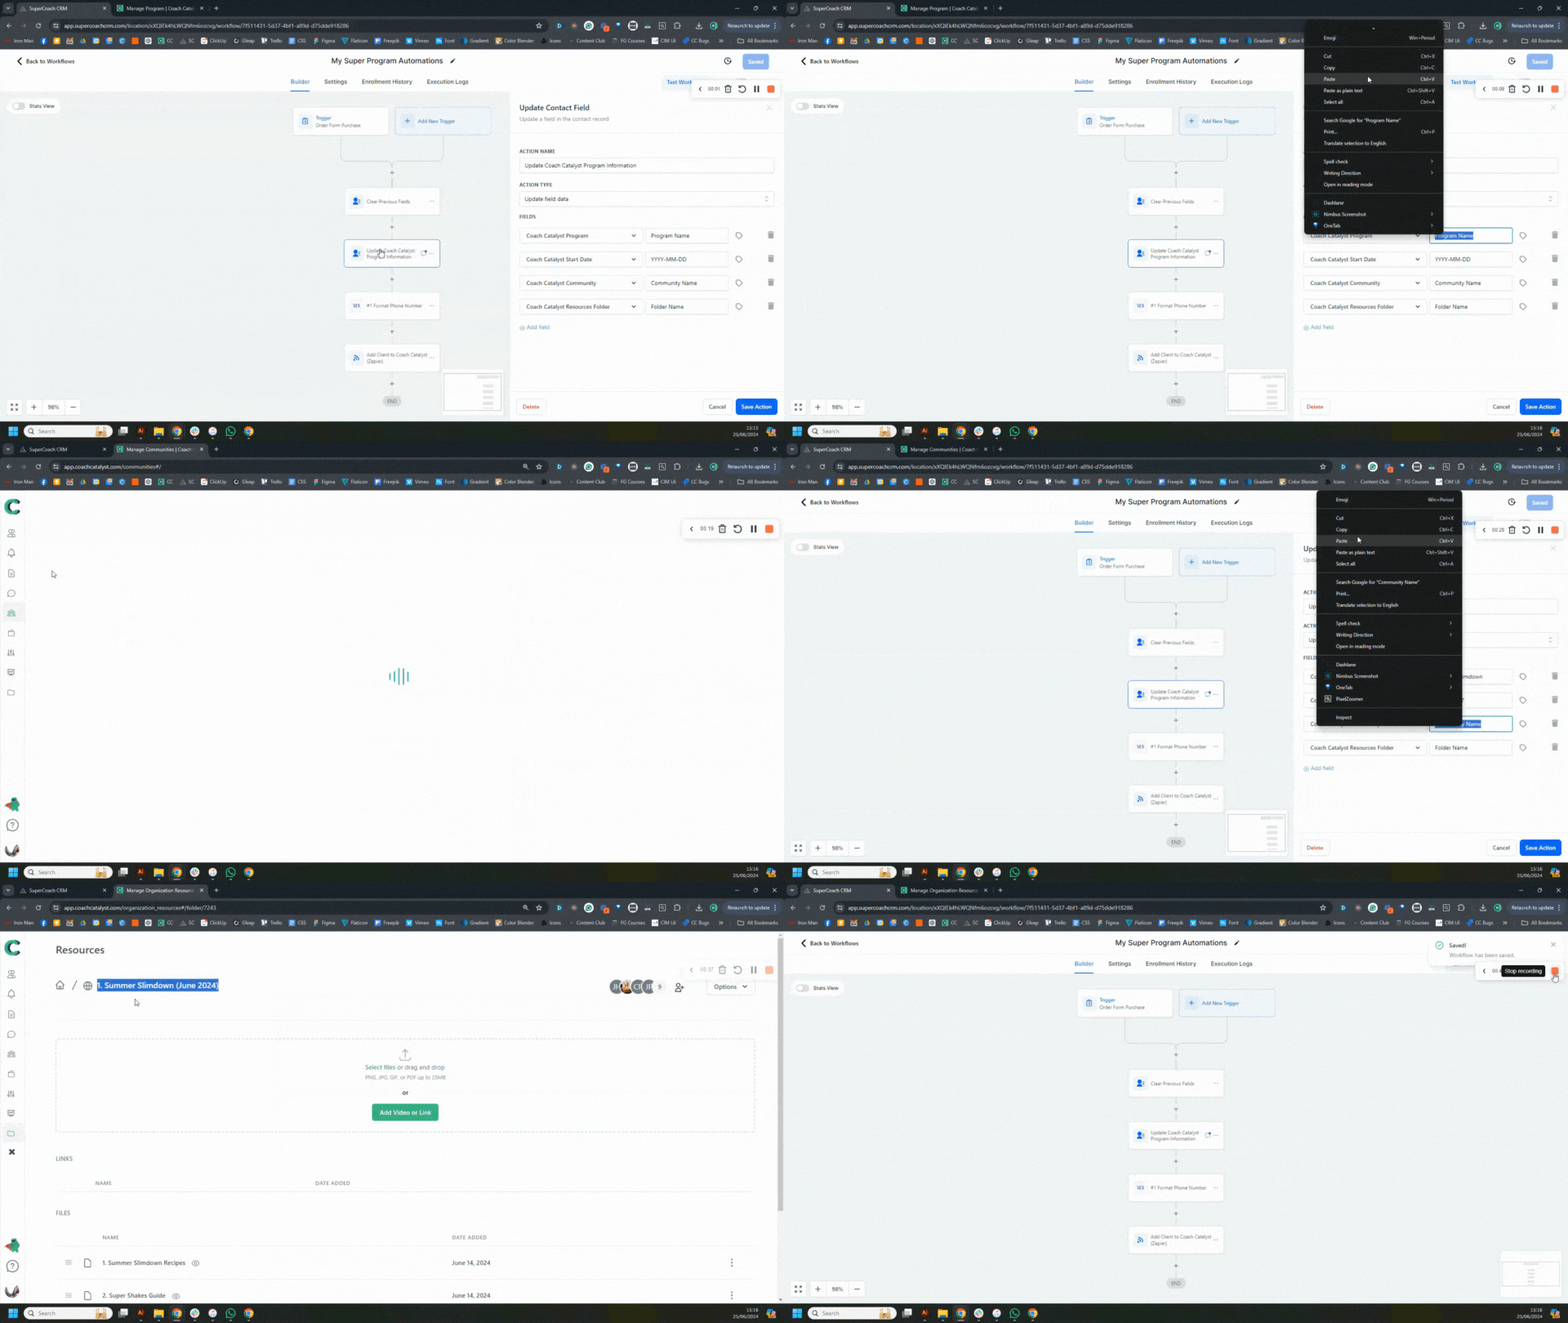
1. Click on the Coach Catalyst Program Information step.
2. In a second tab, open Coach Catalyst and select Programs from the left hand menu.
3. Find the program that you want to add the contact to and copy the name of the program.
4. In SuperCoach CRM, go to the workflow and paste the name of the program into the Coach Catalyst Program field.
The program name must be an exact match to the information in Coach Catalyst. If you change your program name, you need to update the workflow (otherwise the automation will fail). If you do not want to add the client to a program, click on the Trashcan icon next to both the program field and date field.
NOTE: If you change your program start date or program name, you need to update the workflow (otherwise the automation will fail).
Start Date, Day or Tomorrow
You can start a Coach Catalyst program on a specific date, day or tomorrow. The template is set up for a specific date, but this can be changed. You can also start a client on a program immediately (click here for more details).
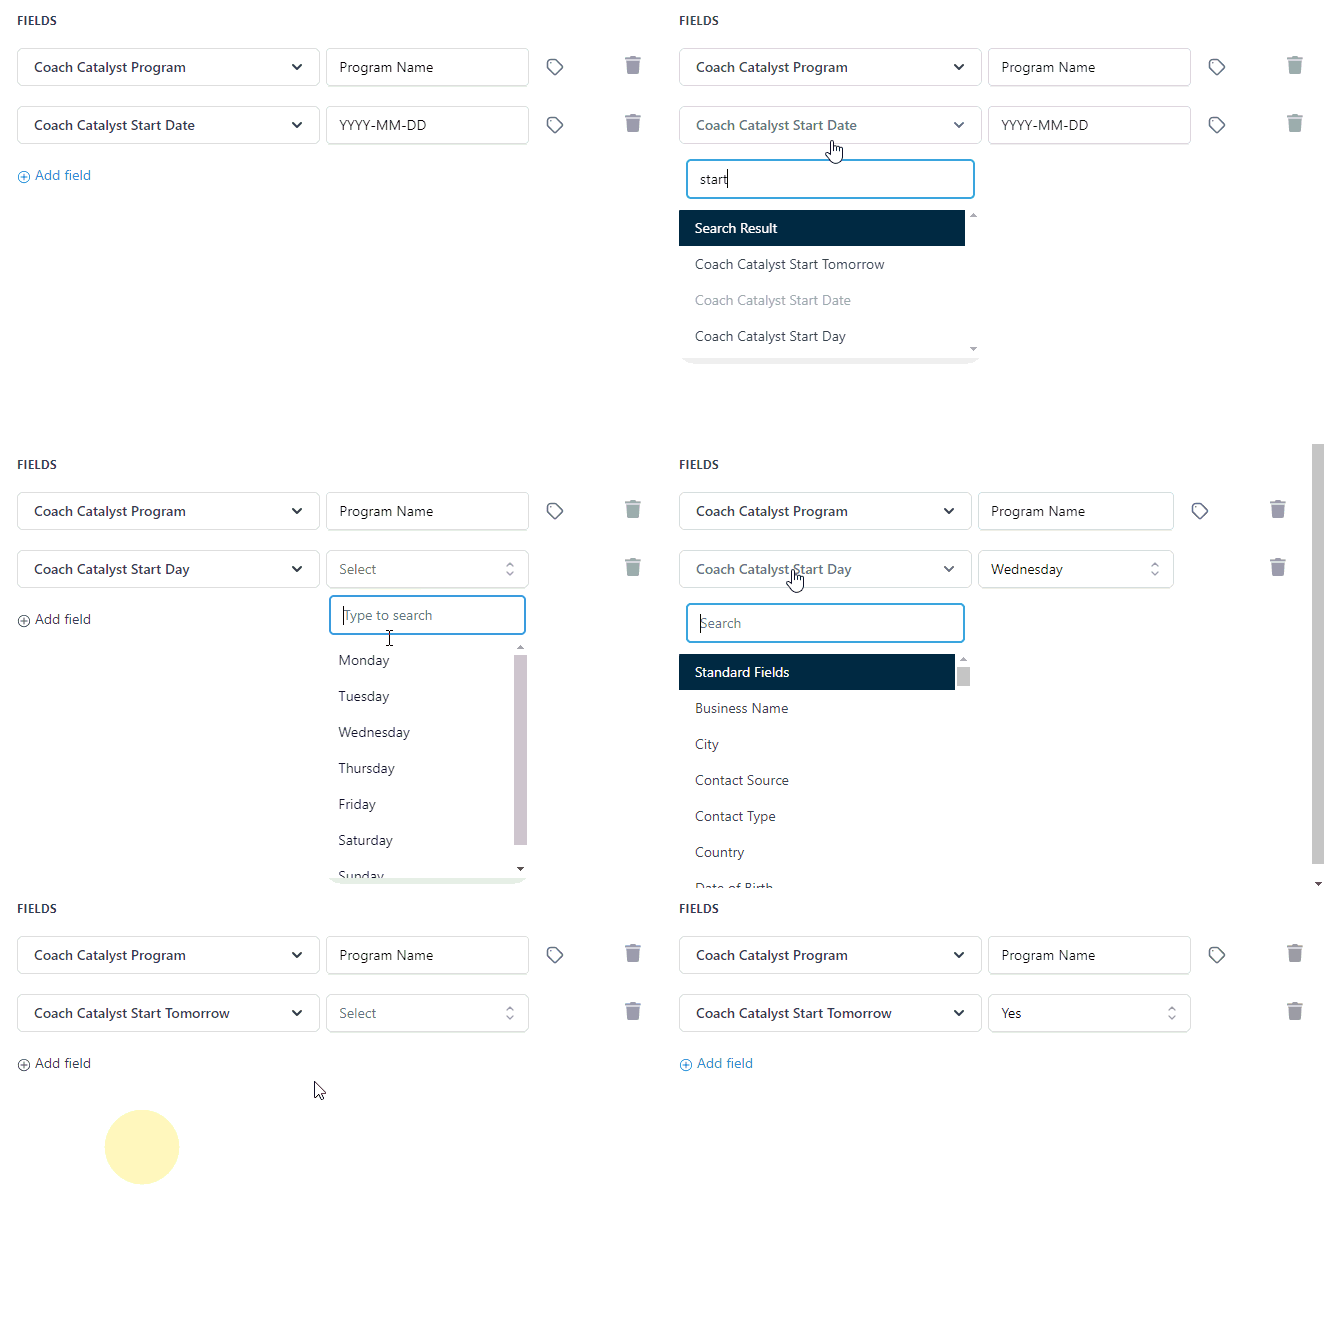
1. In the Coach Catalyst Program Information step of the workflow and locate the Coach Catalyst Start Date field.
2. You can start a program on a specific date, day or tomorrow.
Specific Date - If the program starts on a specific date, enter the date in the format YYYY-MM-DD.
Specific Day - Click on the dropdown arrow next to the start date and search using the term 'start'. Choose Coach Catalyst Start Day and select the required day.
Tomorrow - Click on the dropdown arrow next to the start date and search using the term 'start'. Choose Coach Catalyst Start Tomorrow and select Yes.
3. Add/edit any other required steps.
4. Toggle on Publish and press Save.
Immediate Start
IMMEDIATE START
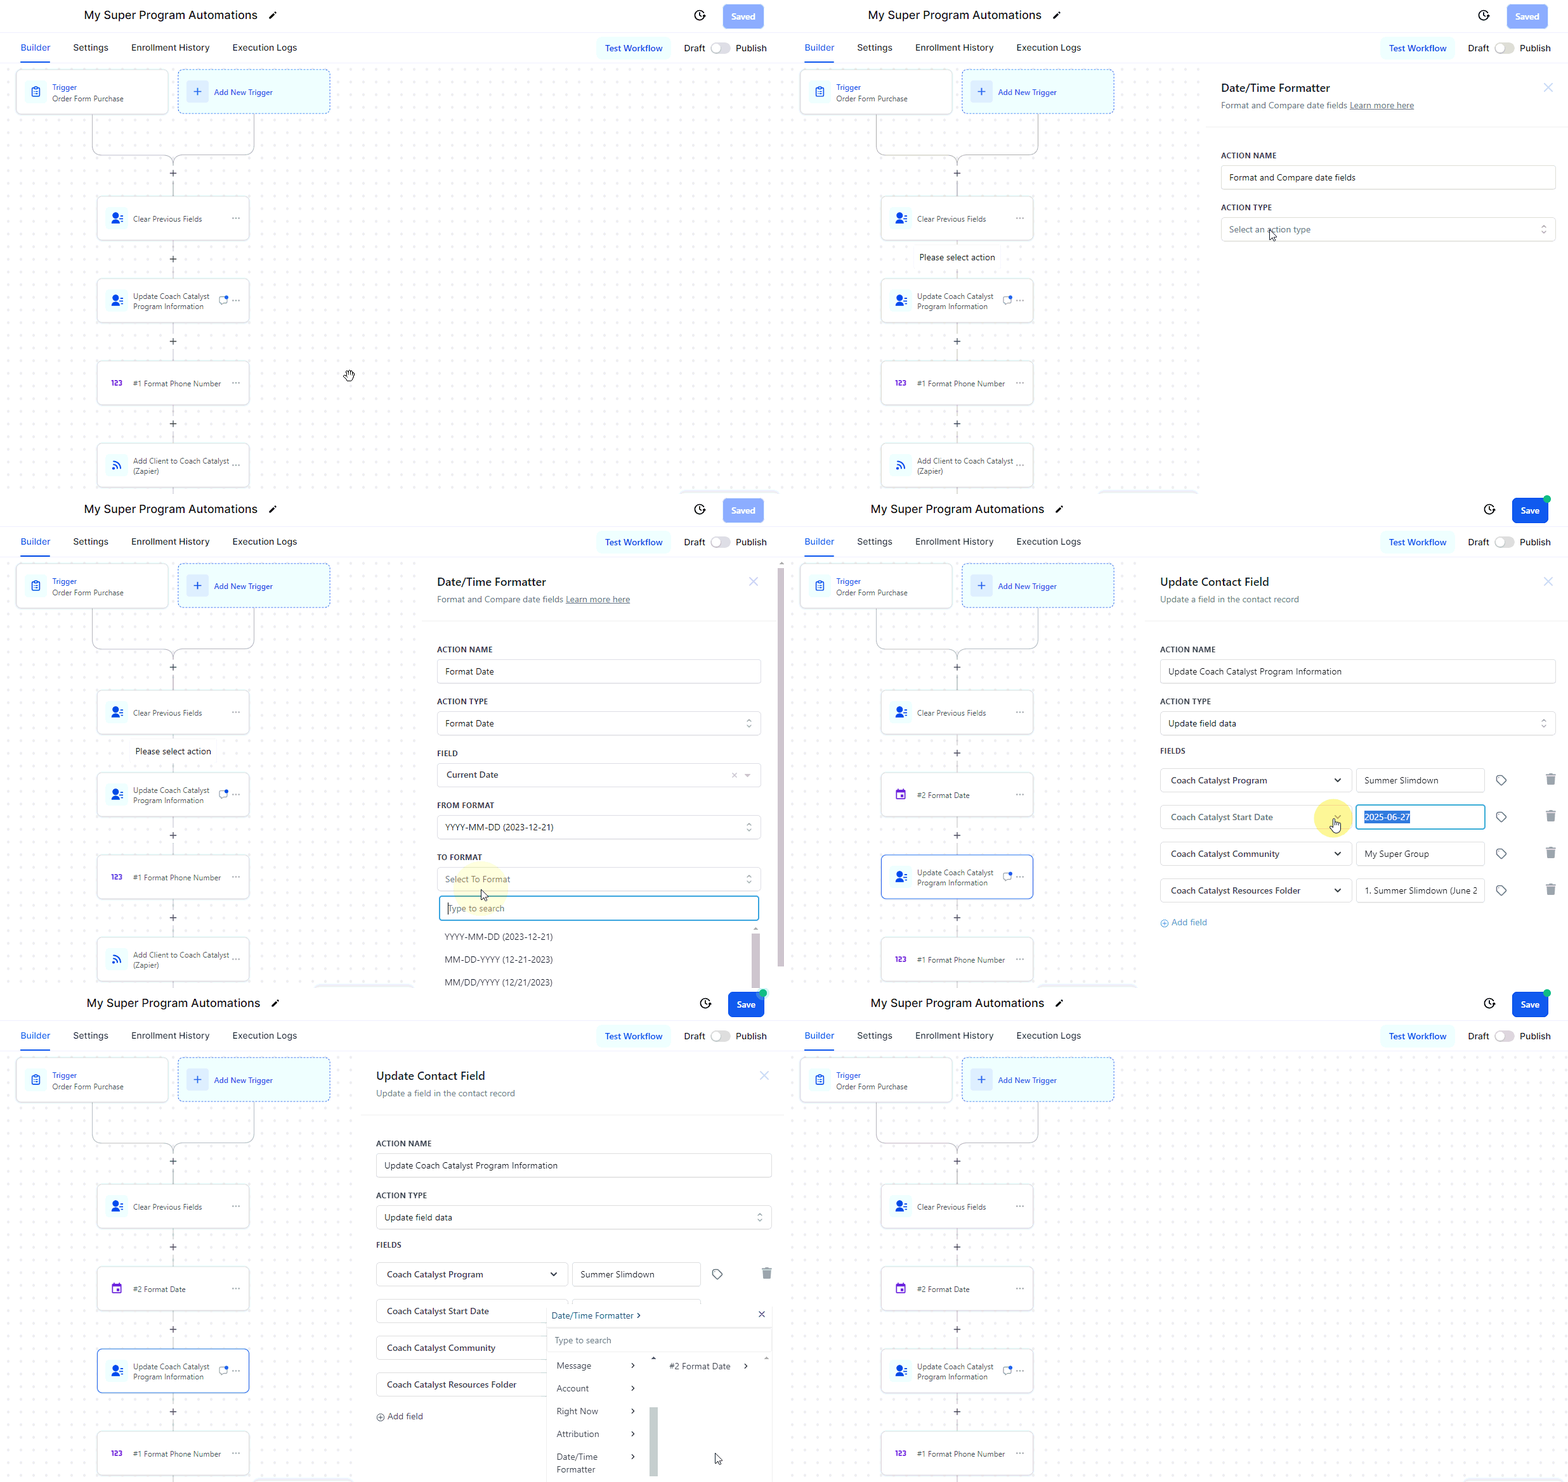
If you want an immediate start (instead of tomorrow), you can achieve this by using additional formatter step.
1. Click on a + in the workflow (above the Coach Catalyst step) and search Date/Time Formatter.
2. Choose Format Date for the action and select Current Date in the field.
3. Choose YYYY-MM-DD for both the From Format and the To Format. Press Save Action.
UPDATE START DATE STEP
4. Open the Coach Catalyst Program Information action step. For the Coach Catalyst Start Date, click on the Tag icon next to the date and select Date/Time Formatter > #1 Format Date > Date from the list. Press Save Action.
5. When finished, toggle on Publish and press Save.
Community
COACH CATALYST COMMUNITY
1. In Coach Catalyst, select Communities from the left hand menu.
2. Find the community that you want to add the contact to and copy the name of community.
3. In SuperCoach CRM, go to the workflow and paste the name of the community into the Communities field.
If you do not want to add the client to a community, click on the Trashcan icon next to that field. Click here for more information about using Communities in Coach Catalyst.
Resources
COACH CATALYST RESOURCES
1. In Coach Catalyst, select Resources from the left hand menu.
2. Find the resources folder that you want to add the contact to. Open the folder and copy the name.
3. In SuperCoach CRM, go to the workflow and paste the name of the folder into the Resource Folder field.
If you do not want to add the client to a resource folder, click on the Trashcan icon next to that field. Click here for more information about using Resources in Coach Catalyst. You do not need to add contacts to auto-assign folders, as they are already added automatically.
Client Tags
COACH CATALYST CLIENT TAGS
1. In Coach Catalyst, click on your initials/photo in the bottom left corner and open Settings. Select the Tags tab.
2. If the client tag already exists, copy the name of the tag you want to use. Otherwise, first click on green Add Tag button to create one (choosing Client Tag as the tag type).
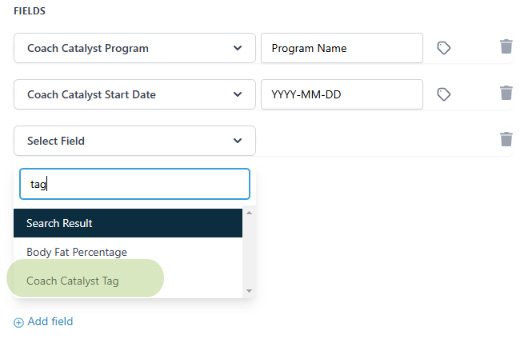
3. In SuperCoach CRM, go to the Coach Catalyst step in the workflow and click on + Add Field.
4. Start typing the terms 'tag' in the Select Field box and then select Coach Catalyst Tag from the dropdown menu and paste the name of the client tag into the field.
Note that Coach Catalyst client tags are completely separate from SuperCoach CRM contact tags. Click here for more information on using tags in Coach Catalyst.
Troubleshooting
Troubleshooting Coach Catalyst Errors
COACH CATALYST ERRORS
When testing your funnel, if your client is not added to Coach Catalyst, don’t panic. In most cases, this happens because a step was missed or the information entered wasn’t quite right, rather than there being a system bug. By working through a few simple checks, you’ll usually be able to identify and resolve the issue yourself.
1. WHAT DOES THE ZAPIER CONFIRMATION EMAIL SAY?
Every time a client is added, Coach Catalyst always sends a Zapier confirmation email to show whether the client was successfully added or not. Checking this message will usually point you straight to the fix.
Does the email say successful? Then the client was added correctly. If they didn’t receive a welcome text, that’s expected behavior. Coach Catalyst does not send the welcome text to clients who are already in the system.
Does the email say unsuccessful? The email will explain why—for example, if required information was missing or if there was a mismatch between the details you entered and the information already stored in Coach Catalyst.
No email? That means the workflow didn’t run. Go to steps 4–6 to check the workflow status, trigger, and errors.
2. IS THE COACH CATALYST INFORMATION CORRECT?
If the there is a mismatch, then go to Automations > Workflows and edit the workflow. Open the Coach Catalyst Information [Edit] step and make sure the details look correct. In some cases, the step has been skipped altogether, which means no information has been sent across.
3. IS THERE A ROGUE SPACE?
The information in the workflow must be an exact match to the information in Coach Catalyst. If you have believe you have copied the program name, but are experiencing an error, there may be a rogue space after the program name. To check this, open the program in Coach Catalyst and double click the program name.

4. IS THE WORKFLOW PUBLISHED?
Go to Automations > Workflows and check the workflow is published. If the workflow is still in test mode, click on the ellipsis menu (three vertical dots) and select Publish Workflow. Complete a second test.
5. DID THE WORKFLOW FIRE?
Go to the workflow and click on the Enrollment History tab to see if that contact was added to the workflow. If not, then there is an error with your workflow trigger.
6. WERE THERE ANY WORKFLOW ERRORS?
Next, click on the Execution Logs tab and check if all of the action steps were executed. If any have failed or been skipped, click on More Details to learn more.
SUPPORT
If you have worked through steps 1–6, run a second test, and the client has still not been added to Coach Catalyst, please contact the Level 2 Specialist Support Team at [email protected].
NOTE: If you change your program start date or program name, you need to update the workflow (otherwise the automation will fail).
Important Notes
TEST NAMES
When creating test contacts, always include both a first and last name. Coach Catalyst anchors clients by email rather than name, so if you enter a real email address with a test name, the system will keep the original contact details. This is expected behavior, not an error.
WELCOME EMAIL/TEXT
Coach Catalyst does not send the welcome text to clients who are already in the system. This is intentional and not an error. The purpose of the welcome text is to prompt a new client to create their login details. If the client has already been added before, they will already have their login details, so sending the message again isn’t necessary.
PROGRAM CHECK
If you want to confirm whether a client has been added to a program, open their contact in Coach Catalyst, go to the client page, click the program tab, and then select Future Programs. If the program is showing there, they’ve been added successfully.
COACH CATALYST
Log In Details
COACH CATALYST ERRORS
When testing your funnel, if your client is not added to Coach Catalyst, don’t panic. In most cases, this happens because a step was missed or the information entered wasn’t quite right, rather than there being a system bug. By working through a few simple checks, you’ll usually be able to identify and resolve the issue yourself.
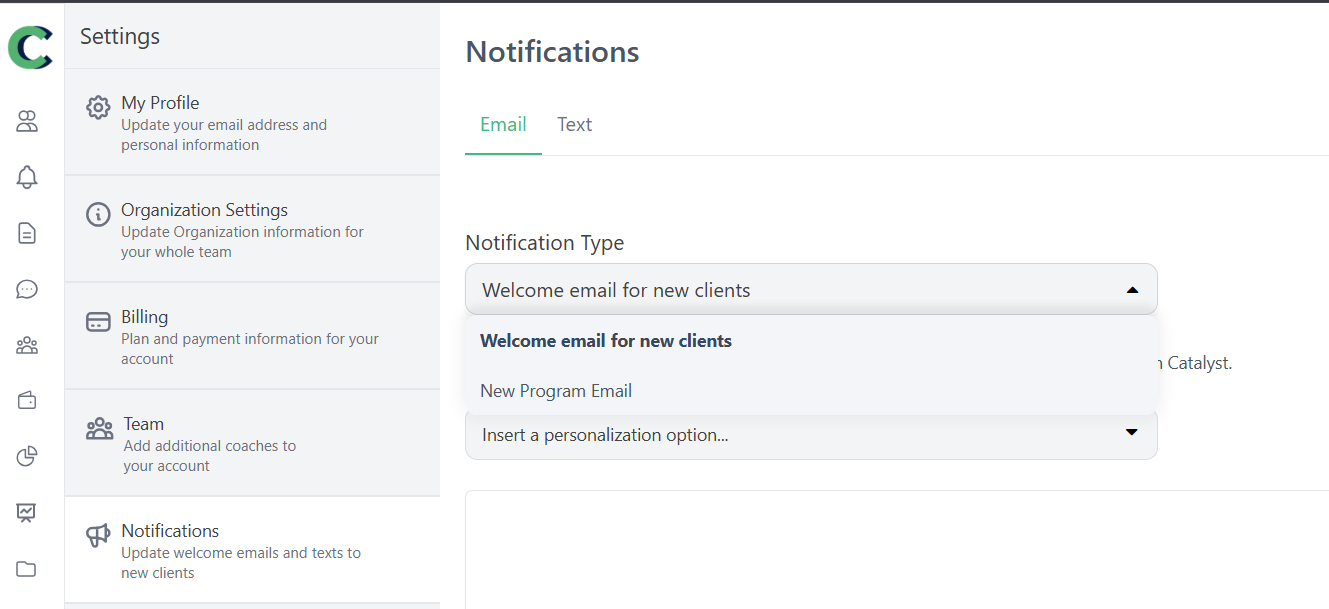
EDIT WELCOME EMAIL AND TEXT
You have the ability to edit the email and text message a client is sent.
1. In Coach Catalyst, click on your initials/photo in the bottom left corner of the sidebar.
2. Go to Settings > Notifications, and select either the Email or Text tab. Select the Notification Type.
3. Make the required changes (being careful not to change of the dynamic fields) and press Save to finish.
Click here for more information on managing clients in Coach Catalyst and click here for more information about the MyCoach client app.
Coach Catalyst Support
COACH CATALYST SUPPORT
If you have any further questions about using Coach Catalyst or the MyCoach app, you can contact their support team by either emailing [email protected] or by clicking on the question mark icon in the menu bar of the Coach Catalyst app.

If you have a quick, system-specific "how-to" question, you can chat with our L1 Technical Support Team using the purple chat bubble in the bottom corner of the software. This team offers live chat 24/7, giving you instant access to help at any time of day.
If you have a more complex or outcome-specific “how-to” question, or a query about project requests, done-for-you resources, or Coach Catalyst, you can email our L2 Specialist Team at [email protected]. This team is available Monday to Friday, 8:00am – 1:00pm (EDT).
© 2026 SuperCoach CRM