Funnels
Created by: Emma Johnston
Last Updated: March 08, 2023
Order Forms
You can add either a one-step or two-step order form to funnels and websites to take payments. The advantage of a one-step order form is that all the information is presented at once. The advantage of a two-step order is that you can create an abandoned cart automation when a contact opts in but doesn't complete the purchase.
ADD A ONE-STEP OR TWO-STEP ORDER FORM
1. Open the funnel page where you want to add the order form. If needed, add a new section and a single column row.
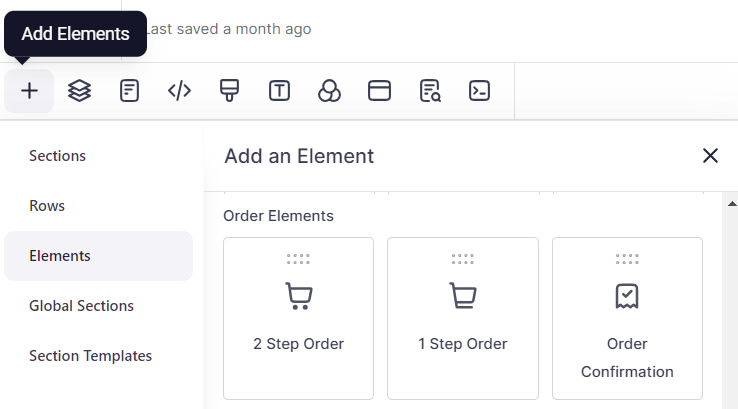
2. Click + Add Element and select either 2 Step Order or 1 Step Order from the bottom of the list.

3. Click on the order form to bring up the settings menu. In the General settings tab, you can change the button color, text color, size, style, font, and corner radius. You can also change the form fields background color and select Sale Action (such as Go to Next Step).
ORDER CONFIRMATION ELEMENT
There is also an option to add an order confirmation element to the confirmation page using the same steps as above.
Editing the Order Form
EDITING A TWO-STEP ORDER FORM
1. Click on the order form to bring up the settings menu and go to the Advanced settings tab.
2. Go to Step #1. There are options to change the headline and sub-headline, hide the company name field, toggle on full name validation, hide the shipping address (if required), toggle on country picker (for international purchases), change the shipping title, and edit the field wording. You can also change the button wording (Step 1# Btn Text). There are additional options for sticky contact, purchases (such as cart mode), order bumps, coupons, and adding terms and conditions.

3. Next, go to Step #2. You can change the headline and sub-headline, the back button wording, the summary titles (item and price). You can also change the button wording (Step 2# Btn Text). There are additional options for postal code, sticky contact, and purchases.
4. Press Save.
Note: In Step #2 of the order form, where it says Dynamic Item and Price, these are just placeholders. These will populate with the product information added below. Click here for instructions on adding products.

EDITING A ONE-STEP ORDER FORM
One-step order forms are an option on the newer funnel types (version 2 funnels).
1. Click on the order form to bring up the settings menu and go to the Advanced settings tab.
You can change the headline and sub-headline, hide the company name field, toggle on full name validation, edit the field wording, hide the shipping address (if required), toggle on country picker (for international purchases), change the payment headline and summary titles (item and price). You can also change the button wording. There are additional options for sticky contact, purchases (such as cart mode), order bumps, coupons, and adding terms and conditions.
2. Press Save.
Note: On the order form, where it says Dynamic Item and Price, these are just placeholders. These will populate with the product information added below. Click here for instructions on adding products.
FULL NAME VALIDATION
We recommend that you toggle on Full Name Validation on all order forms (which can be found in the Advanced tab in the right hand panel), especially if the contact will be added to a Coach Catalyst program as part of the purchase.
CUSTOM CSS
To change the color of the titles, line, and caret icon, you will need to add CSS. Ask us and we can send you the code you need.
1. In the funnel builder, click on Settings at the top of the page, select Custom CSS.
2. Paste the code in, and click Yes, Save.
Terms and Conditions
TERMS AND CONDITIONS
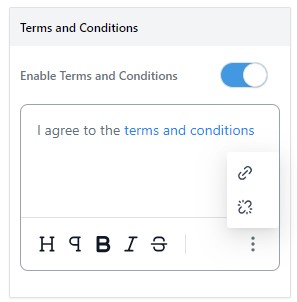
If you want contact's to agree to your terms and conditions before purchases, you can toggle on Enable Terms and Conditions (which can be found in the Advanced tab in the right hand panel). Once toggle on, click on the ellipsis menu (three vertical dots) to edit the link to your policy.

Cart Mode
ENABLE CART MODE
You can also use order forms to sell multiple products and multiple quantities.
1. After adding either a One-Step or Two-Step order form to your funnel, click on the order form to bring up the settings menu and go to the Advanced settings tab.
2. Scroll down to the Main Product Options section and toggle on Enable Cart Mode.
3. Go back to funnel overview page, select the payment funnel step and click on Products. Either add a new product or edit an existing product.
4. Expand the Additional Options menu in the product editing screen and toggle on Allow Multiple Quantity to be Purchased.
5. Set the maximum units per order (between 1 and 10) and press Save.

Apple Pay and Google Pay
ENABLE APPLE PAY AND GOOGLE PAY
If Stripe is connected as payment integration, you have the option to offer Google Pay and Apple Pay on funnel order forms, making it quicker for customers to purchase your programs and products. To enable this, go to Payments > Integrations, go to the Stripe section and toggle Enable Google Pay and Apple Pay.
Order Form Automations
You can either create your own workflow from scratch or clone the Purchase Automations template from the SuperCoach CRM templates folder.
ORDER FORM SALE WORKFLOWS
When someone purchases a product, you might want to automate an event (such as adding them to a Coach Catalyst program, adding a tag, or sending a payment confirmation email).
1. Click on Automation > Workflows and click the blue + Create Workflow button in the top right of the screen.
2. On the next screen, select Start from Scratch. Once in the workflow builder, at the top of the page, you can rename a workflow using the pencil icon next to the title.
3. Click Add New Workflow Trigger and select Order Form Submission. In Add Filters, choose In Funnel and select your funnel. Click Add Filter, choose Submission Type, and then select Sale.
4. Click the + to add a new event to the workflow. Use the drop-down menu to select the choose one or more actions to occur, such as Add a Contact Tag, Send an Email or Execute a Webhook.
5. Add any other required steps.
6. Toggle on Publish and press Save.
NOTE: When creating triggers, you may want the trigger to fire off specific actions for a specific product only, which can be useful if you have more than one product for a customer to select. In Event Trigger, you can also add additional filters to filter by Funnel Page and then Product Type. Once selected, the trigger will now run for the selected product exclusively.
Testing Funnel Order Form
TEST MODE
To test your funnel order form (and check your automations fire correctly), you can change your funnel into test mode.
1. Go to Sites > Funnels and select your funnel.
2. Go to Settings > Payment Mode and toggle on Test.
3. You will need to enter test card data when testing (card number 4242 4242 4242 4242, any future expiry date, and any CVC). Click here for more details on Stripe test card data.
4. After you have finished testing your order form, toggle the funnel back Live.
Important! Don't forget to toggle the funnel back Live! Otherwise, you won't get paid!!

If you have a quick, system-specific "how-to" question, you can chat with our L1 Technical Support Team using the purple chat bubble in the bottom corner of the software. This team offers live chat 24/7, giving you instant access to help at any time of day.
If you have a more complex or outcome-specific “how-to” question, or a query about project requests, done-for-you resources, or Coach Catalyst, you can email our L2 Specialist Team at [email protected]. This team is available Monday to Friday, 8:00am – 1:00pm (EDT).
© 2026 SuperCoach CRM