
CONTACT Fields
Created by: Emma Johnston
Last Updated: August 26, 2025
Custom Fields
CUSTOM FIELDS
Custom fields let you capture extra information beyond the standard fields in SuperCoach CRM. You can use them to personalize contact profiles, store key onboarding details, add questions to forms and surveys, or even trigger automations.
CONTACT FIELDS AND OPPORTUNITY FIELDS
There are two types of custom fields you can create: contact fields and opportunity fields.
Contact fields are ideal for storing client-specific details, such as PAR-Q information or onboarding questions. They can be added as questions to forms and surveys, with the answers automatically saved to the client’s contact card.
Opportunity fields live on the opportunity card inside a pipeline. Click here for more information about creating and using Opportunity Fields.
Important: Once a field is created as a contact field or an opportunity field, it can’t be switched to the other type.
Create Custom Fields
CREATING CUSTOM CONTACT FIELDS
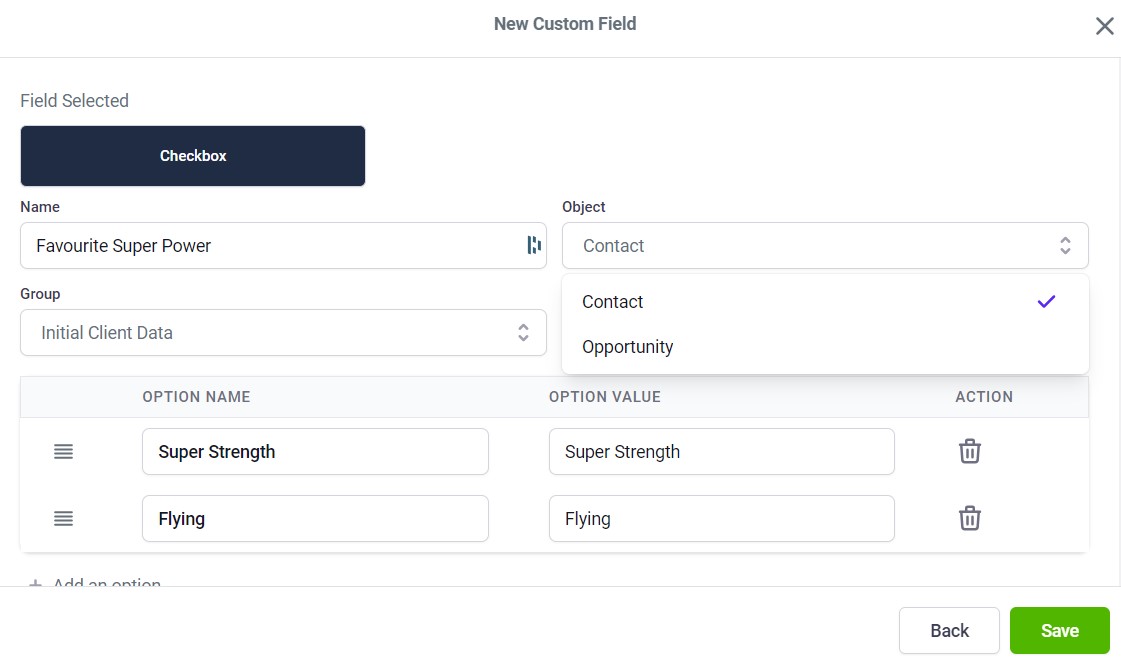
1. Click on Settings > Custom Fields, and click on the green + Add Field button in the top right corner.
2. Choose the type of field you want to create and click Next.
3. Add the field Name. If you have a long question, we recommend keeping the field name short and then editing the field title when adding the field to a form or survey.
4. Select Contact from the Object from the dropdown menu and which Group (field folder) you want to add the field to.
5. Press Save to exit.
You can also create custom fields directly in Forms, Surveys and Opportunities but they can only be edited in Settings.
Click here for more information on using Forms.
Types of Custom Fields
TYPES OF CUSTOM FIELD TYPES
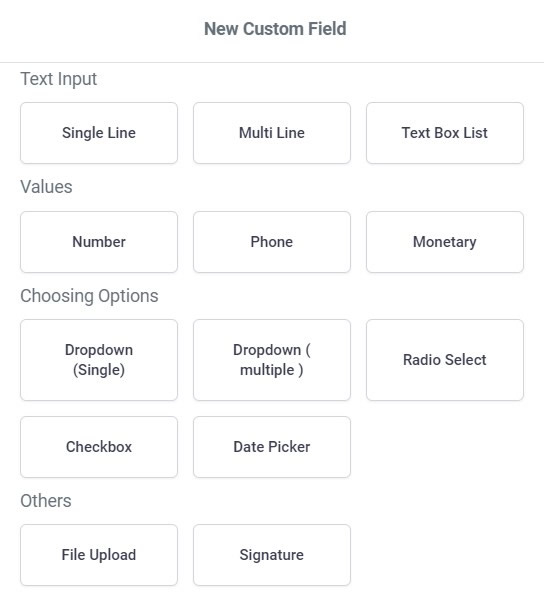
There are several types of custom fields including :
TEXT INPUT - Basic options such as Text (one line) and Multi Line (paragraph). If you need to take a list of values, such as initial measurements, you can use Textbox List.
VALUES - Numerical (number entry), Phone and Monetary.
CHOOSING OPTIONS - For dropdown menu options, there is Single Options (only one option can be chosen) and Multiple Options (multiple options can be chosen). For a list of options, there is also Checkbox (multiple options can be chosen) and Radio (only one option can be chosen).
OTHERS - If you want a handwritten signature, to use on something like a membership contract or PARQ, you can use Signature. If you want the contact to upload a document, choose File Upload (allows files to be uploaded (or required) with submission. File types allowed include PDF, DOC, JPG, PNG, GIF and you can specify which of those file types you will accept and whether you want to allow multiple files. If a client tries to upload a file format that is not in the accepted format, they will get an error message.
Dashboard and Folders
Custom Field Dashboard
CUSTOM FIELDS DASHBOARD
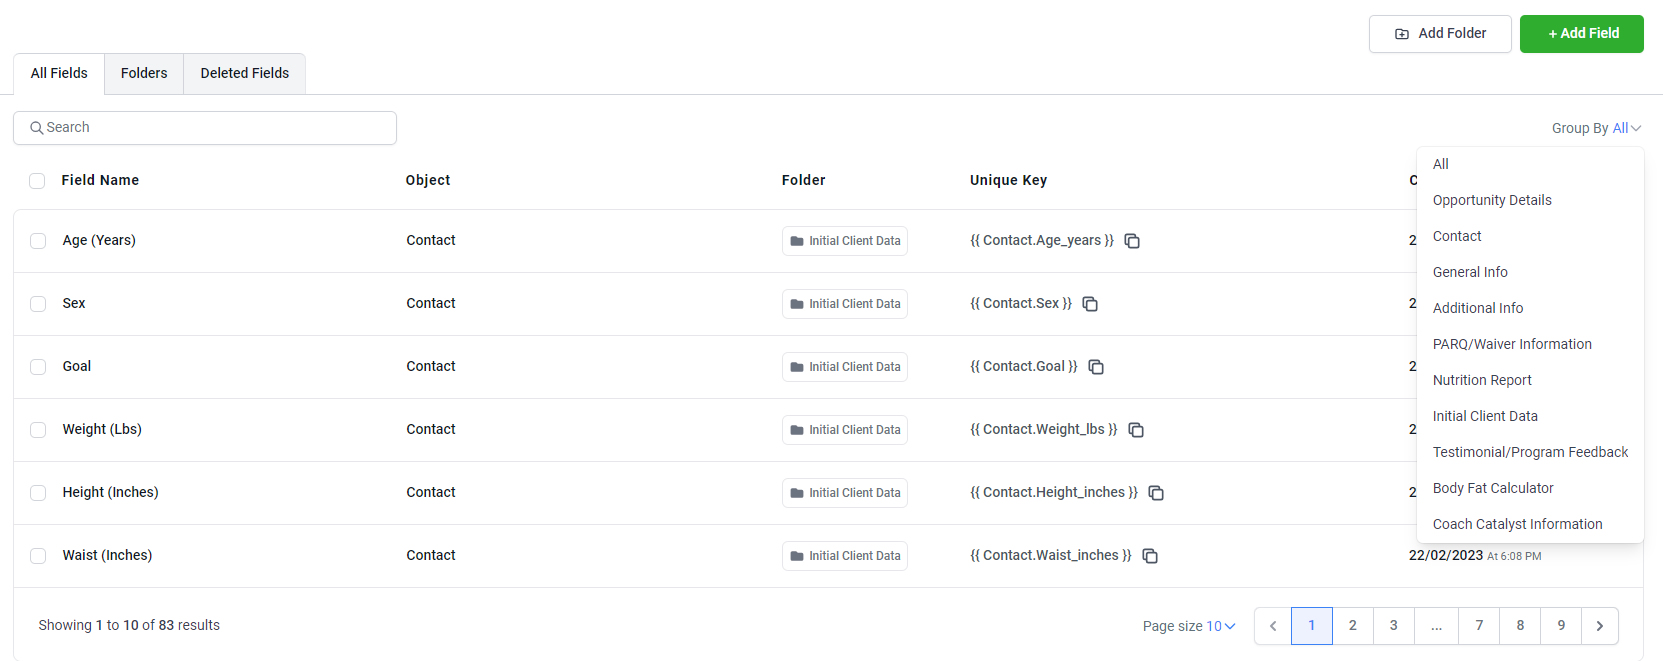
Click on Settings > Custom Fields > All Fields to view existing custom fields. You can search field by name using the Search Box. You can filter the fields list by selecting a folder from the Group By dropdown in the top right corner. You can change the page size or change page in the bottom right corner. You can also see whether a custom field is a contact field or an opportunities field (in the Object column) and view/copy a field's unique key.
EDITING A CUSTOM FIELD
1. Click on Settings > Custom Fields and select the All Fields tab.
2. Select the (single) required field and select Edit from the blue Bulk Actions dropdown.
3. Edit the field and press Save to exit.
You can also edit a field when you are inside a folder by clicking on the ellipsis menu (three horizontal dots) and selecting Edit.

NOTE: Once you create a custom field, you cannot edit the field type. To change it, you will need to delete the field and create a new one.
DELETING A CUSTOM FIELD
1. Click on Settings > Custom Fields and select the All Fields tab.
2. Select the (single) required field and select Delete from the blue Bulk Actions dropdown.
3. Press OK (or cancel)
You can also delete a field when you are inside a folder by clicking on the ellipsis menu (three horizontal dots) and selecting Delete.
REARRANGING CUSTOM FIELDS
To reorder the fields, click on the Folders tab and select the required folder. Press and hold down the left mouse button on the four grip lines icon next to the field name and drag it to a new position. The order of the custom fields in Settings is the order they will appear in Contacts or in the Opportunities card (depending on the type of folder). You can also Hide Empty Fields in Contacts by checking the box.
Custom Field Folders
CUSTOM FOLDERS DASHBOARD
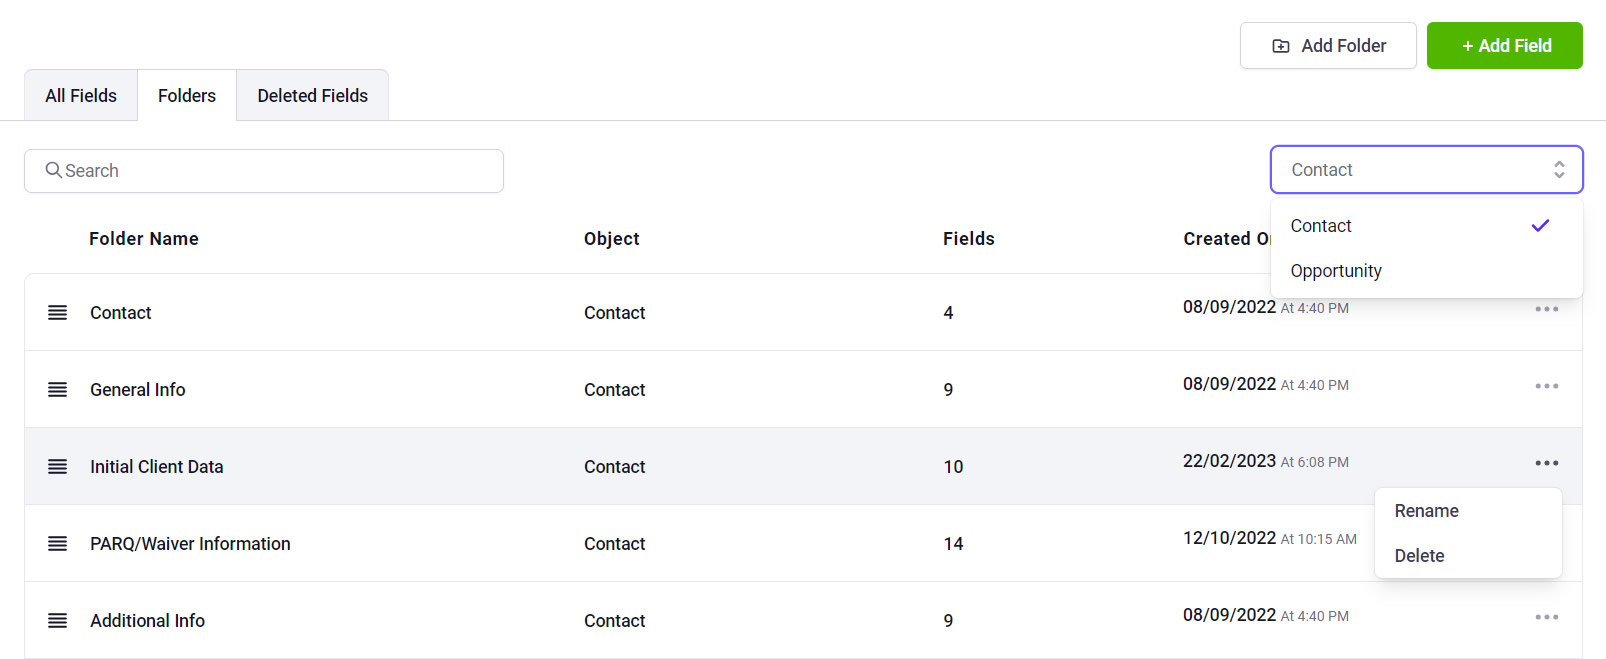
Click on Settings > Custom Fields > Folders to view existing custom folders. You can see the folder name, object type, number of fields within the folder and date created. You can search folders by name using the Search Box. You can filter the folders by Object type (Contact or Opportunity).
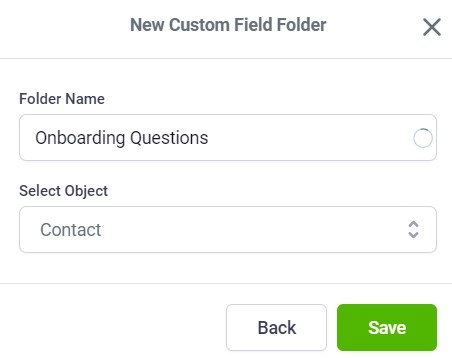
CREATING A FOLDER
1. Go to Settings > Custom Fields, and click on the white + Add Folder button in the top right corner.
2. Enter the name of the folder, and select Contact from the Object from the dropdown menu .
3. Press Save to finish.
REARRANGING FOLDERS
To reorder the folders, click on the Folders tab. Press and hold down the left mouse button on the four grip lines icon next to the folder name and drag it to a new position. The order of the contact folders in Settings matches the order the sections in the left hand panel of contact cards in Contacts. The order of the opportunities folder is the order of the menus in the opportunities card in Opportunities.
RENAME OR DELETE FOLDERS
To rename or delete a folder, click on the Folders tab. Click on the ellipsis menu (three horizontal dots) and select Rename or Delete. You cannot delete or rename the Contacts folder, Additional Info folder or General Info folder.
MOVING A CUSTOM FIELD TO A FOLDER
1. Click on Settings > Custom Fields and select the All Fields tab.
2. Select the required field(s) and select Move to Group from the blue Bulk Actions dropdown.
3. Select the folder from the dropdown menu and press Move to exit (or cancel).
You can also delete a field when you are inside a field folder by clicking on the ellipsis menu (three horizontal dots) and selecting Delete.

Custom Fields Automations
TRIGGER A WORKFLOW WHEN A CONTACT FIELD IS UPDATED
1. Click on Automation > Workflows and click the blue + Create Workflow button in the top right of the screen.
2. On the next screen, select Start from Scratch. Once in the workflow builder, at the top of the page, you can rename a workflow using the pencil icon next to the title.
3. Click Add New Workflow Trigger and select Contact Changed. In Add Filters, choose the Custom Field and complete the boxes.
4. Click the + to add a new event to the workflow. From the right-hand menu, select the choose one or more actions to occur, such as Add a Tag, Send an Email or Add to a Workflow.
5. Add any other required steps.
6. Toggle on Publish and press Save.

UPDATE CONTACT FIELD WORKFLOW
You can update a standard field or custom field for multiple contacts based on a trigger event.
1. Click on Automation > Workflows and click the blue + Create Workflow button in the top right of the screen.
2. On the next screen, select Start from Scratch. Once in the workflow builder, at the top of the page, you can rename a workflow using the pencil icon next to the title.
3. Click Add New Workflow Trigger and select an event to trigger the rule.
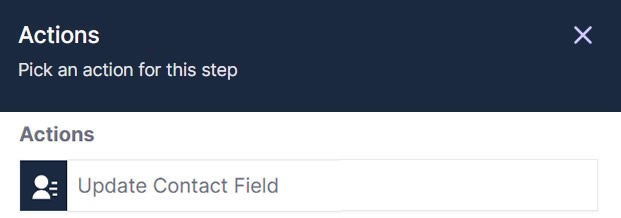
4. Click the + to add a new event to the workflow and select Update Contact Field from the right-hand menu. Click + Add Field and select the required field from the dropdown list. Add the value to the box. Press Save Action when complete.
You can update multiple fields at the same time. Just select + Add Field again to add other fields. You can also delete fields using the trashcan icon.
5. Add any other required steps.
6. Toggle on Publish and press Save.
CLEAR CONTACT FIELD WORKFLOW
You can update a standard field or custom field for multiple contacts based on a trigger event.
1. Click on Automation > Workflows and click the blue + Create Workflow button in the top right of the screen.
2. On the next screen, select Start from Scratch. Once in the workflow builder, at the top of the page, you can rename a workflow using the pencil icon next to the title.
3. Click Add New Workflow Trigger and select an event to trigger the rule.
4. Click the + to add a new event to the workflow and select Update Contact Field from the right-hand menu.
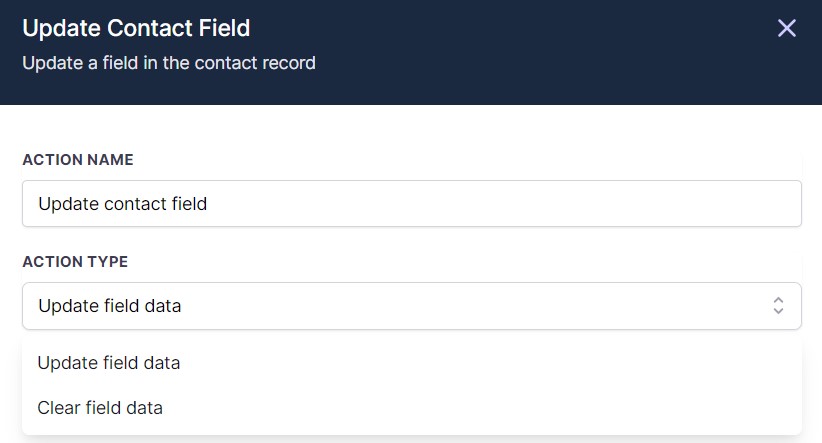
5. Next select Clear Field Data from the Action Type dropdown menu. Click + Add Field and select the required field(s) from the dropdown list. Press Save Action when complete.
6. Add any other required steps.
7. Toggle on Publish and press Save.

If you have a quick, system-specific "how-to" question, you can chat with our L1 Technical Support Team using the purple chat bubble in the bottom corner of the software. This team offers live chat 24/7, giving you instant access to help at any time of day.
If you have a more complex or outcome-specific “how-to” question, or a query about project requests, done-for-you resources, or Coach Catalyst, you can email our L2 Specialist Team at [email protected]. This team is available Monday to Friday, 8:00am – 1:00pm (EDT).
THANKSGIVING, CHRISTMAS AND NEW YEAR
Our Level 2 Support Desk will be closed from December 24 – January 1. The 24/7 Level 1 Technical Team will be available throughout these dates and during the holiday period.
Please remember that all New Year–related project requests should be submitted by November 30, and that we recommend testing all resources by December 20.
© 2025 SuperCoach CRM