
Calendars
Created by: Emma Johnston
Last Updated: August 26, 2025
Advanced Calendars Options
ADVANCED OPTIONS
This page covers the additional calendar options that go beyond the essentials. Most solo coaches won’t need these, but they can be especially useful if:
You have multiple team members sharing calendars and need to control appointment distribution or staff selection.
You want to take payments or add guests when people book.
You’d like to embed your calendar externally or group multiple calendars together.
You’re running recurring appointments, classes, or events and webinars.
You want extra reporting or custom reminder options beyond the basics.
If you’re only using a single calendar for yourself, you’ll rarely need these features. But if you’re managing a team, selling sessions, or setting up events, the sections below will walk you through the advanced tools available.
Additional Advanced Settings
Advanced Setting Overview
ADVANCED SETTINGS
To edit further settings, such as calendar location, color, logo, date range, buffer time, etc, click on Edit Calendar to access the Advanced Settings page.
Meeting Details - edit the calendar name, calendar description, custom URL, and calendar group.
Availability - Set your availability for the calendar, as well as meeting duration and scheduling notice. Note that both the calendar availability and the user availability need to open for the calendar to display appointments.
Click here for more information on setting up user availability.
Forms & Payments - choose the calendar form, add guests and take payment.
Notifications & Additional Options – manage notifications for bookings, reminders, cancellations, and reschedules.
Customization – adjust widget style, colors, and other display preferences.
In this article, we’ll cover the additional advanced settings that give you more flexibility and customisation. If you’re looking for the essentials — such as creating a calendar, setting your availability, and setting up reminders — click here for the Basics guide.
Meeting Details
GROUPS
Add the calendar to a calendar group. Click here for more information about Groups.
APPOINTMENT DISTRIBUTION
If you assign more than one team member to a calendar, you will need to set the appointment distribution. For Optimize for Availability, you need to change their priority (so the system will choose team members with high priority where available). Optimize for Equal Distribution adds appointments in a sequence, starting at the top of the list of team members and working its way down.
SELECT TEAM MEMBERS
Add the user(s) by selecting the required user(s) from the drop-down list. Set their priority level and a meeting location (such as Zoom, Google Meet, phone, gym address or custom location). Click on Advanced Settings to set reschedule preference and new appointment preferences. If you want to enable contacts to choose a particular staff member when booking, this option can be found in the Customizations tab.
You can only select one Appointment Owner for a Class Booking calendar.
Forms & Payments
CONSENT CHECKBOX
To ensure compliance with GDPR and A2P 10DLC regulations, forms will display a checkbox to obtain consent from contacts when they provide their phone number during the appointment booking process. You can edit/customize the wording in the box underneath.
ADD GUESTS
Toggle on Add Guest if you want to allow your contact to add other attendees to the same appointment (available on Personal Booking and Round Robin Calendars). Email notifications will be sent to all participants, including the primary attendee and their guests, but only the original contact can cancel or reschedule the appointment.
CONFIRMATION PAGE
Either add a redirect URL (if you have a confirmation page) or add a thank you submission message (type in the box here if you want something different than the default message).
META PIXEL ID (OPTIONAL)
There is an option to enter a Meta Pixel ID. This is particularly useful, for example, if the calendar is linked to a Facebook ad.
PAYMENT
Toggle on Accept Payments, if required. Enter the amount, currency, and description. Toggle between test mode and live mode. Payments are currently unavailable for calendars with recurring turned on. To set up an automatics receipt for calendar payments, go to Payments > Settings > Receipts. Click here for more information.
Notifications & Additional Options
ASSIGNED USER
Choose whether to assign contacts to their respective calendar team members each time an appointment is booked (or skip assigning contacts if the contacts already has an assigned user).
ADDITIONAL NOTES
By default, the system adds contact information and a link to reschedule and cancel to the calendar appointment notes. These can be edited as required.
Customizations
CALENDAR COVER IMAGE
Upload a calendar cover image which will be visible when viewing a calendar group page (not the individual calendar page).
STAFF SELECTION
If you would like to enable the option for contacts to choose a specific staff member while booking an appointment, toggle on Allow Staff Selection During Booking. All team members who are part of the Round Robin will be visible for the appointee to make a selection.
CUSTOM CODE
Add custom CSS code to change the design of the calendar.
Appointment Reminders
Appointment Reminder Workflow
APPOINTMENT REMINDERS
There are two ways to setting up appointment reminders. You can use the in-built email notifications option (which will need to be customize for each calendar) in the Notifications and Additional Options tab for that calendar.
Click here for more details.
For more advanced notifications, you can also use a workflow (which can be useful if you want to include SMS text messages, or want to enable the same notifications globally for multiple calendars, calendar groups, or all calendars). Workflows also have more trigger options and logic.
APPOINTMENT REMINDER WORFLOW
We have created an appointment reminders template workflow in your account that you can clone. Go to Automations > Workflows and search for the Appointment Reminder (Clone to Use) workflow. Click the Copy icon to clone the workflow. Update the workflow name and click Create to confirm.

You can then edit the steps and timings to suit your needs. The email and SMS have been set up with the basic information, ready for you to add more detail. You can also create appointments emails in Marketing > Emails > Templates and link them to your appointment reminders.
CUSTOMIZED APPOINTMENT REMINDERS
If you want different appointment reminders for different calendars or calendar groups, you can create a different workflow for each and change the filter in the workflow trigger. You can also filter by single appointments (normal), recurring appointments, or any.

EMbedding Calendars
Embed a Calendar
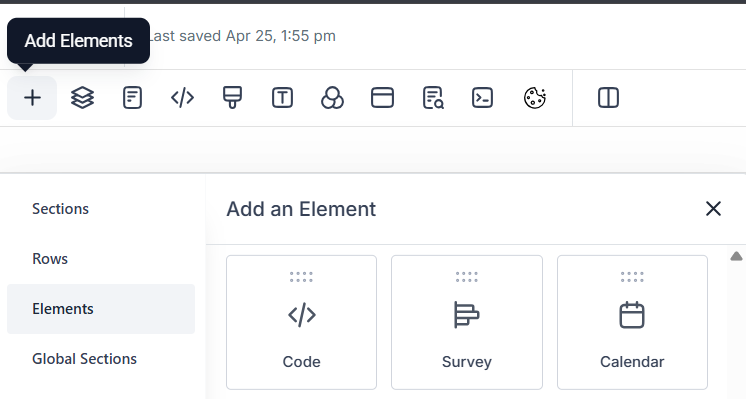
EMBED A CALENDAR (FUNNEL OR WEBSITE)
If you want to embed a calendar or calendar group on a SuperCoach CRM website or funnel page, this can be added directly as an element. Open the funnel editor, click on Add Elements, and select Calendar from the Elements list.
Click here for more information.
EMBED INDIVIDUAL CALENDAR (EXTERNAL WEBSITE)
If you want to embed an individual calendar on an external website, click on the Share icon. Select the Embed Code tab and press Copy (and then add paste that code to that website).
Calendar Groups
Calendar Groups
Grouping calendars can be useful when you want to display multiple calendars to a client (you will have seen this type of layout when booking calls with SuperCoach CRM). It can also be helpful if you want to trigger the same workflow for multiple calendars.
ACCESS GROUPS
To access calendar groups, go to on Settings > Calendars > Groups. You can search groups by name using the Search box.
CREATE A GROUP
1. Click on Create Group to create a new calendar group.
2. Enter a name and description for the calendar group, select a template type (Classic or Neo) and create a custom calendar link (a unique slug for the URL associated with this calendar).
3. Press Create to save.
EDIT A GROUP
To edit a group, click on the Pencil icon. Once the edits are complete, press Save.
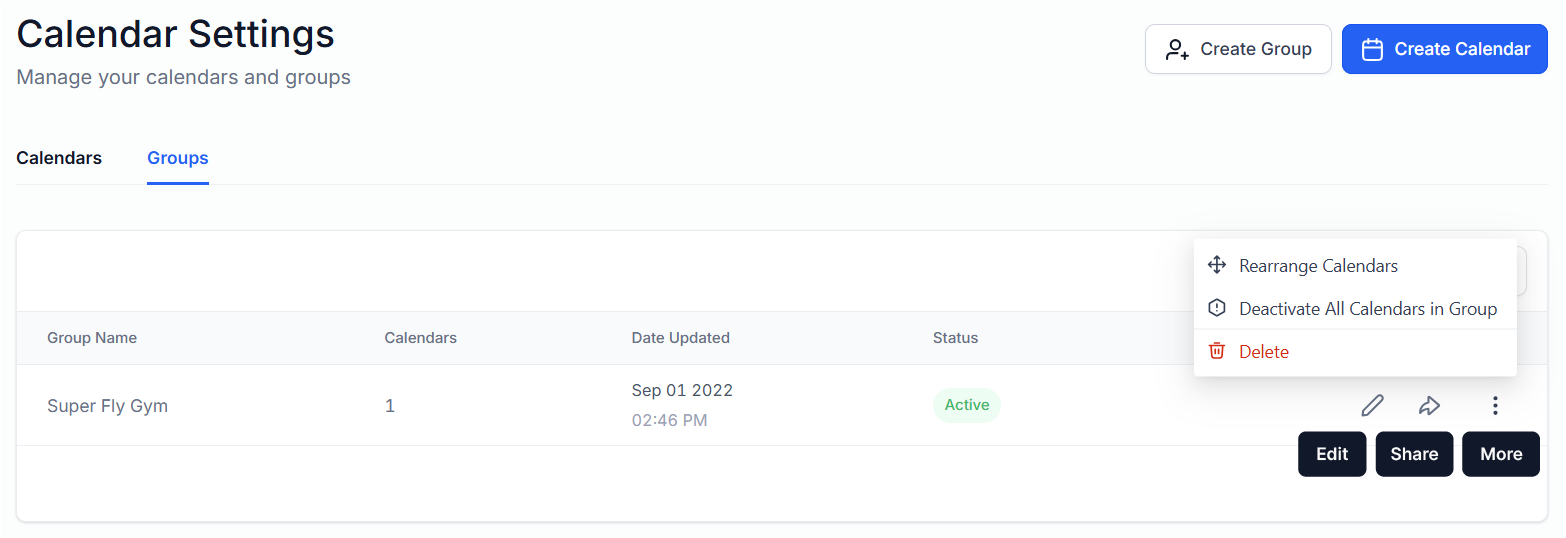
ELLIPSIS MENU OPTIONS
Click on the ellipsis menu (three vertical dots) to view available options. These include to Rearrange Calendars, Activate/Deactivate All Calendars in Group, and Delete. Once you select an option, simply follow the on-screen instructions. To rearrange calendars, press and hold down the left mouse button on the two grip lines icon next to the calendar name and drag it to a new position.
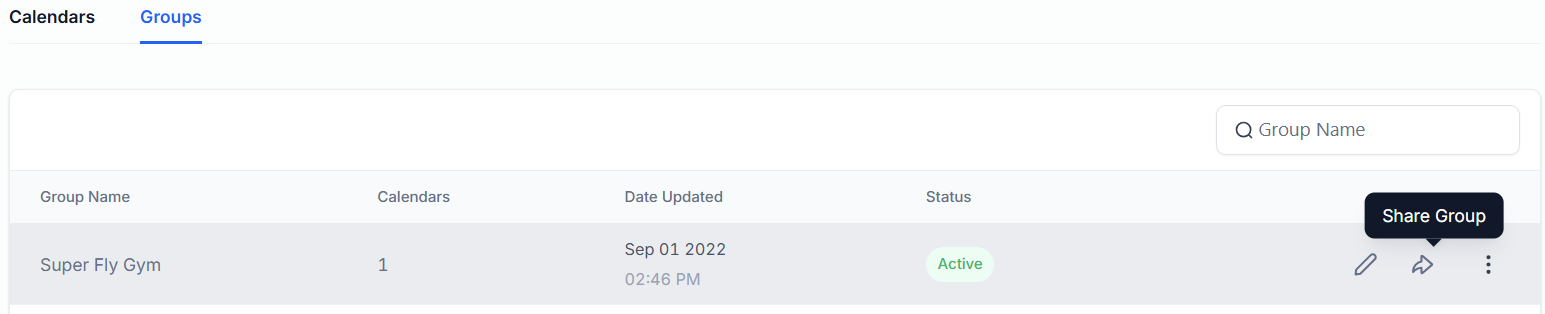
SHARE A CALENDAR GROUP
If you want the calendar group URL, go to the Groups tab and click on the Share icon. Select the Scheduling Link tab and press Copy next to either the Scheduling Link or Permanent Link.
EMBED GROUP CALENDAR (EXTERNAL WEBSITE)
If you want to embed a calendar group on an external website, go to the Groups tab and click on the Share icon. Select the Embed Code tab and press Copy (and then add paste that code to that website).
Other Appointment Types
Recurring Appointments
RECURRING APPOINTMENTS
All calendar types support recurring appointments. Recurring appointments can be useful for appointments that happen on a regular schedule, such as weekly meetings or monthly check-ins.
1. To set a recurring appointment, go to the Availability Tab of your calendar and toggle on Recurring Appointments.
2. Select the Repeat Interval (daily, weekly, monthly or custom) and the number of Times to Repeat (up to 24 times).
3. Select what to do if slots are not available. You can choose to Skip Booking Unavailable Slots (book ONLY the available slots and ignore the rest), Continue Booking (and then set the appointment status for overlapping slots), or Book Next Available Slot (book the reoccurrences irrespective of how far out in the future the calendar needs to scout for the available slots).
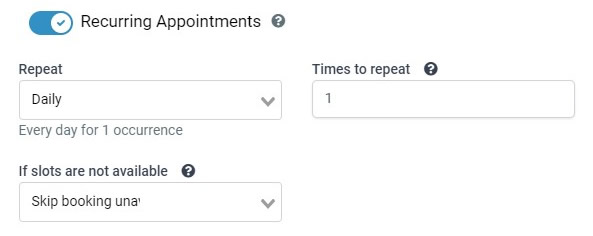
Notes: Only until the next 3 slots for availability are checked. If these three are all unavailable, the slot is not listed on the calendar booking widget. Users cannot bulk update Recurring appointments (cancel or reschedule).
If the meeting location is Zoom or Google Meet, all recurring appointments will have different meeting URLs as the system generates a dynamic meeting URL for each meeting by default.
For recurring appointment reminders, the workflow trigger filter must be set to recurring or any (not normal).
Class Bookings
MANAGING CLASS BOOKING
Go to Calendars to see and manage class bookings. To cancel a class booking, open the appointment and click Cancel All. To reschedule the meeting, click Reschedule All, which would reschedule the appointment for all the attendees.
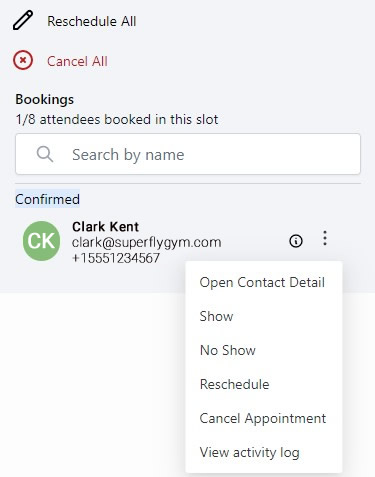
To cancel or reschedule the appointment for a particular attendee, click on the ellipsis menu (three vertical dots) next to the attendee and select Reschedule or Cancel Appointment as required. You can also open the contact card from this menu, mark the contact as show or no show and view the activity log.
CALENDAR NOTE
If you are integrating your SuperCoach CRM calendar with a third party calendar, such as Google Calendar or Outlook integrated, each class booking would show separately. For example, if you have created a class booking with capacity of 5 attendees then, on the Google or Outlook calendar, they would appear as 5 separate events at the same time.
Events and Webinars
CREATE THE CALENDAR
Click here for full details on creating a calendar.
1. Click on Settings > Calendars > Calendars and click on Create Calendar.
2. Choose the Calendar Type from the options available (either round robin, unassigned booking or collective booking) and press Select.
3. Add the required information to the Team & Event Setup tab and press Save & Continue.
4. Next, add the required information to the Appointment Slot Settings in the Availability tab. You can leave the Scheduling Notice section blank as this is not supported with Custom Date and Time.
SET THE CUSTOM EVENT TIMES
5. While still in the Availability tab, toggle on Custom.
6. Edit the dates and times for your event. Click + Add Time to add additional times to a date and click + Add Date to add additional dates. To delete a time, click the red trashcan icon.
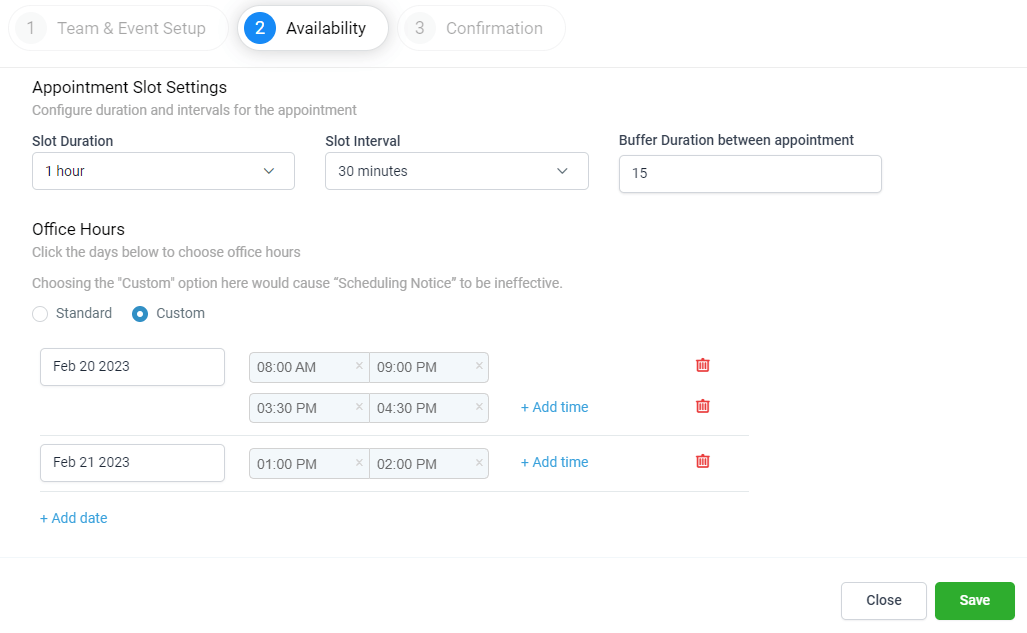
7. Press Save.
8. Add the required information the Confirmation tab and press Complete.
USER AVAILABILITY
Note that the Custom Date and Time slot will not be shown as available when a user/team member does not have availability for a particular day and time, even if the custom date and time was configured in Calendar.
Reporting
Reporting and Activity Logs (16:24)
APPOINTMENT REPORTING
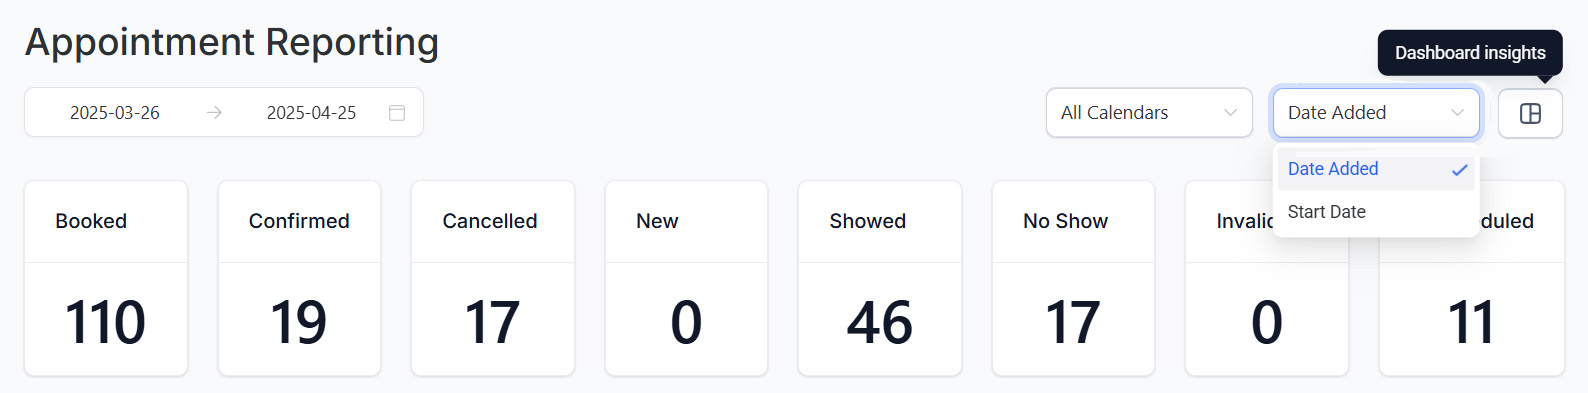
You view appointment reports, go to Reporting > Appointment Reports. Here you will see a summary including number of booked appointments, confirmed, cancelled, and rescheduled. You can change the date range, filter by calendar, and filter by date added or date started.
APPOINTMENT ACTIVITY LOGS
You can see appointment activity logs in Settings > Audit Logs > Calendar Event Module.

If you have a quick, system-specific "how-to" question, you can chat with our L1 Technical Support Team using the purple chat bubble in the bottom corner of the software. This team offers live chat 24/7, giving you instant access to help at any time of day.
If you have a more complex or outcome-specific “how-to” question, or a query about project requests, done-for-you resources, or Coach Catalyst, you can email our L2 Specialist Team at [email protected]. This team is available Monday to Friday, 8:00am – 1:00pm (EDT).
© 2026 SuperCoach CRM